Restoring Applications
Once applications have been protected via a policy or a manual action, it is possible to restore them in-place or clone them into a different namespace.
Restore can take a few minutes as this depends on the amount of data captured by the restore point. The restore time is usually dependent on the speed of the underlying storage infrastructure as times are dominated by how long it takes to rehydrate captured data followed by recreating the application containers.
To speed up the Restore process and account for failures during the first or second attempt (maximum of 3 attempts), all successfully restored volumes will be retained for the next attempt. Only volumes that have been partially restored will be recreated.
Restoring Existing Applications
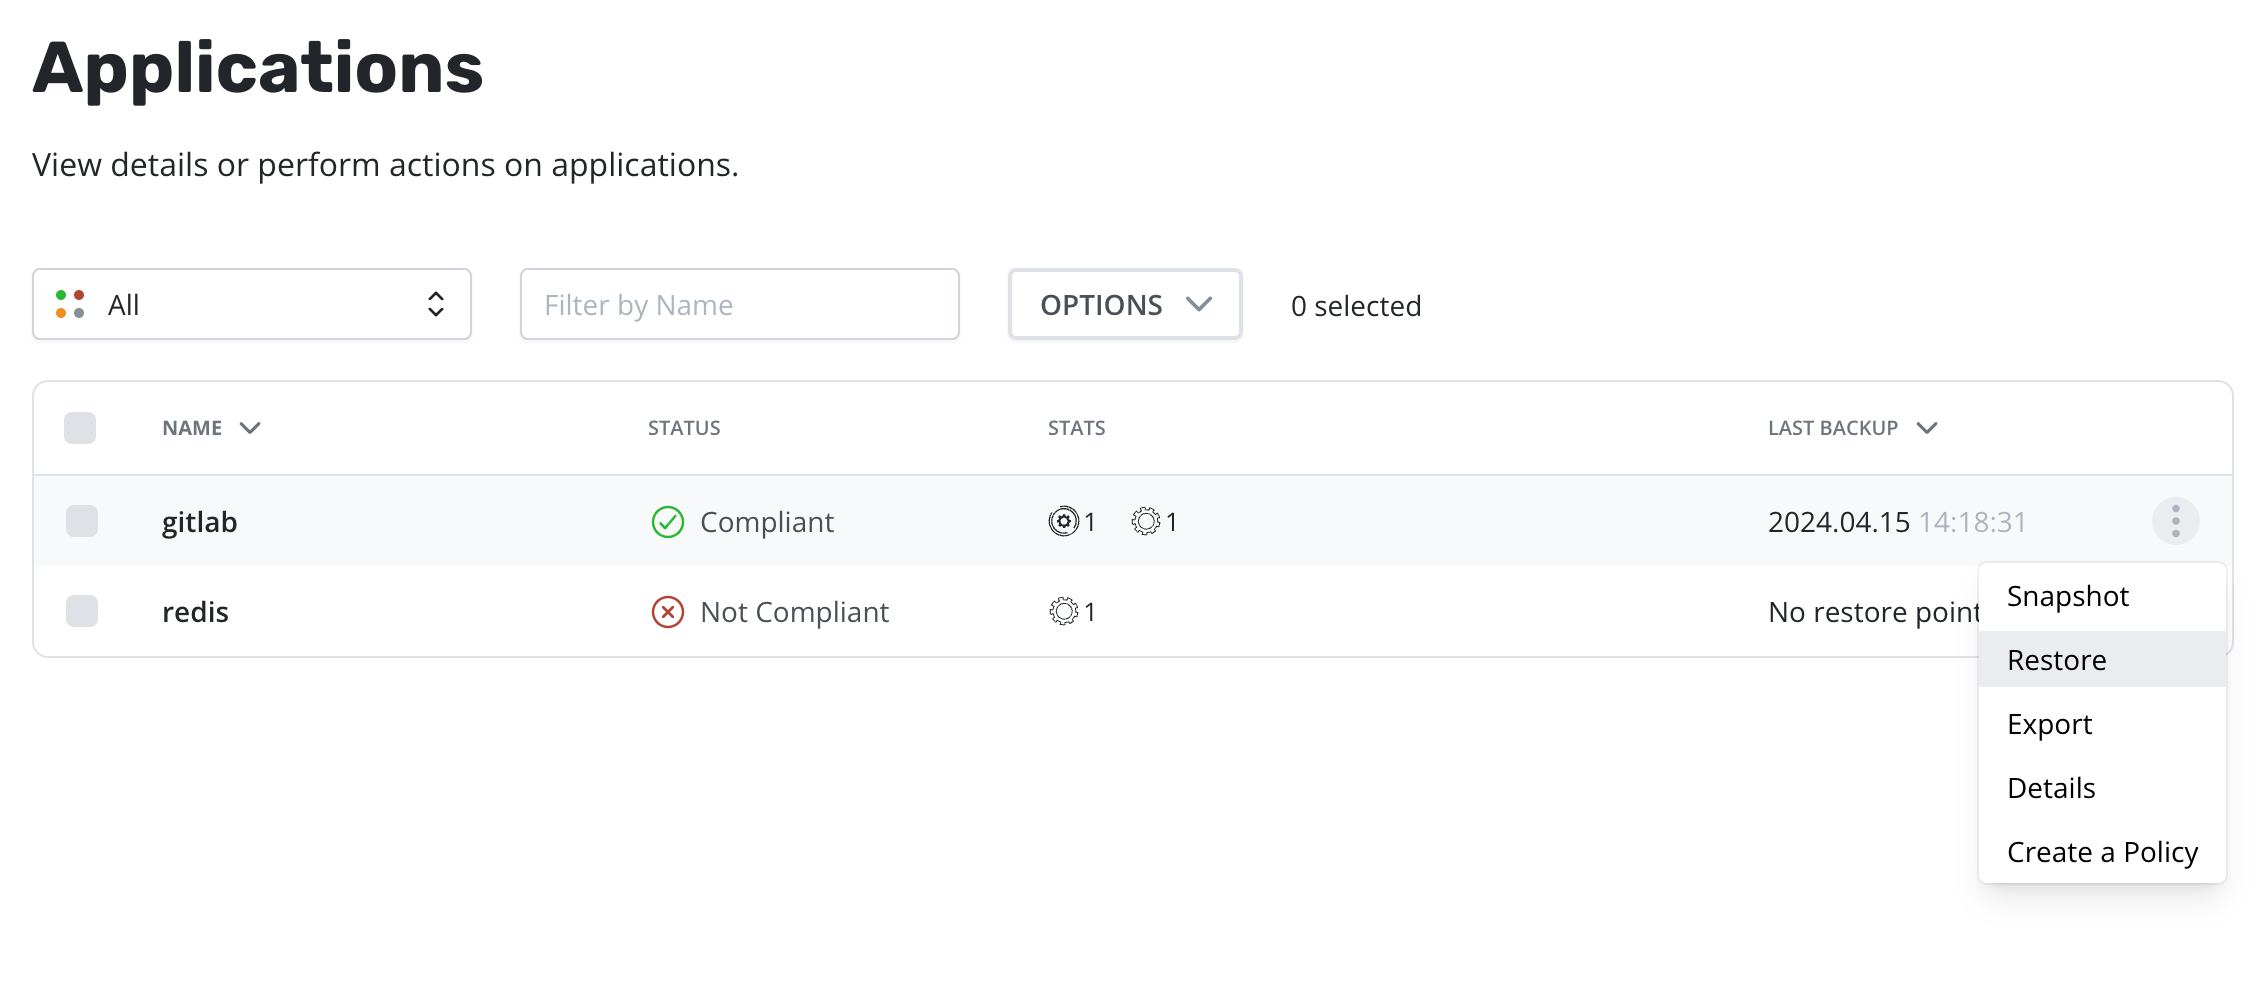
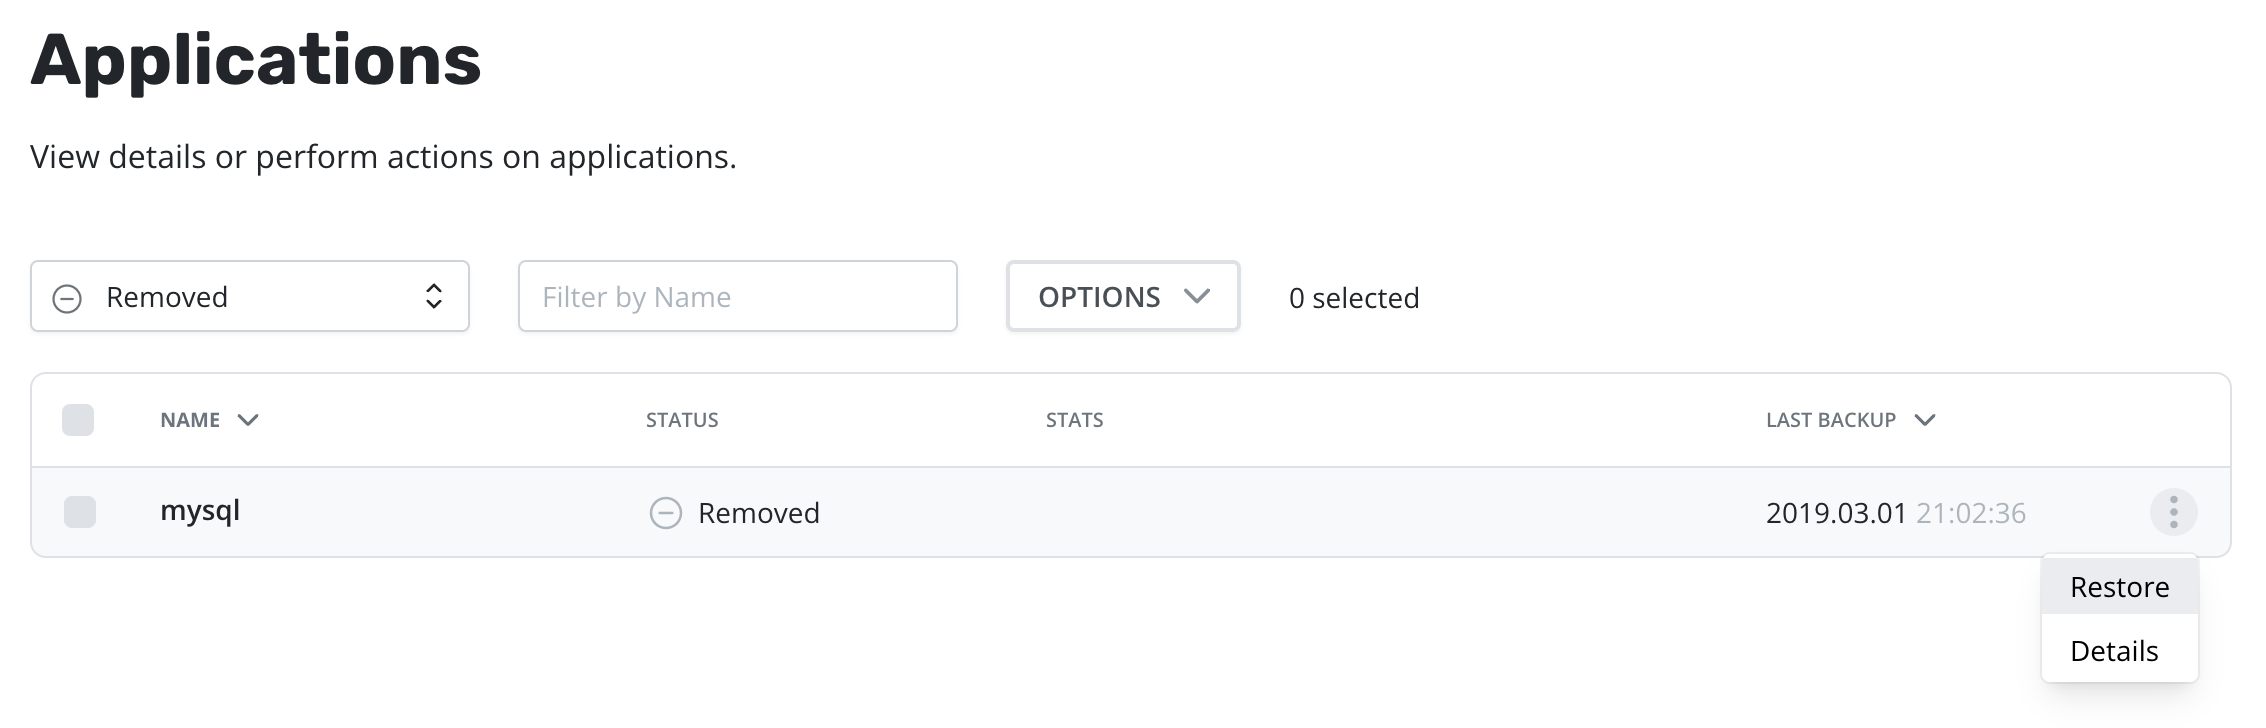
Restoring an application is accomplished via the Applications page. One
needs to simply click the Restore option in the dropdown.
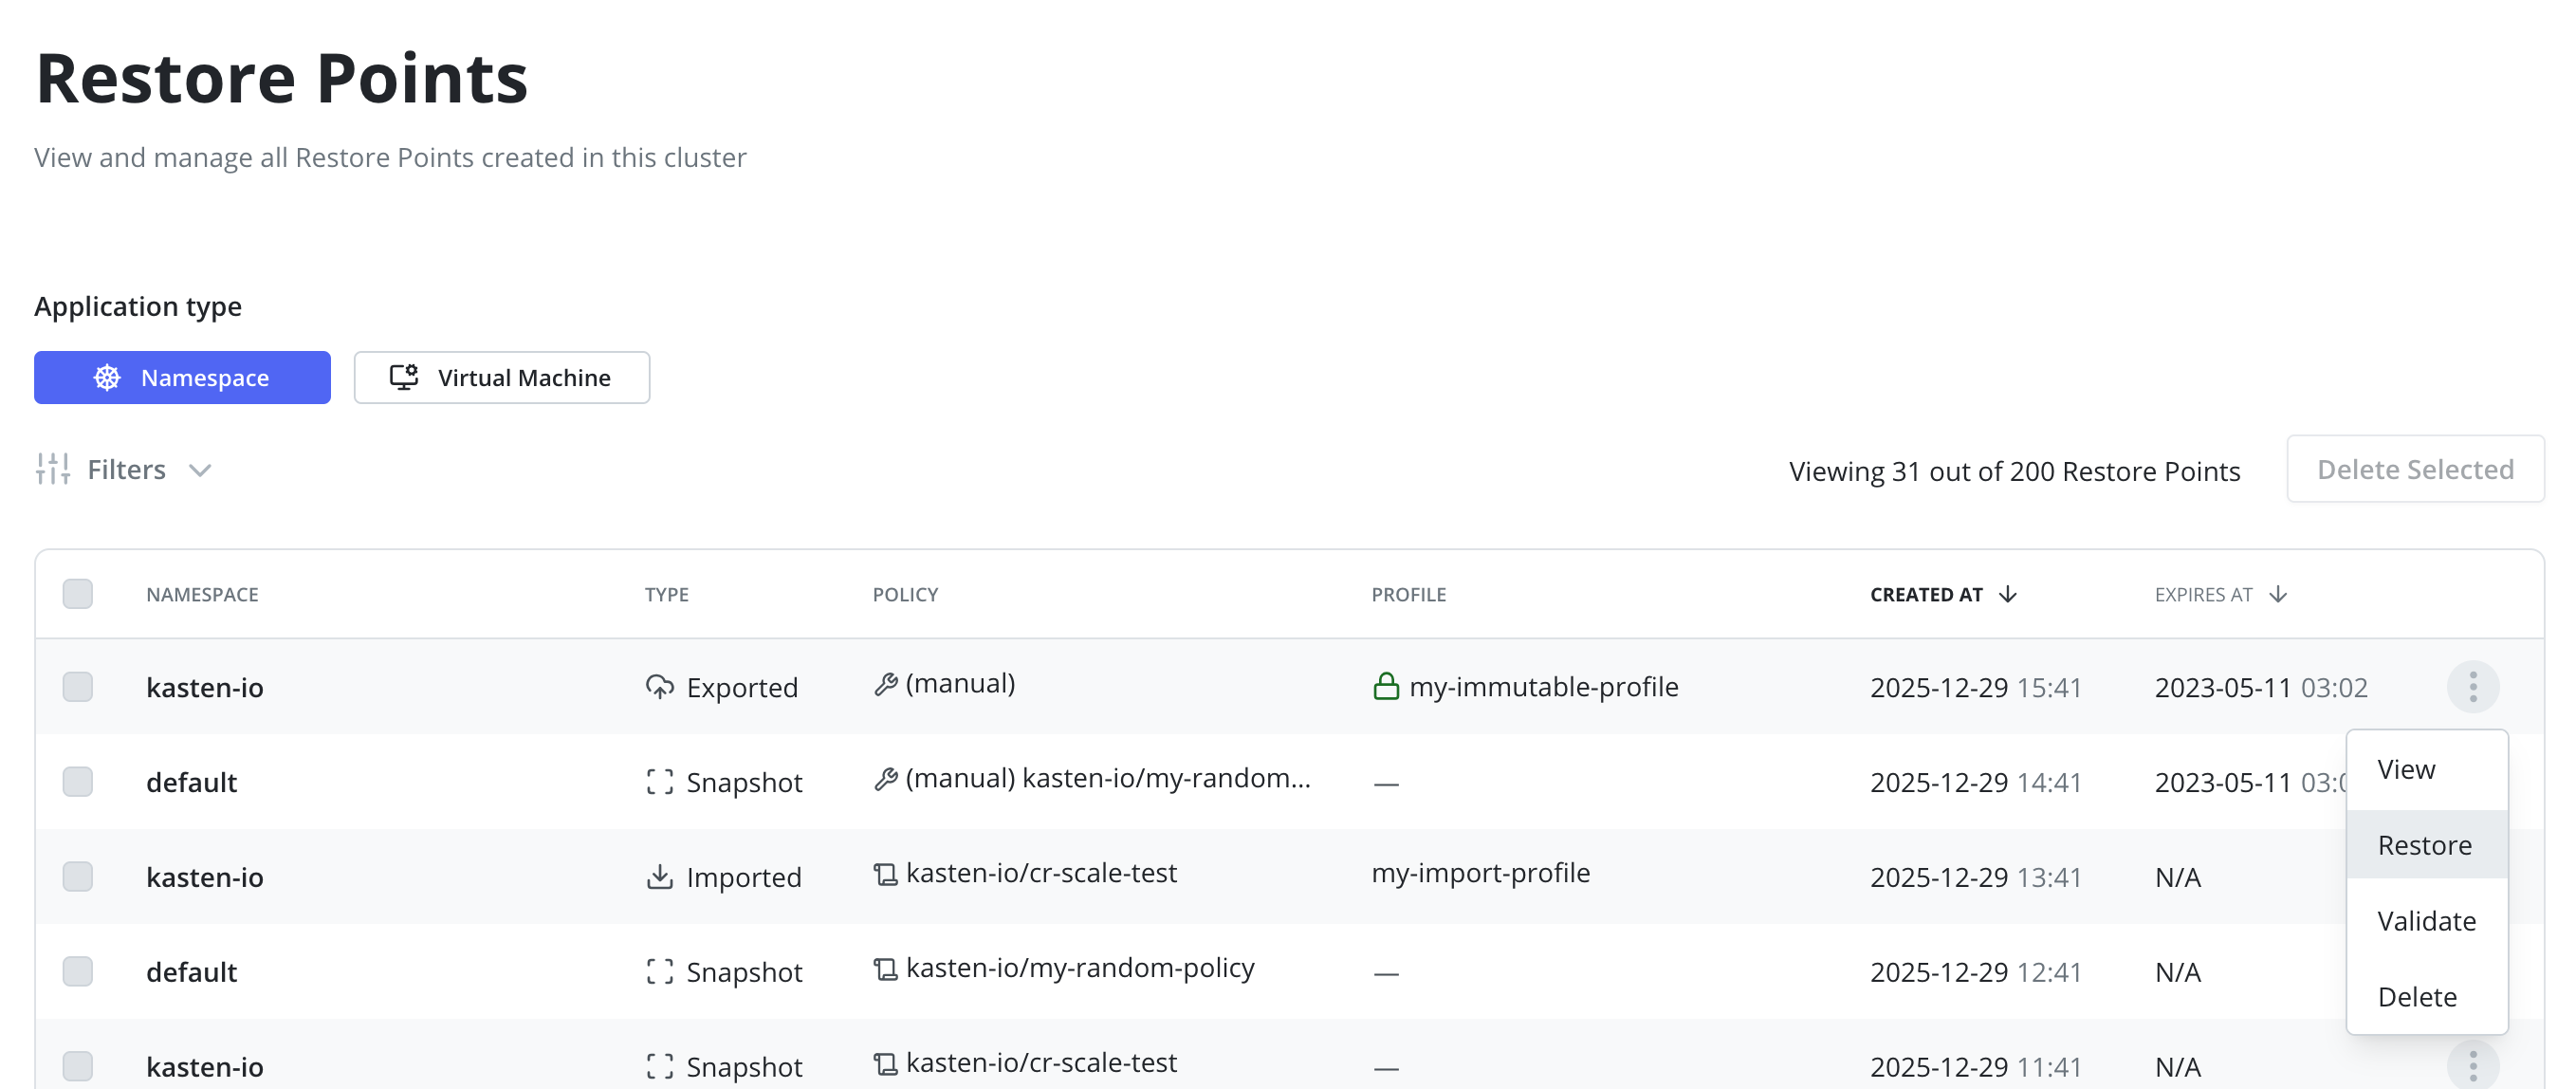
Alternatively, the Restore Points Page can be used to find a
specific Restore Points and initiate the Restore using it:
While the UI uses the Export term for backups, no Import policy is
needed to restore from a backup. Import policies are only needed when
you want to restore the application into a different cluster.
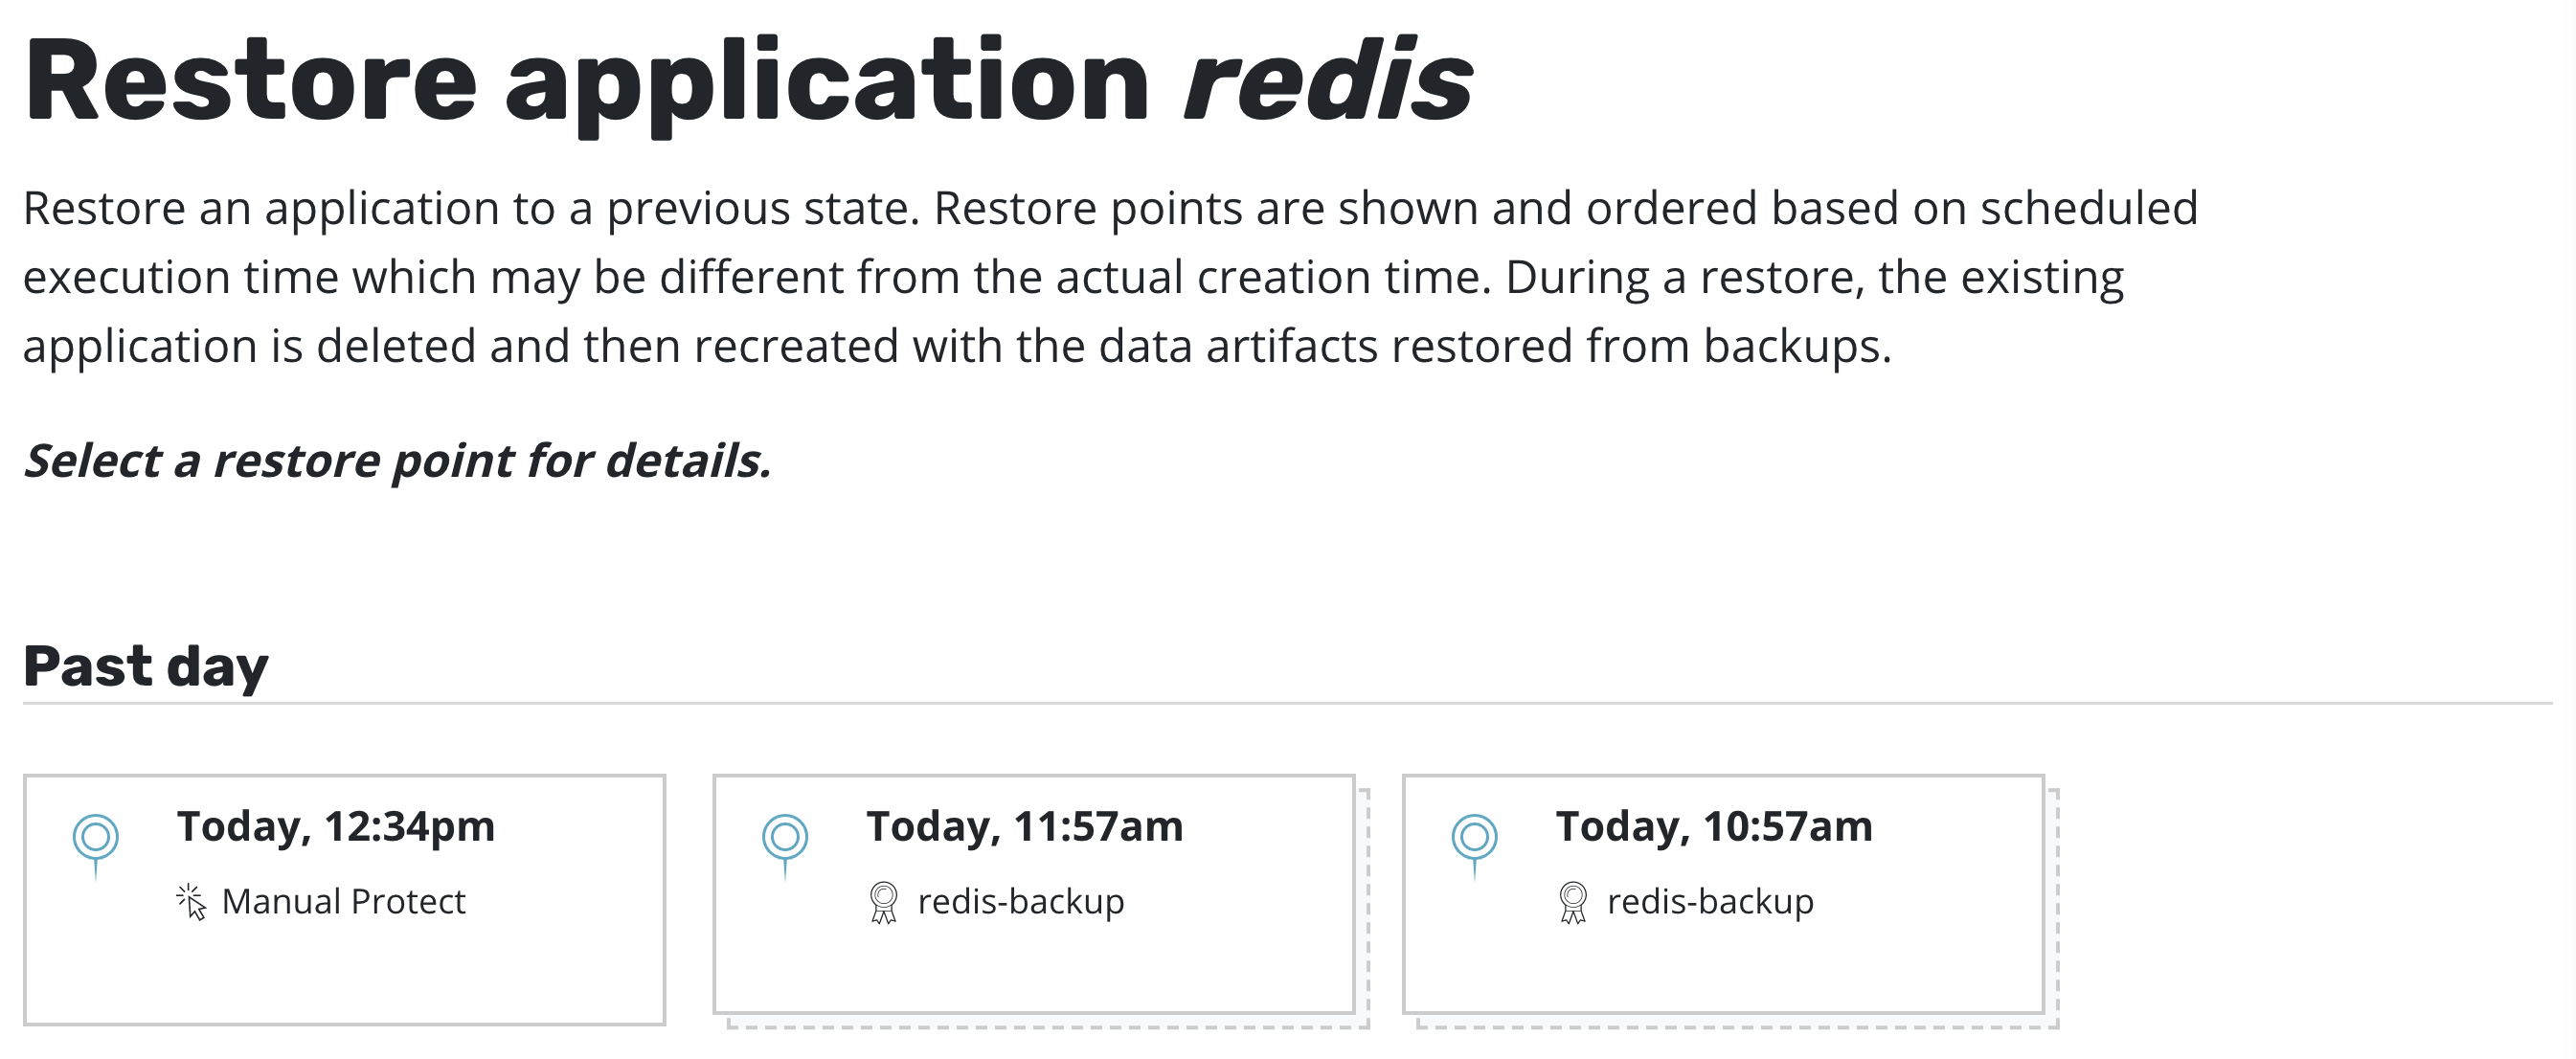
At this point, one has the option to pick a restore point, a grouped collection of data artifacts belonging to the application, to restore from. As seen above, this view distinguishes manually generated restore points from automated policy-generated ones.
It also distinguishes between snapshots and backups. When both are present, as seen above, a layered box is shown to indicate more than one kind of restore point is present for the same data. If you want to restore a version of the application stack, clicking on the layered restore point will present the below option to select between the local snapshot and exported backup.

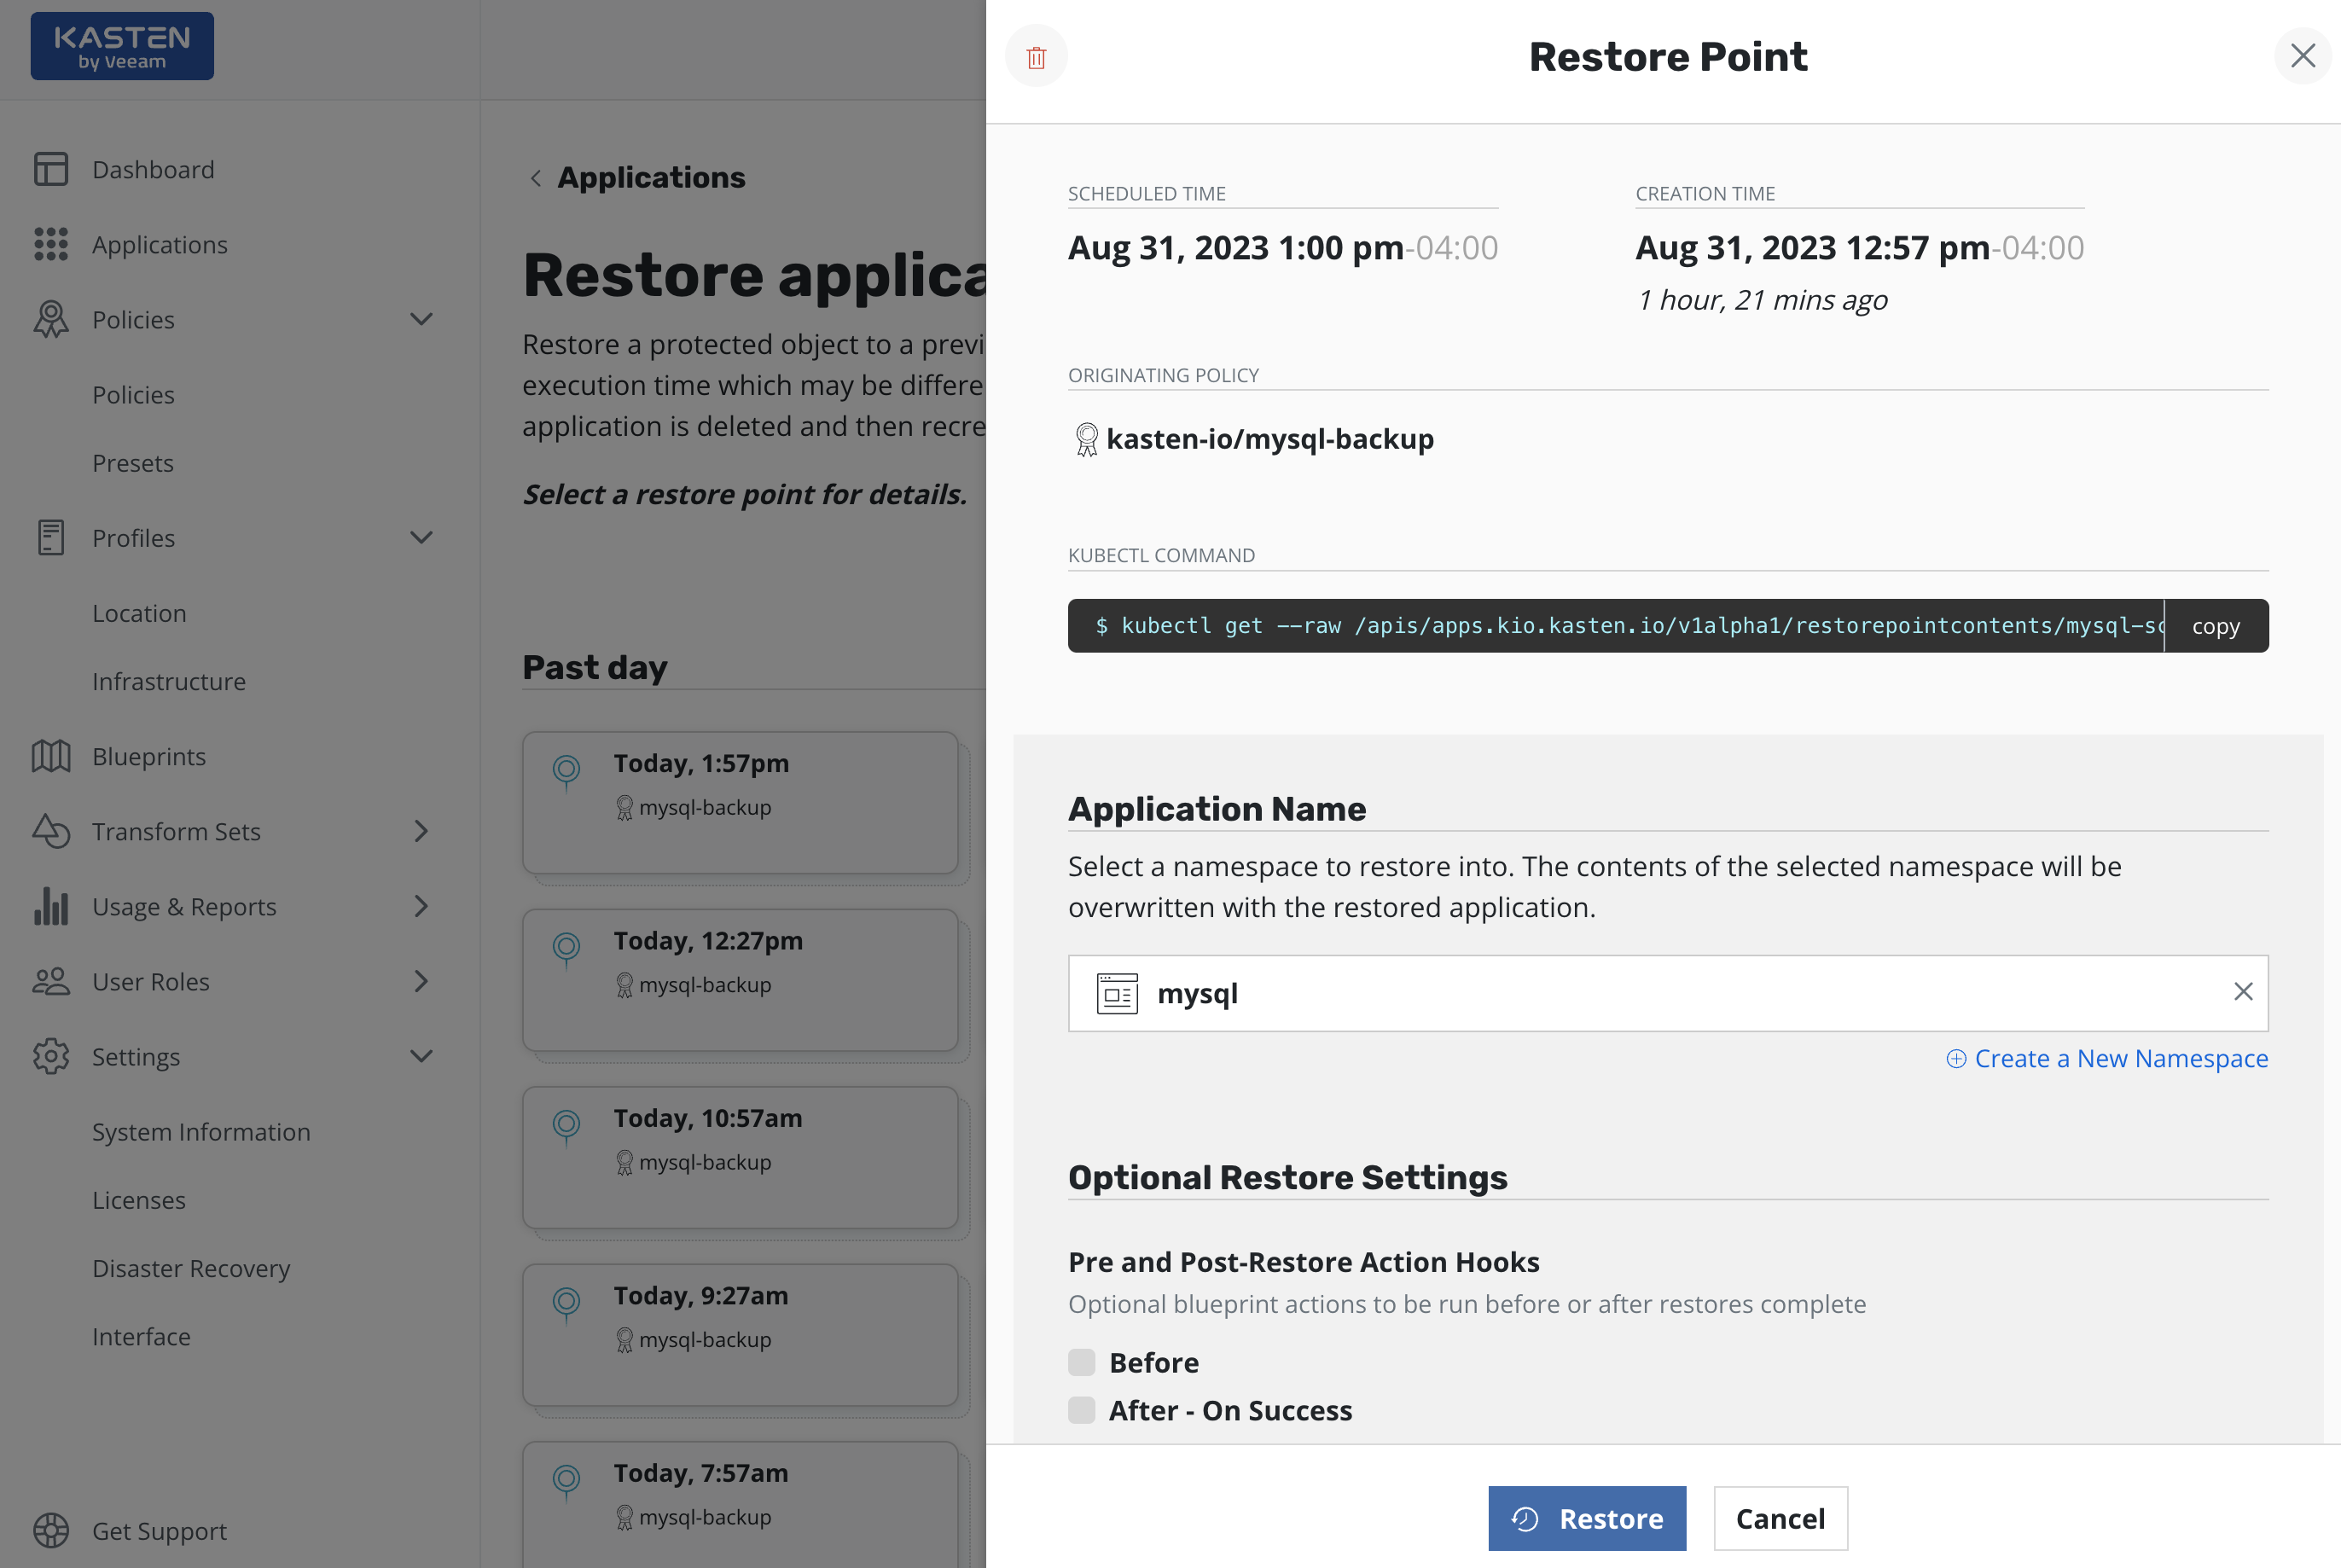
Selecting a restore point will bring up a side-panel containing more details on the restore point for you to preview, if needed, before you initiate an application restore.
Once you click Restore, the system will automatically recreate the
entire application stack into the selected namespace. This not only
includes the data associated with the original application but also the
versioned container images. After the restore completes, you will be
able to go back to your application and verify that the state was
restored to what existed at the time the restore point was obtained.
A resource that doesn't currently exist in the namespace is always
restored. The treatment of namespaced resources which already exist when
the restore is invoked depends on the type of resource and the
overwriteExisting flag.
Workloads are always
restored, regardless of whether the overwriteExisting flag is used.
ServiceAccounts & non-namespaced resources (e.g. storage class) are only
restored when missing from namespace/cluster, regardless of whether the
overwriteExisting flag is used.
For other resources, existing objects are not restored and instead
maintain their current state unless the overwriteExisting flag is
used. When the flag is used, Immutable Secrets and ConfigMaps are also
restored to the restore point version by re-creating the resources.
If desired, use restore_filtering to
selectively control the namespaced objects that are restored.
See the Restoring Individual Files section for how to restore individual files without recreating the entire application stack.
Restoring Deleted Applications
The process of restoring a deleted application is nearly identical to
the above process. The only difference is that, by default, removed
applications are not shown on the Applications page. To discover them,
you simply need to filter and select Removed.
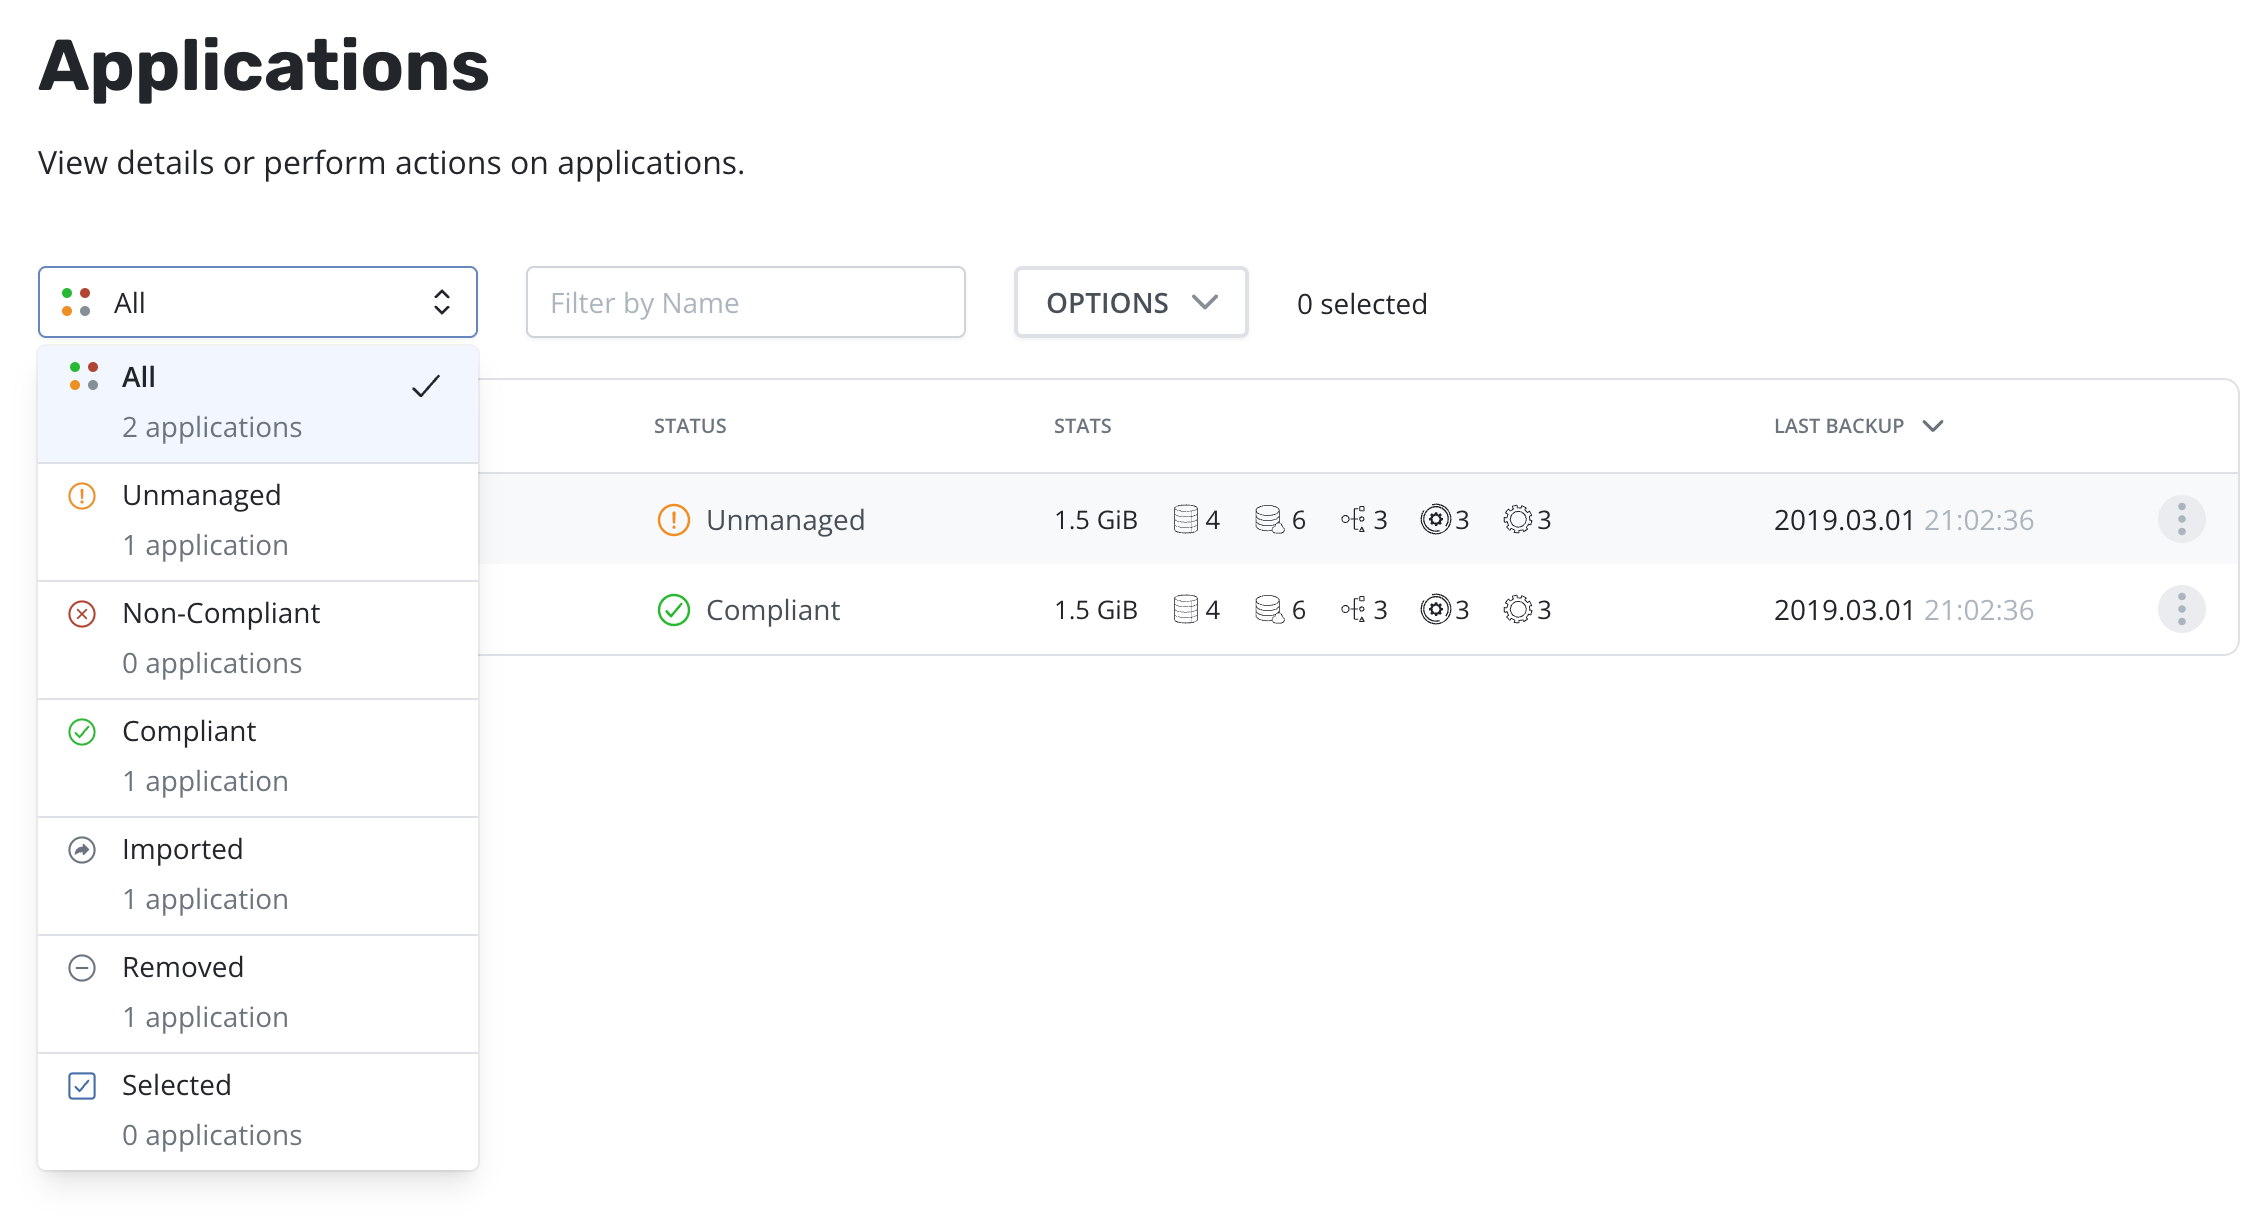
Once the filter is in effect, you will see applications that Veeam Kasten has previously protected but no longer exist. These can now be restored using the normal restore workflow.
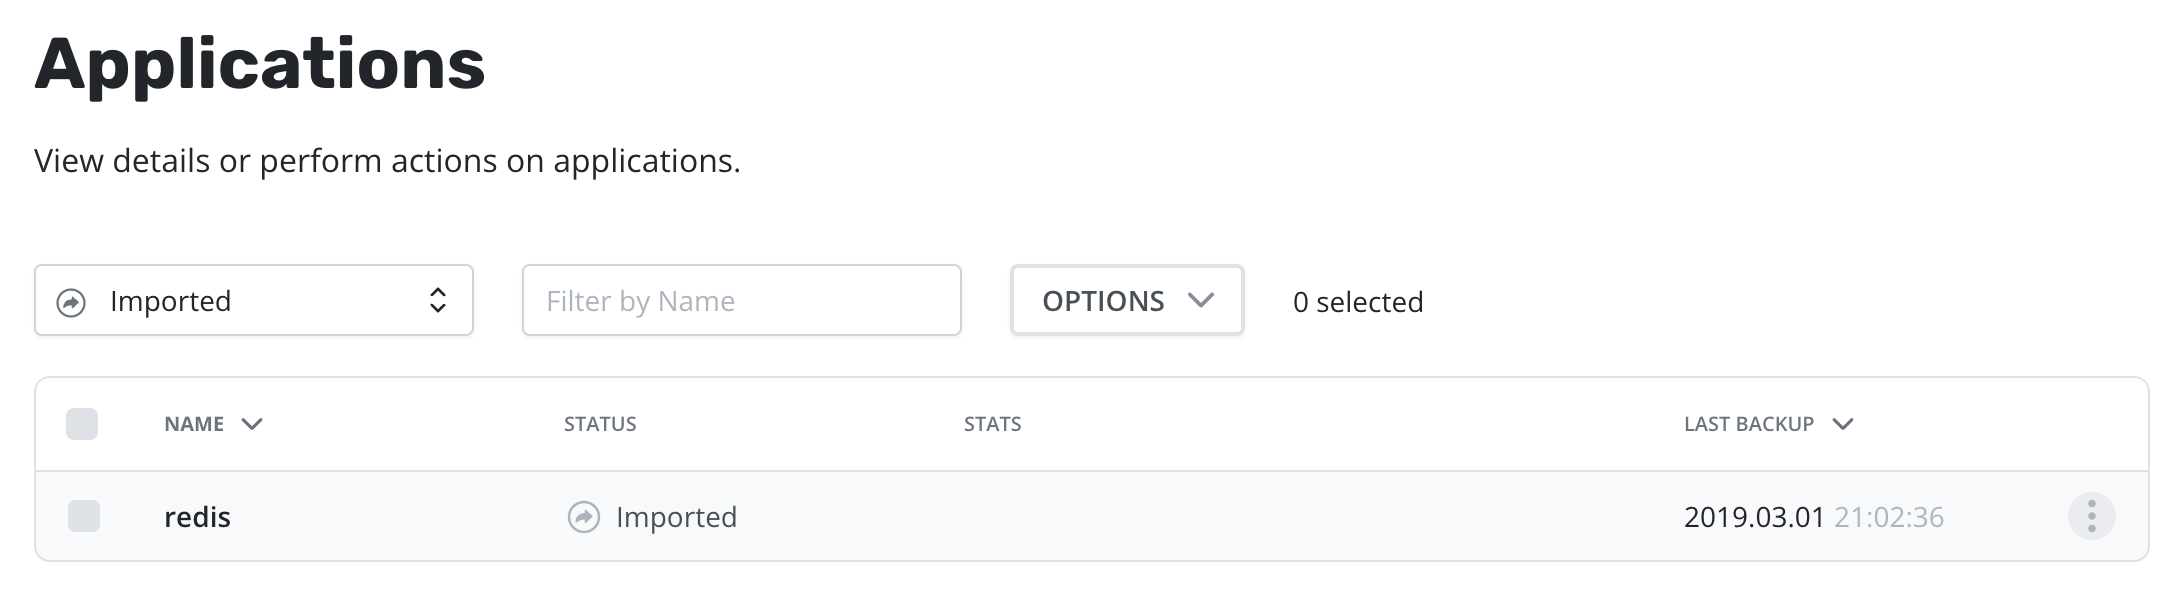
Alternatively, applications that were imported can be filtered by
selecting Imported from the dropdown. In addition, imported
applications will appear in the list of removed applications.
Restoring Multiple Applications
To initiate the restore of multiple applications, simply select them in the table:
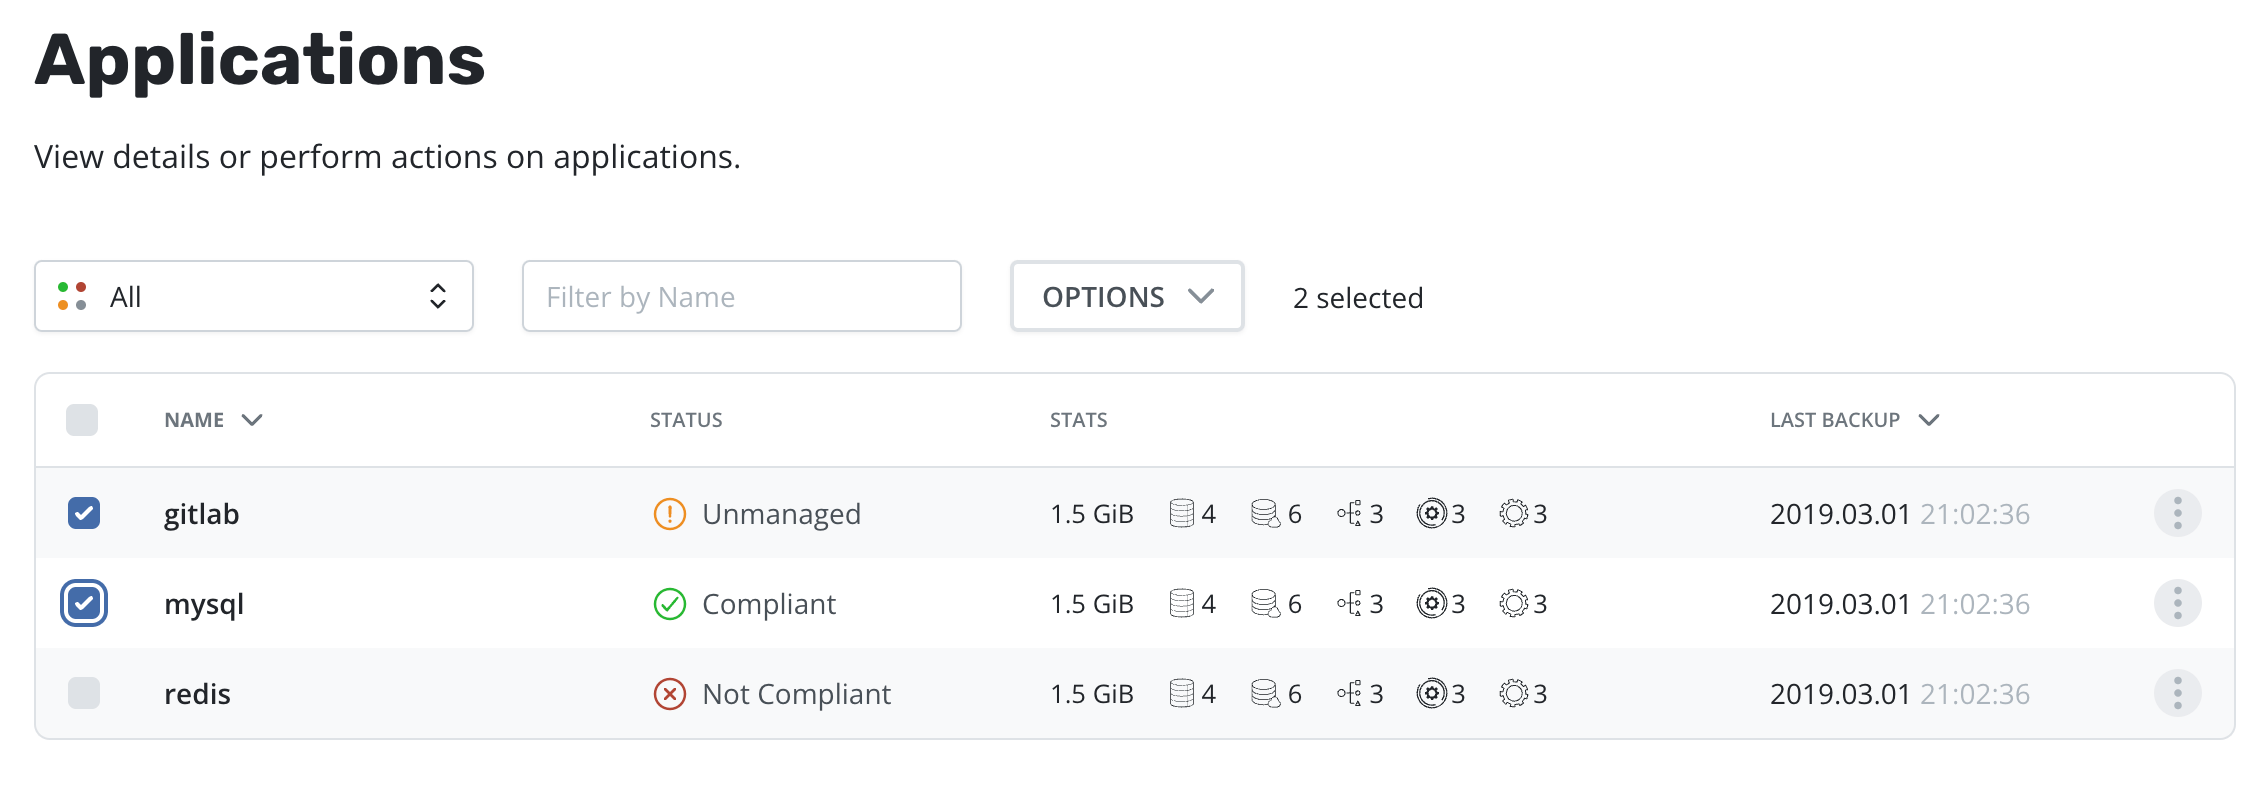
It is possible to quickly identify and manage all applications selected by using the Selected filter:
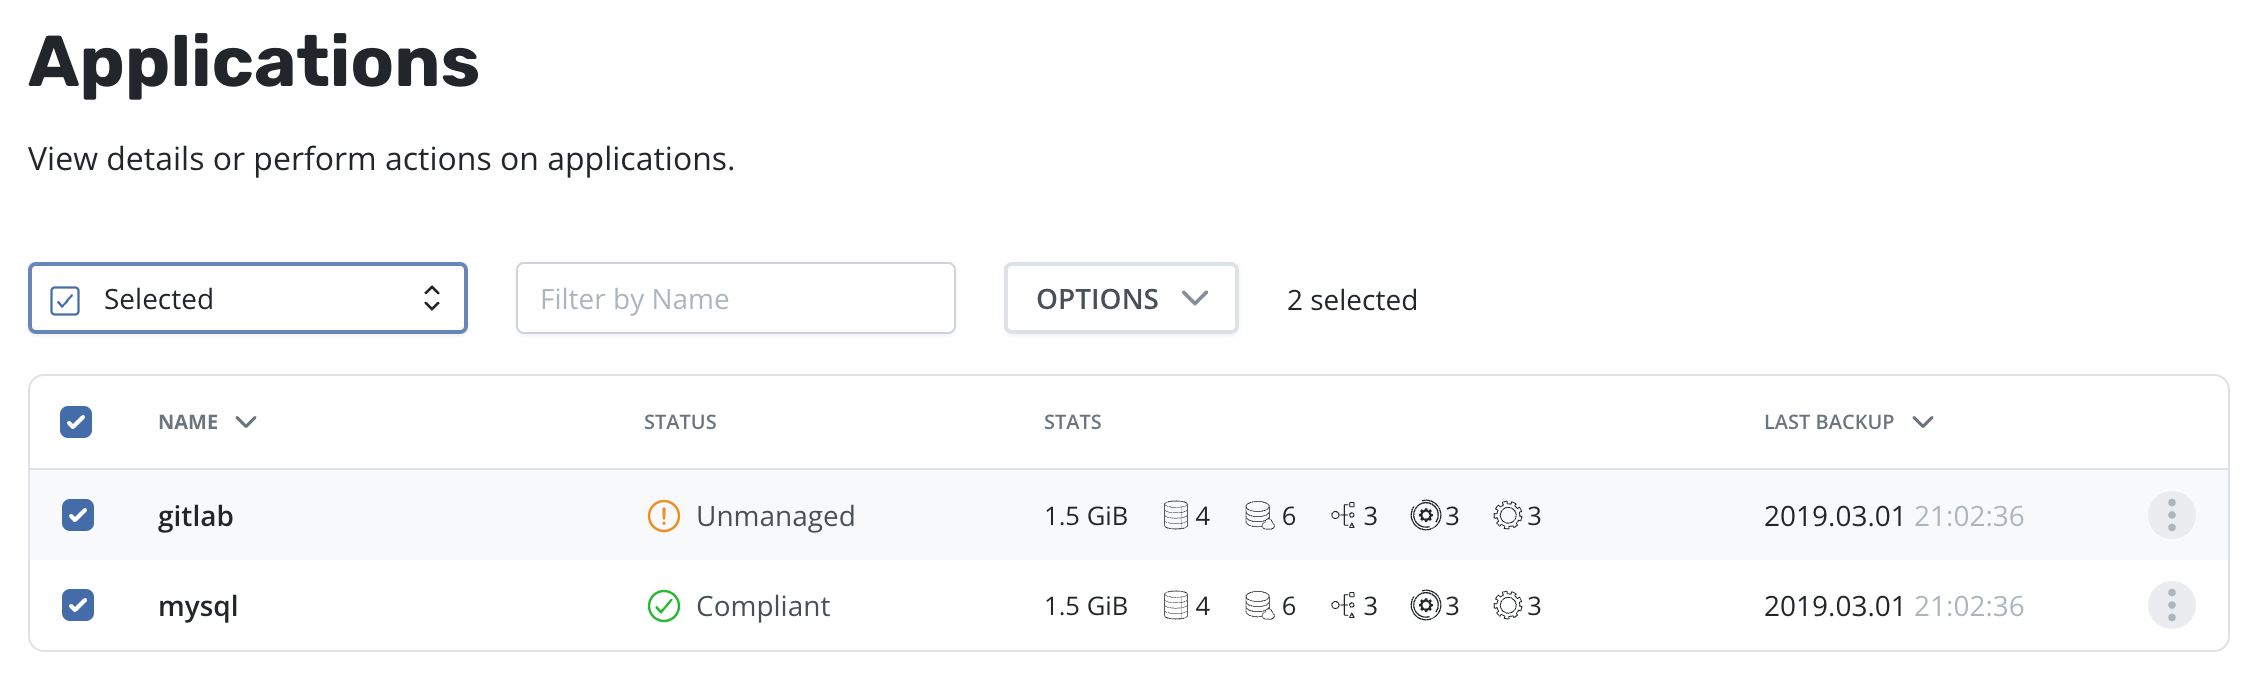
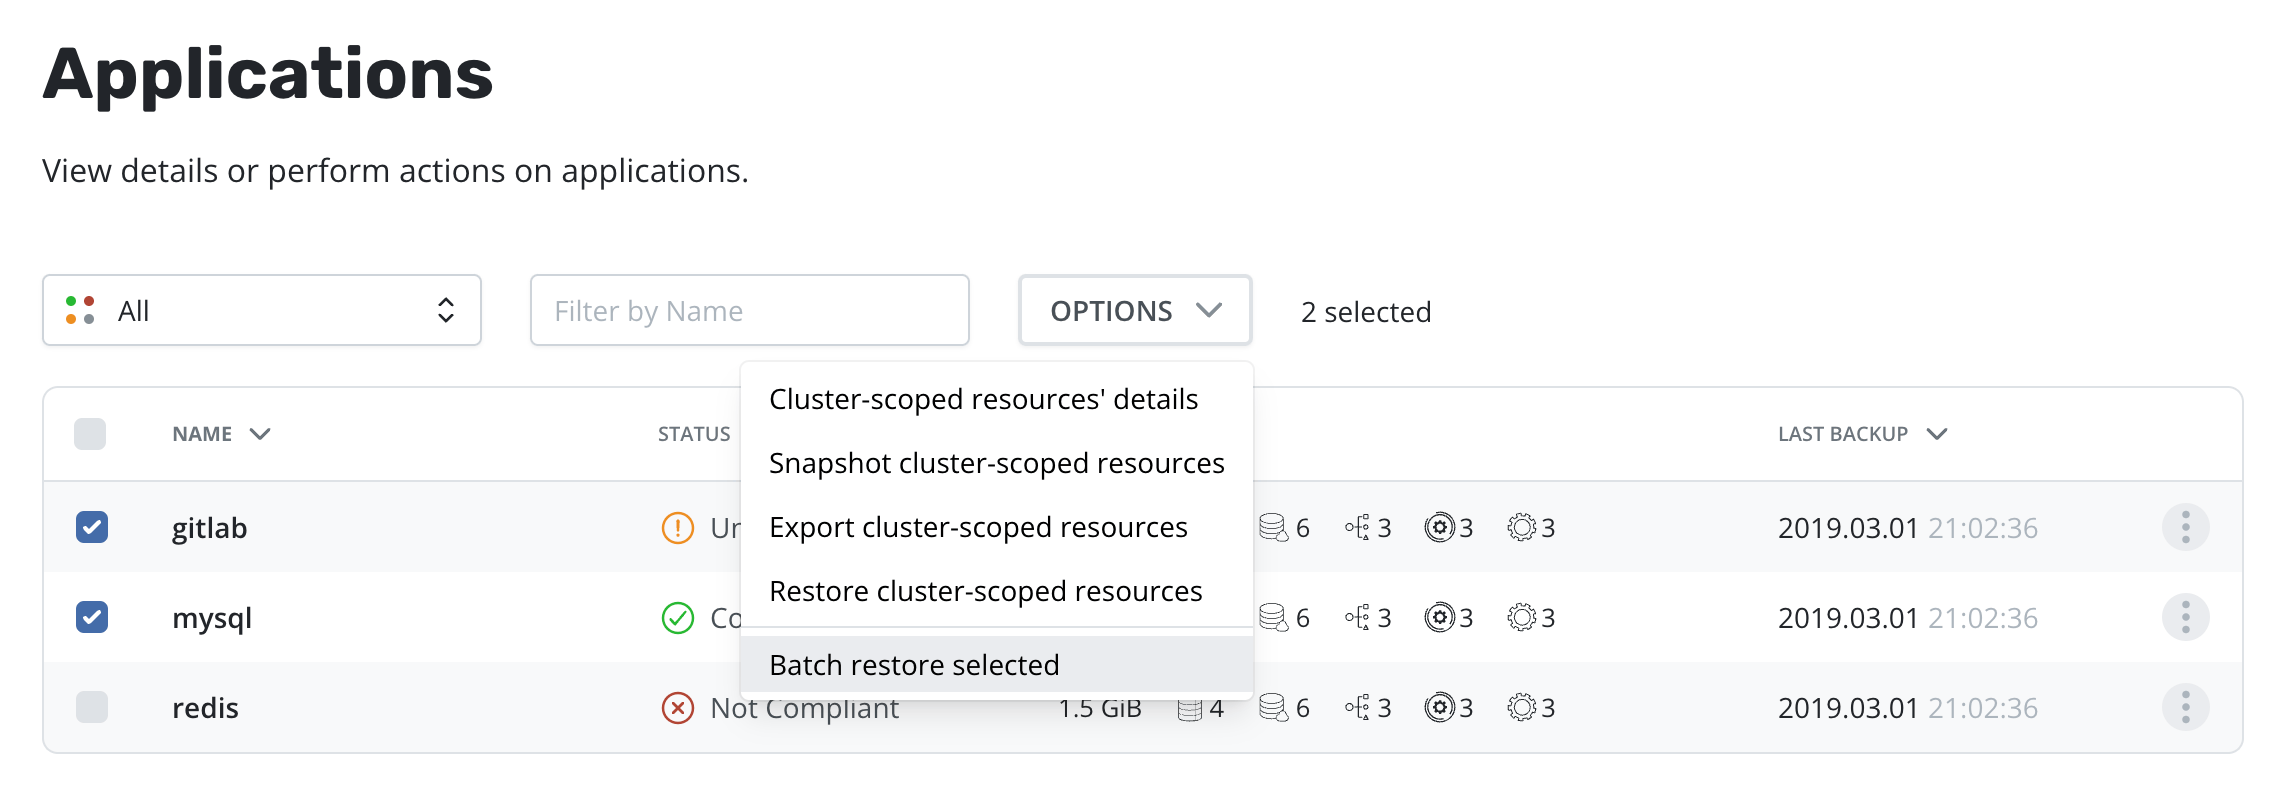
Once one or more applications are selected, the [Restore selected] option is available in the Options menu:
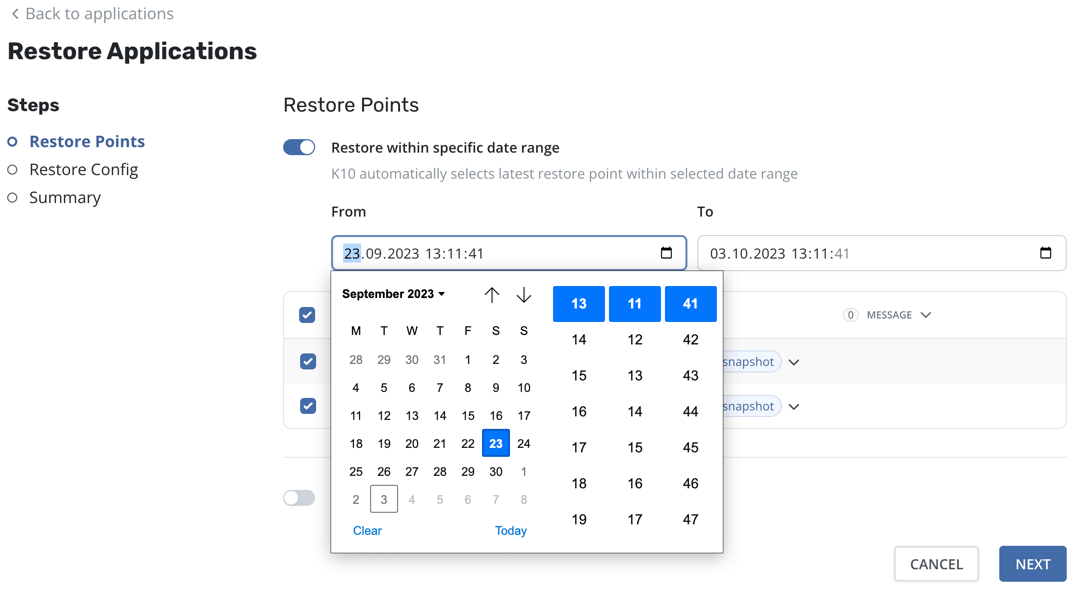
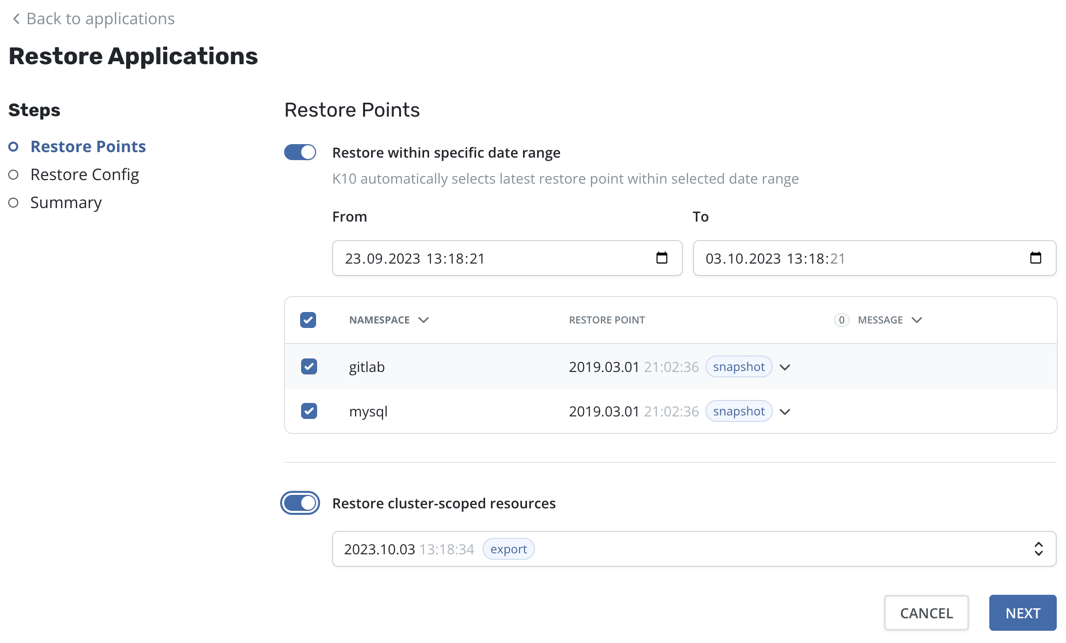
Select restore points for each application. By default, the most recent restore point available will be preselected. Applications can also be excluded from the restore operation, for example, if no valid restore point exists that satisfies the needs of this restore operation.
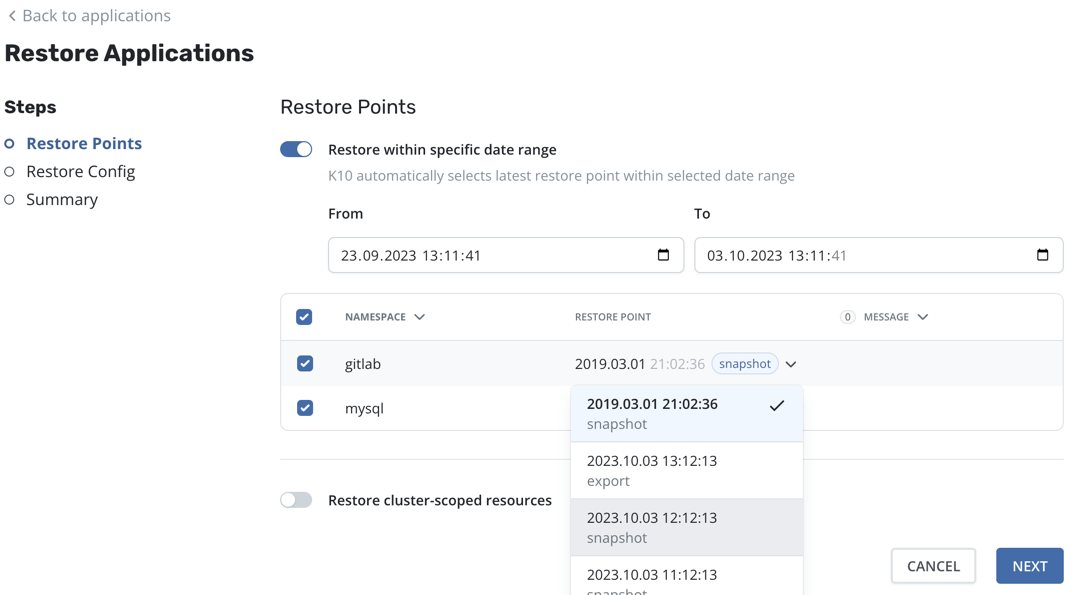
You can specify a date range, such as during a ransomware attack, in order to choose the latest restore point containing unencrypted data, even if there are more recent restore points (potentially containing corrupted data). When a date range is selected, the most recent restore point within that range will be automatically selected for each application.
It is also possible to restore cluster-scoped resources along with selected applications:
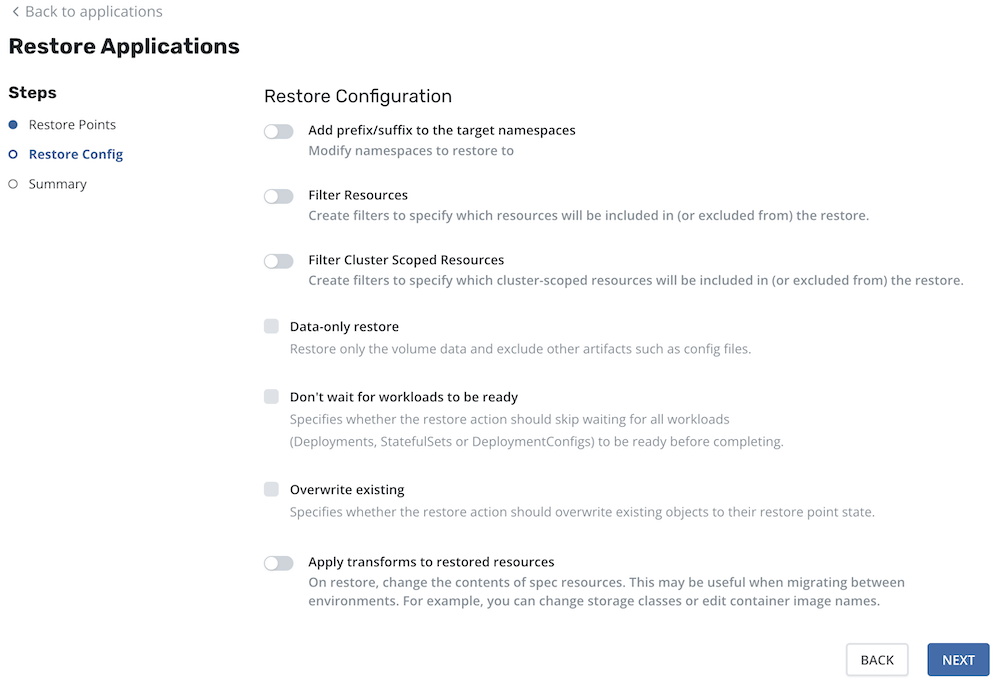
When a valid restore point has been picked up for each selected application, click the "Next" button to proceed to the next step, Restore Configuration. This step contains modified options from the single application restore workflow. For instance, it is possible to add a prefix/suffix to the target namespace or filter resources.
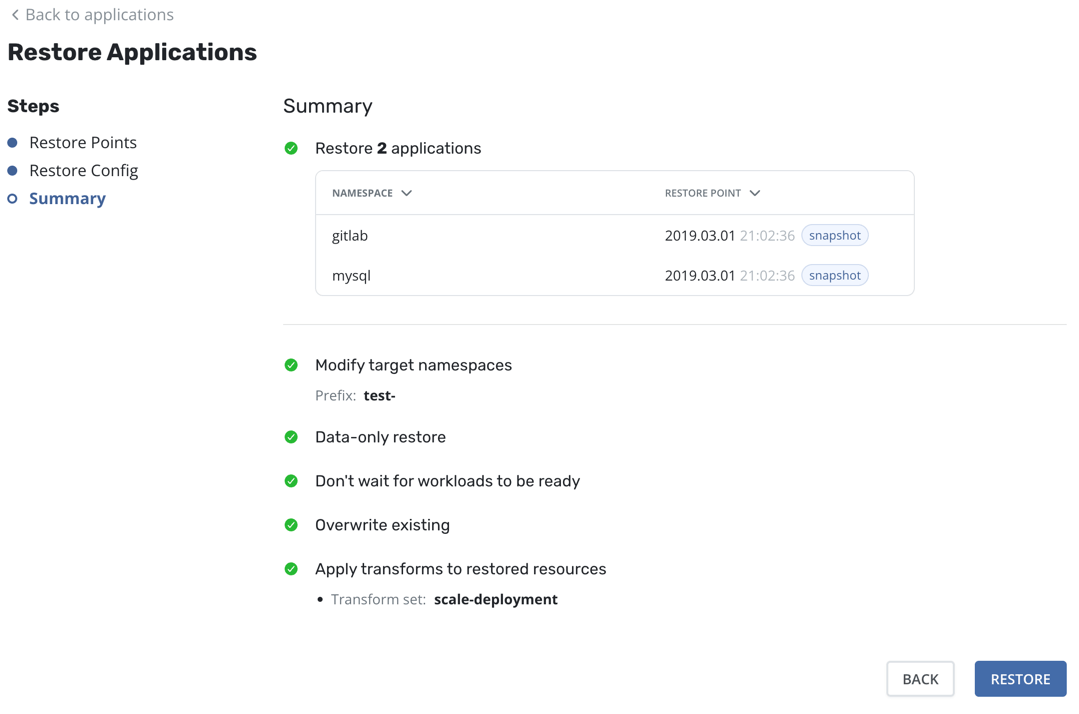
Finally, the Summary screen provides a comprehensive overview of the upcoming operations, the relevant applications, and all the options enabled throughout the process.
After multiple restore is submitted a page of batch restore action will appear.
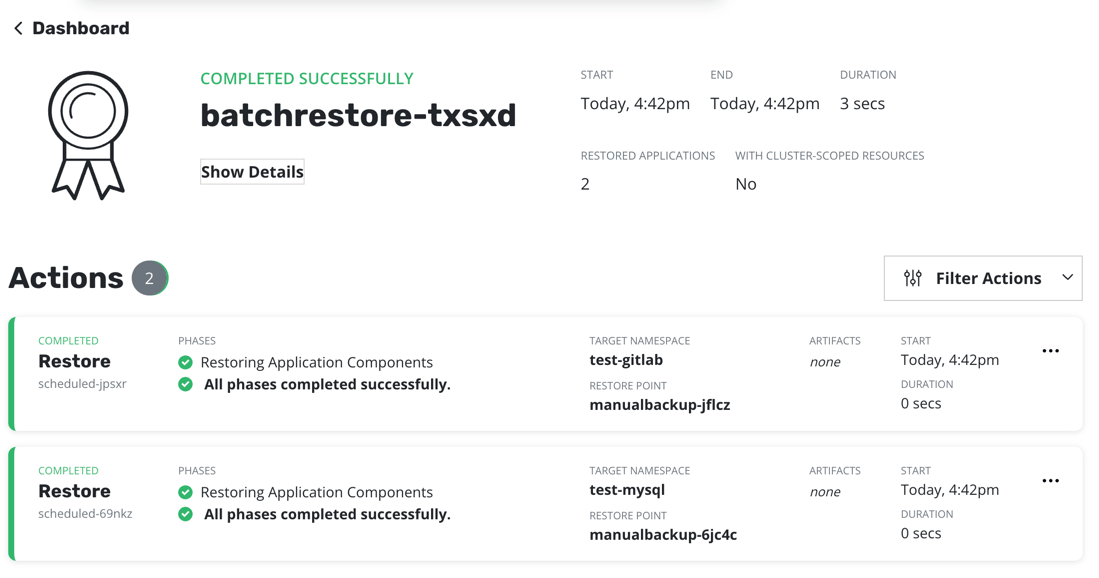
There will be also an action card in Action section on the Dashboard page.

Limitations
-
Currently, Veeam Kasten only supports
Allowed Topologiesconsisting of a single zone. If more than one zone is provided, Veeam Kasten will choose the first one. - Changing the size of a PersistentVolumeClaim resource (PVC) on restore via transform is not supported.
- A resource's owner references will not be preserved if a transform changes the name of the resource to an auto-generated name (generatedName).
Restore Filtering
By default, a restore will bring back all artifacts and data captured during the backup process. However, there are times where only a subset of these artifacts are required and, to support that use case, the restore workflow supports two distinct filtering options.
- Artifact Filtering: Full-control over what artifacts and data to restore
- Data-Only Restore: Data-only restore (usually for a running application)
- Volume-Clones Restore: Volume-Clones restore (for restoring volumes only)
Artifact Filtering
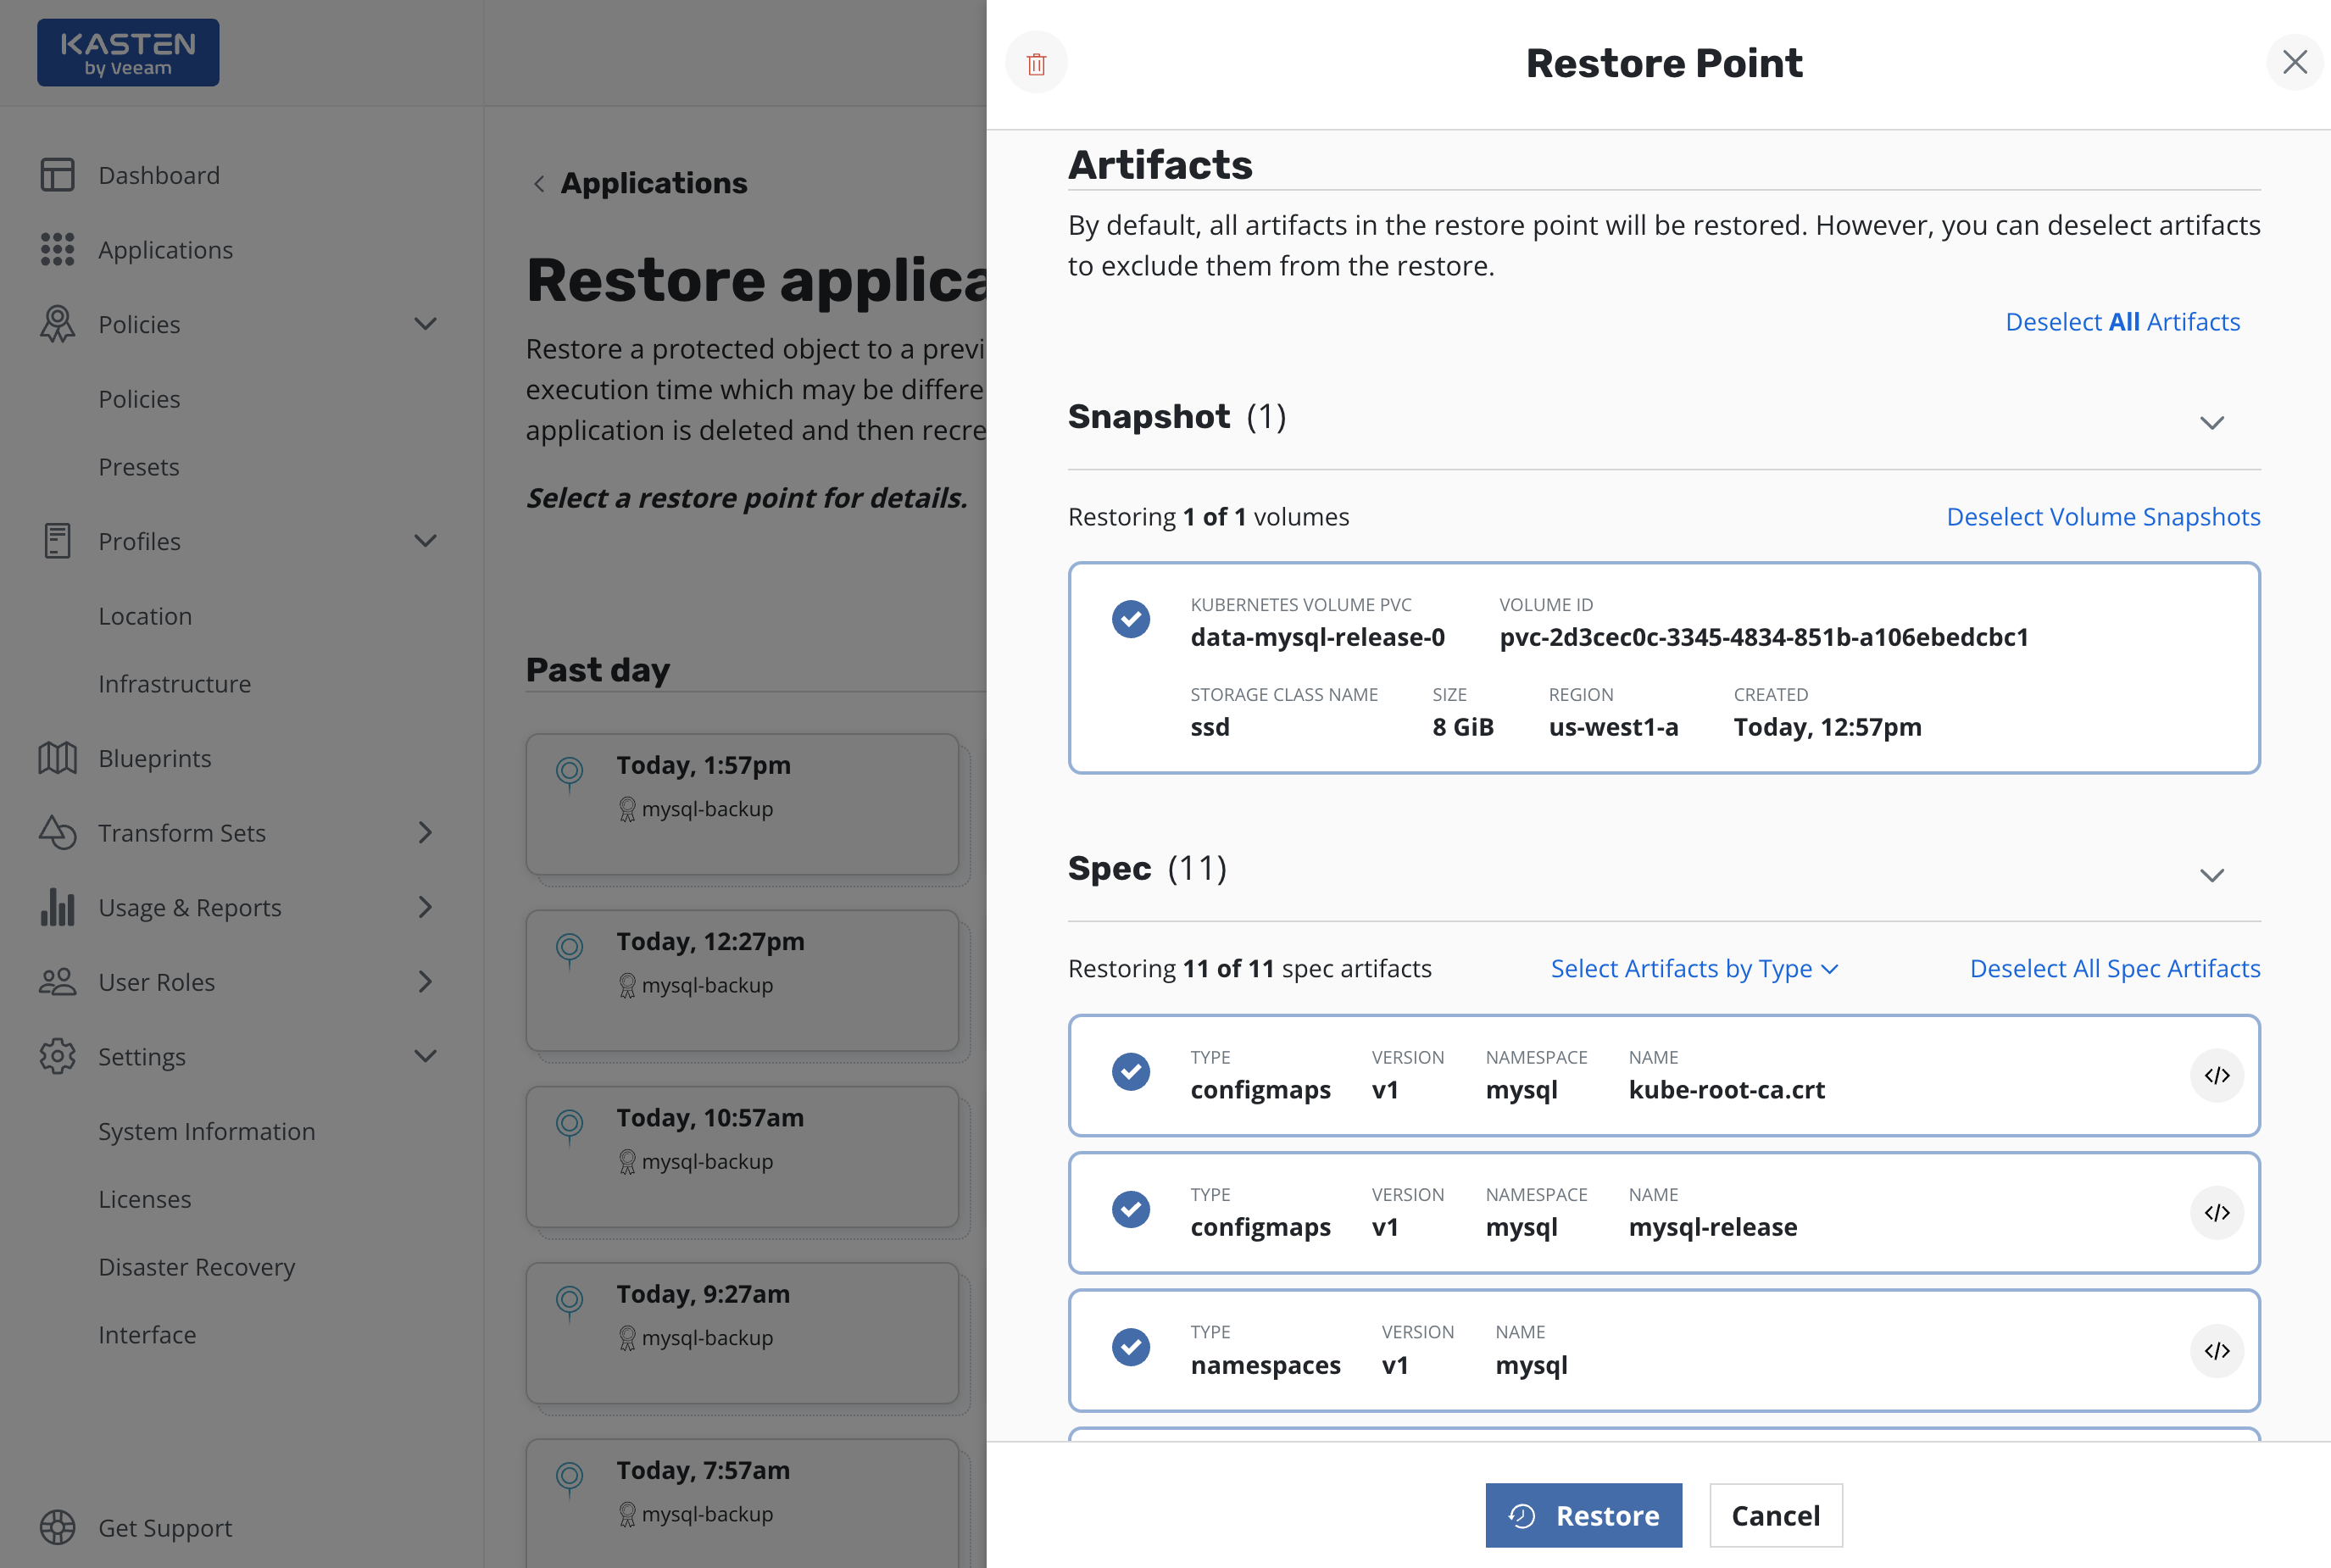
As seen in the above diagram, it is possible to selectively bring back restore point artifacts (including volume snapshots). This is useful for scenarios such as single PVC restore or rolling back configuration updates. By default, all artifacts are selected for restore.
To preserve owner references, both the resource and its owners must be included by the filters.
Data-Only Restore
As seen in the above sections, it is also possible to select a
Data-Only Restore. While, at the surface level, this is similar to
just selecting all volume snapshots and no Kubernetes specs, there are a
number of safety guardrails for successful data-only restores. The
important differences to be aware of include:
- The Kubernetes workloads (Deployments, StatefulSets, etc.) captured in the restore point must exist in the namespace the application is being restored in
- The running Kubernetes workloads must have the same number of replicas as captured in the restore point
- The Kubernetes workloads must also have same volumes as were gathered in the restore point (number of volumes, names of the volumes)
These guardrails are in place as data-only restore is frequently used to bring older versions of data into a newer version of application code. In those scenarios, these checks are essential to ensure that a successful restore can be completed.
Data-Only Restore follows delete and restore from backup approach for the PVCs to maintain data integrity.
Volume-Clones Restore
The Volume-Clones restore feature enables the restoration of individual volumes into the existing application namespace without disrupting its operation or workloads.
This method is particularly beneficial when specific files need to be recovered from a backup without causing any disruption to the ongoing workload, and restoring the volume to an alternative namespace is not permitted or desirable.
The important differences from Data-Only Restore to be aware of
include:
- The Kubernetes workloads (Deployments, StatefulSets, etc.) captured in the restore point can exist in the namespace where the application is being restored without being affected.
- The restored PVCs follow a predefined naming convention that includes the original PVC name with the Restore Point's creation timestamp appended to denote that they are clones.
- Volume-Clones restore does not automatically mount volumes to any Pods. The responsibility for mounting these volumes to the appropriate Pods lies with the user, providing flexibility in managing workload dependencies.
-
Each cloned PVC has label
k10.kasten.io/cloned: "true"to identify it as a clone. This label can be utilized as a policy exclusion to prevent the cloned volumes from being accidentally included in the backup policy. - Once the cloned PVCs have served their intended purpose, it is recommended to remove them from the namespace. This ensures their exclusion from future backups, maintaining a clean environment, and preventing unnecessary data duplication.
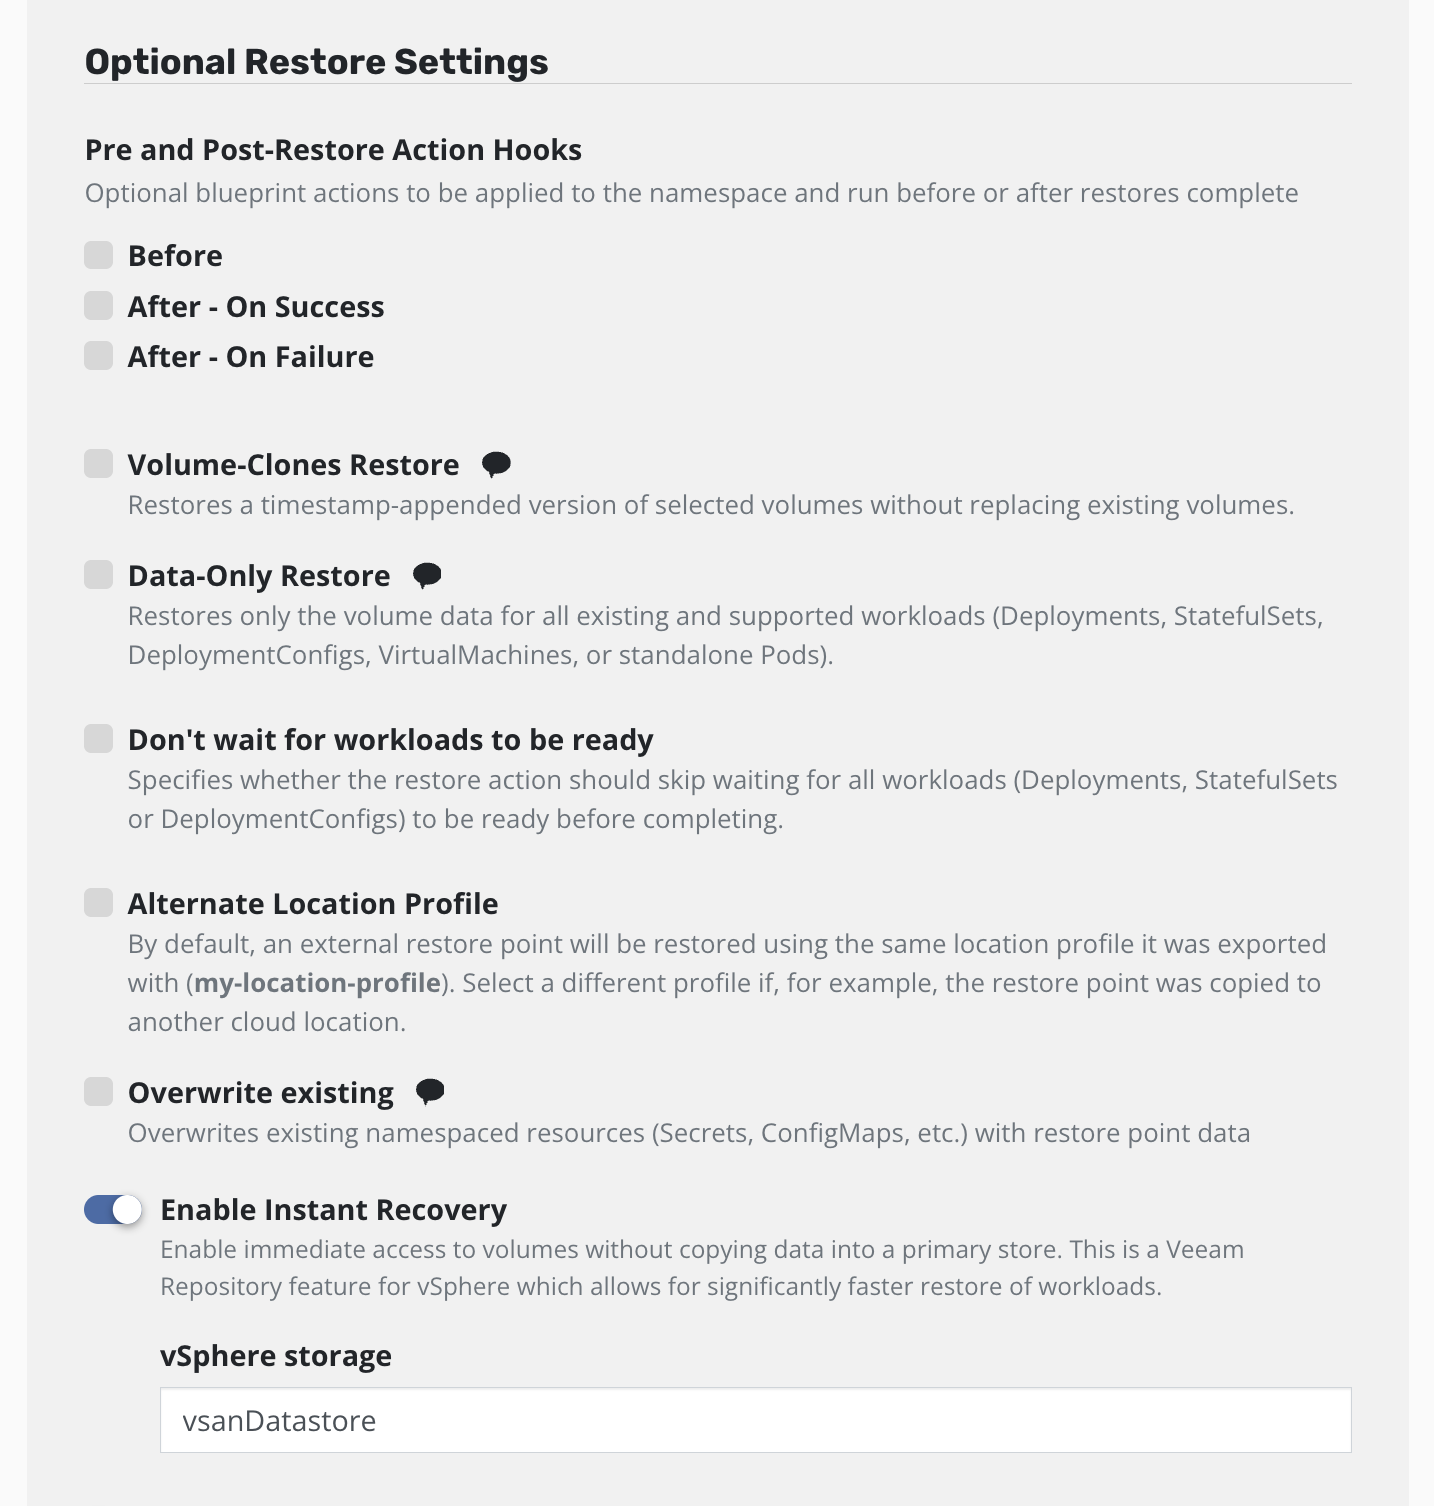
Instant Recovery
Support for Instant Recovery has been deprecated and will be removed in a future release. Standard restore of local or exported Kasten restore points will remain unaffected.
Instant Recovery will get an exported restore point up and running much faster than a regular restore. This feature requires vSphere 7.0.3+ and a Veeam Backup server version V12 or higher. This is not supported on vSphere with Tanzu clusters at this time. Before using Instant Recovery, you should ensure that all Storage Classes in your Kubernetes clusters are configured to avoid placing new volumes in the Instant Recovery datastore. Please see this Knowledge Base article for recommendations on Storage Classes for use with Instant Recovery. After an Instant Recovery has been completed, the migration step will start automatically. The migration occurs in the background while the recovered application runs from the network volume. Please see the Instant Recovery section for more details on how Instant Recovery works.
Currently Instant Recovery is only supported for Restore Actions, not Restore Policies. To use Instant Recovery, select the Enable Instant Recovery checkbox (this will only appear if all compatibility criteria are met) and set the target datastore name on vSphere to migrate the volume to. It is possible to use either the datastore name or datastore id from VBR. Alternatively set the InstantRestore and TargetDatastorage properties in the RestoreAction spec.
All restore features are supported with Instant Recovery.
Resource Transformation
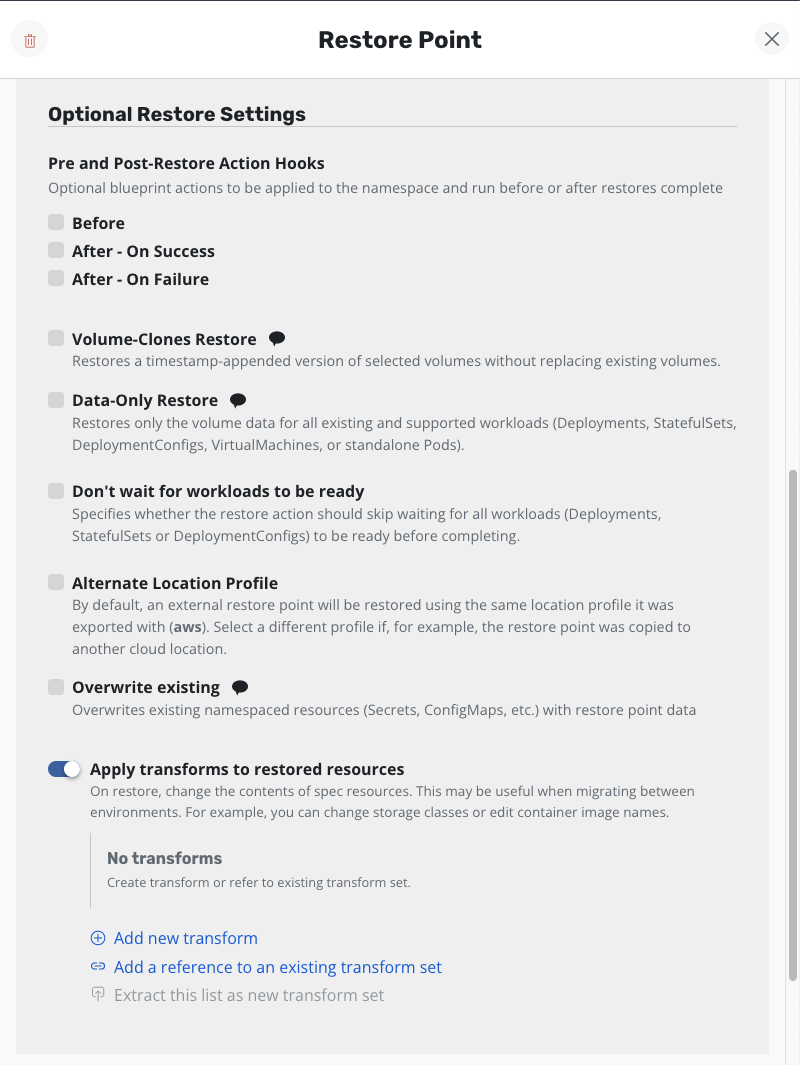
By default, Veeam Kasten restores Kubernetes resources as they exist in the restore point. However, there are times when the restore target does not match the environment of the backup. For these situations, Veeam Kasten allows Kubernetes resource artifacts to be transformed on restore.
For example, if a restore point was created in one cloud provider and it should be restored into a cluster in a different cloud provider, it might be necessary to use a transform that updates the container image URLs in some resources, or one that changes storage class settings.
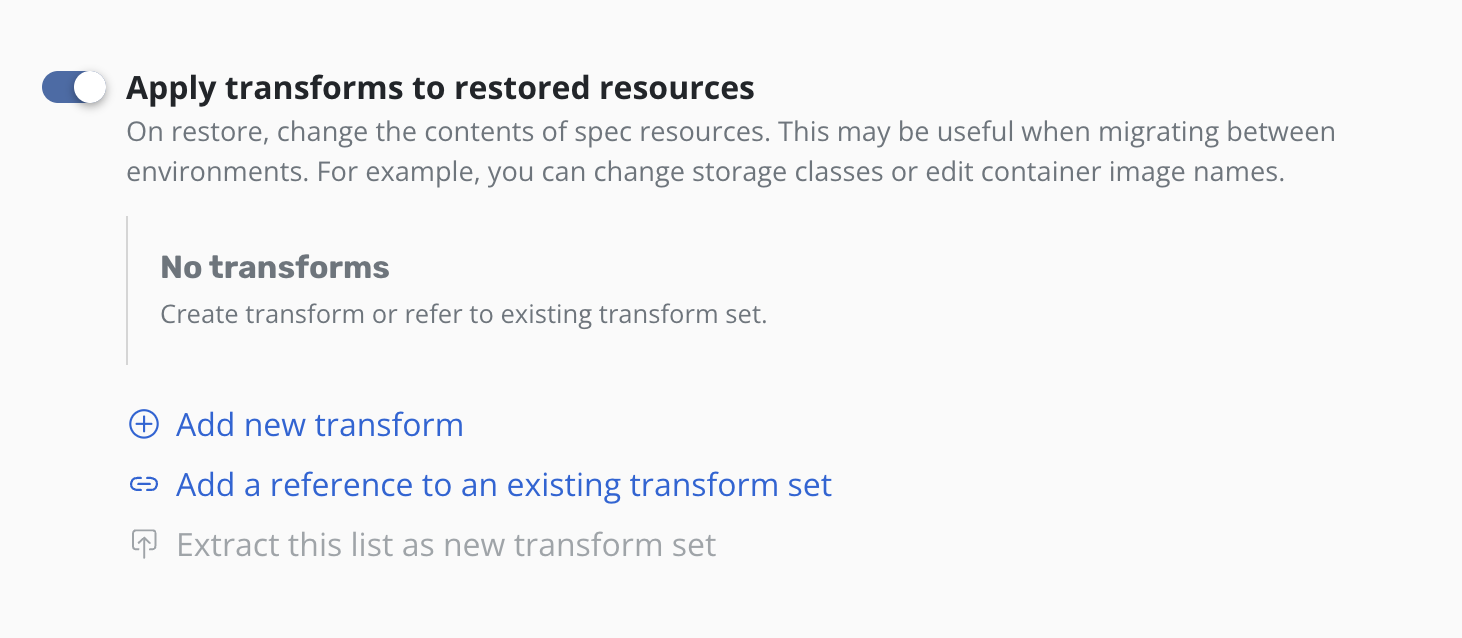
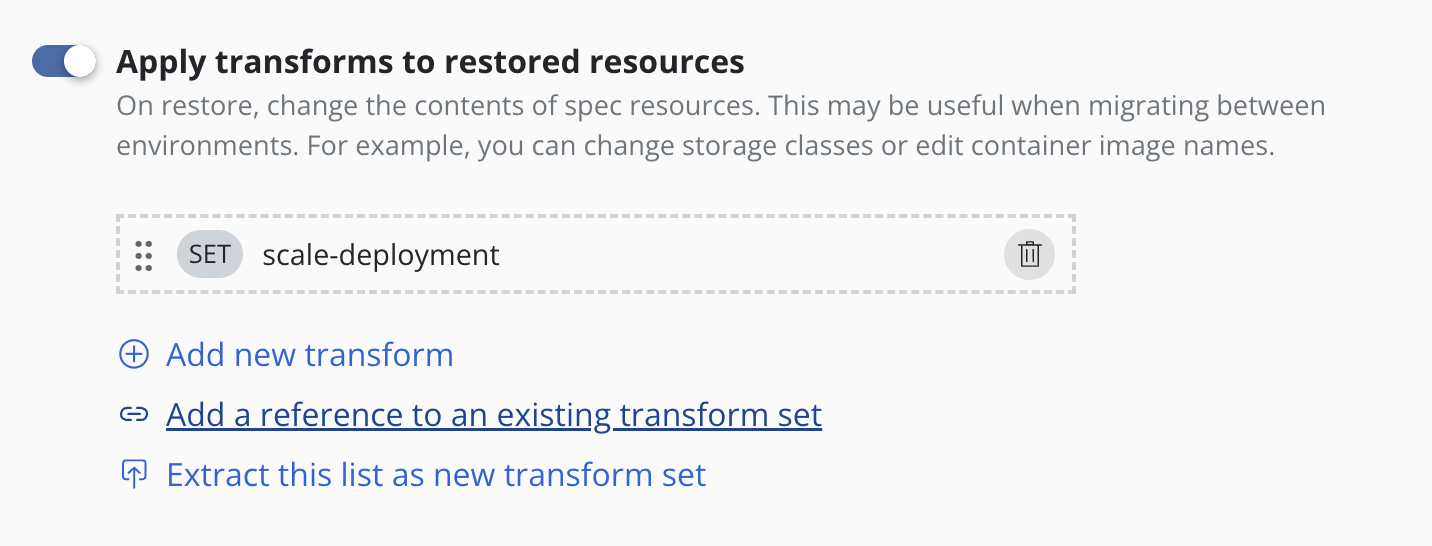
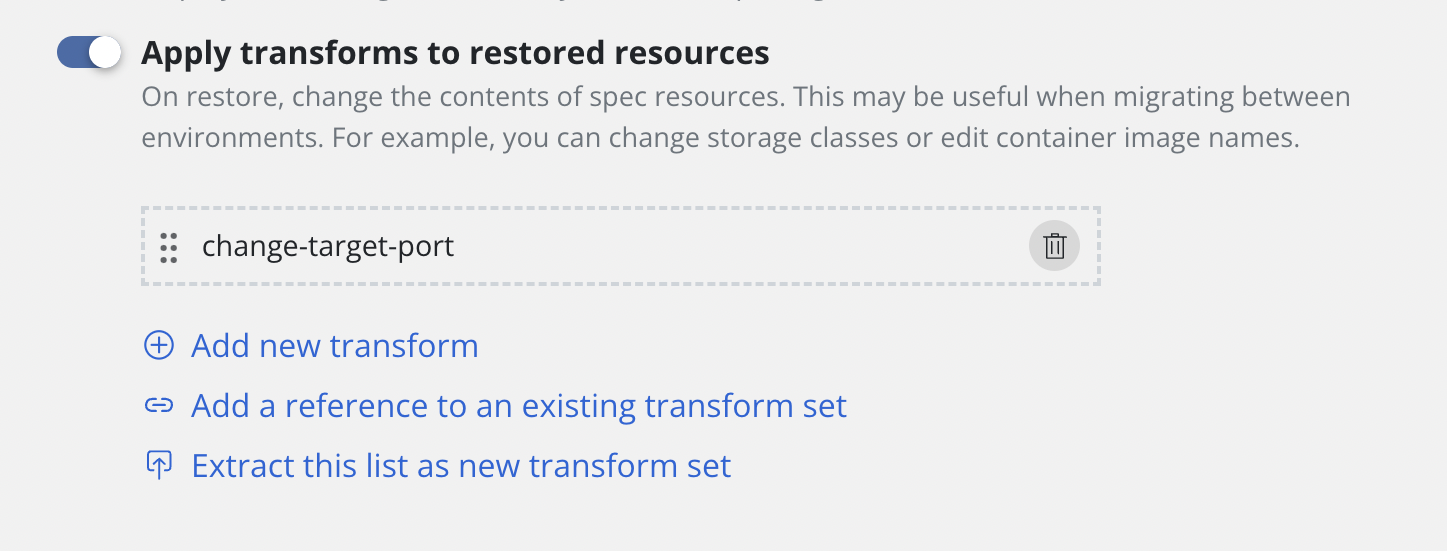
To apply transforms to the restored application, enable
Apply transforms to restored resources under Restore After Import.
Add transforms using transform sets
A complete guide of how to setup a transform set can be found here.
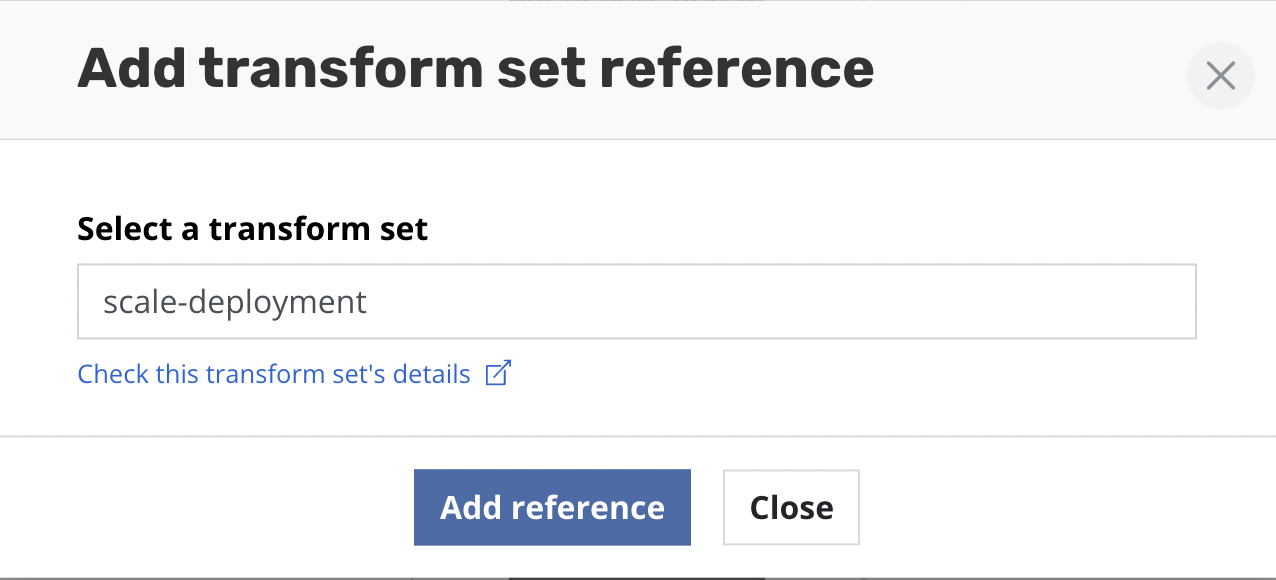
Clicking the Add a reference to an existing transform set will open a
form for selecting a transform set.
Type the name of the transform set and click Add reference.
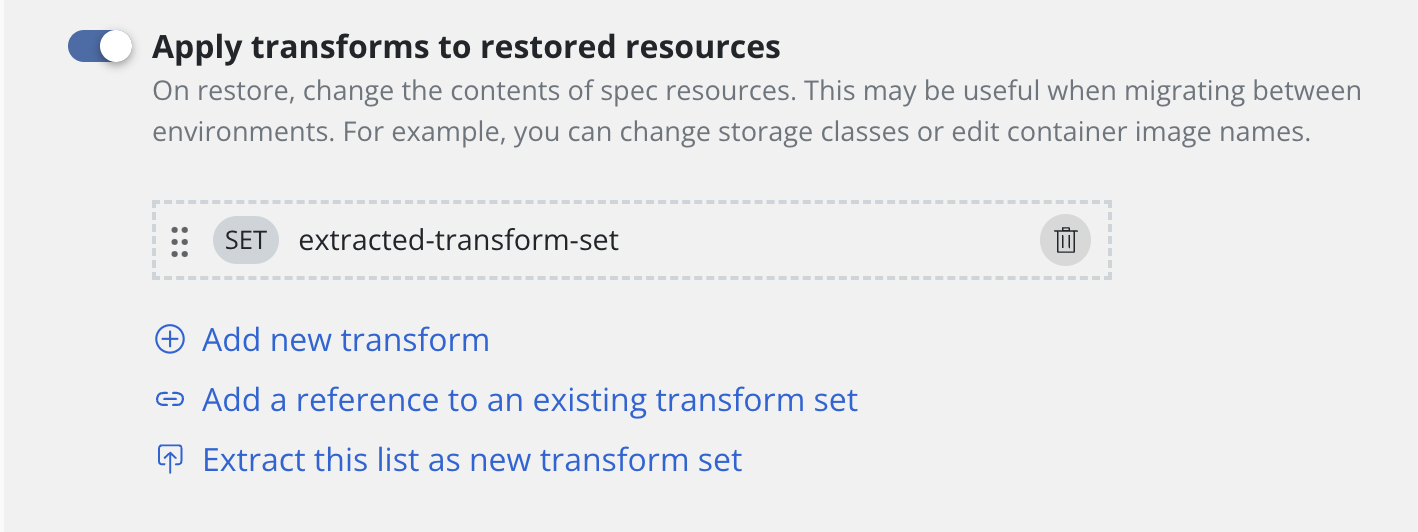
A reference to the transform set will then be added to the form. The
SET label helps identify transforms which are stored and referenced
rather than those that are created inline via Add new transform.
Add new custom transform
A complete specification of how transforms can be configured can be found here.
Clicking the Add new transform will open a form for creating a new
transform.
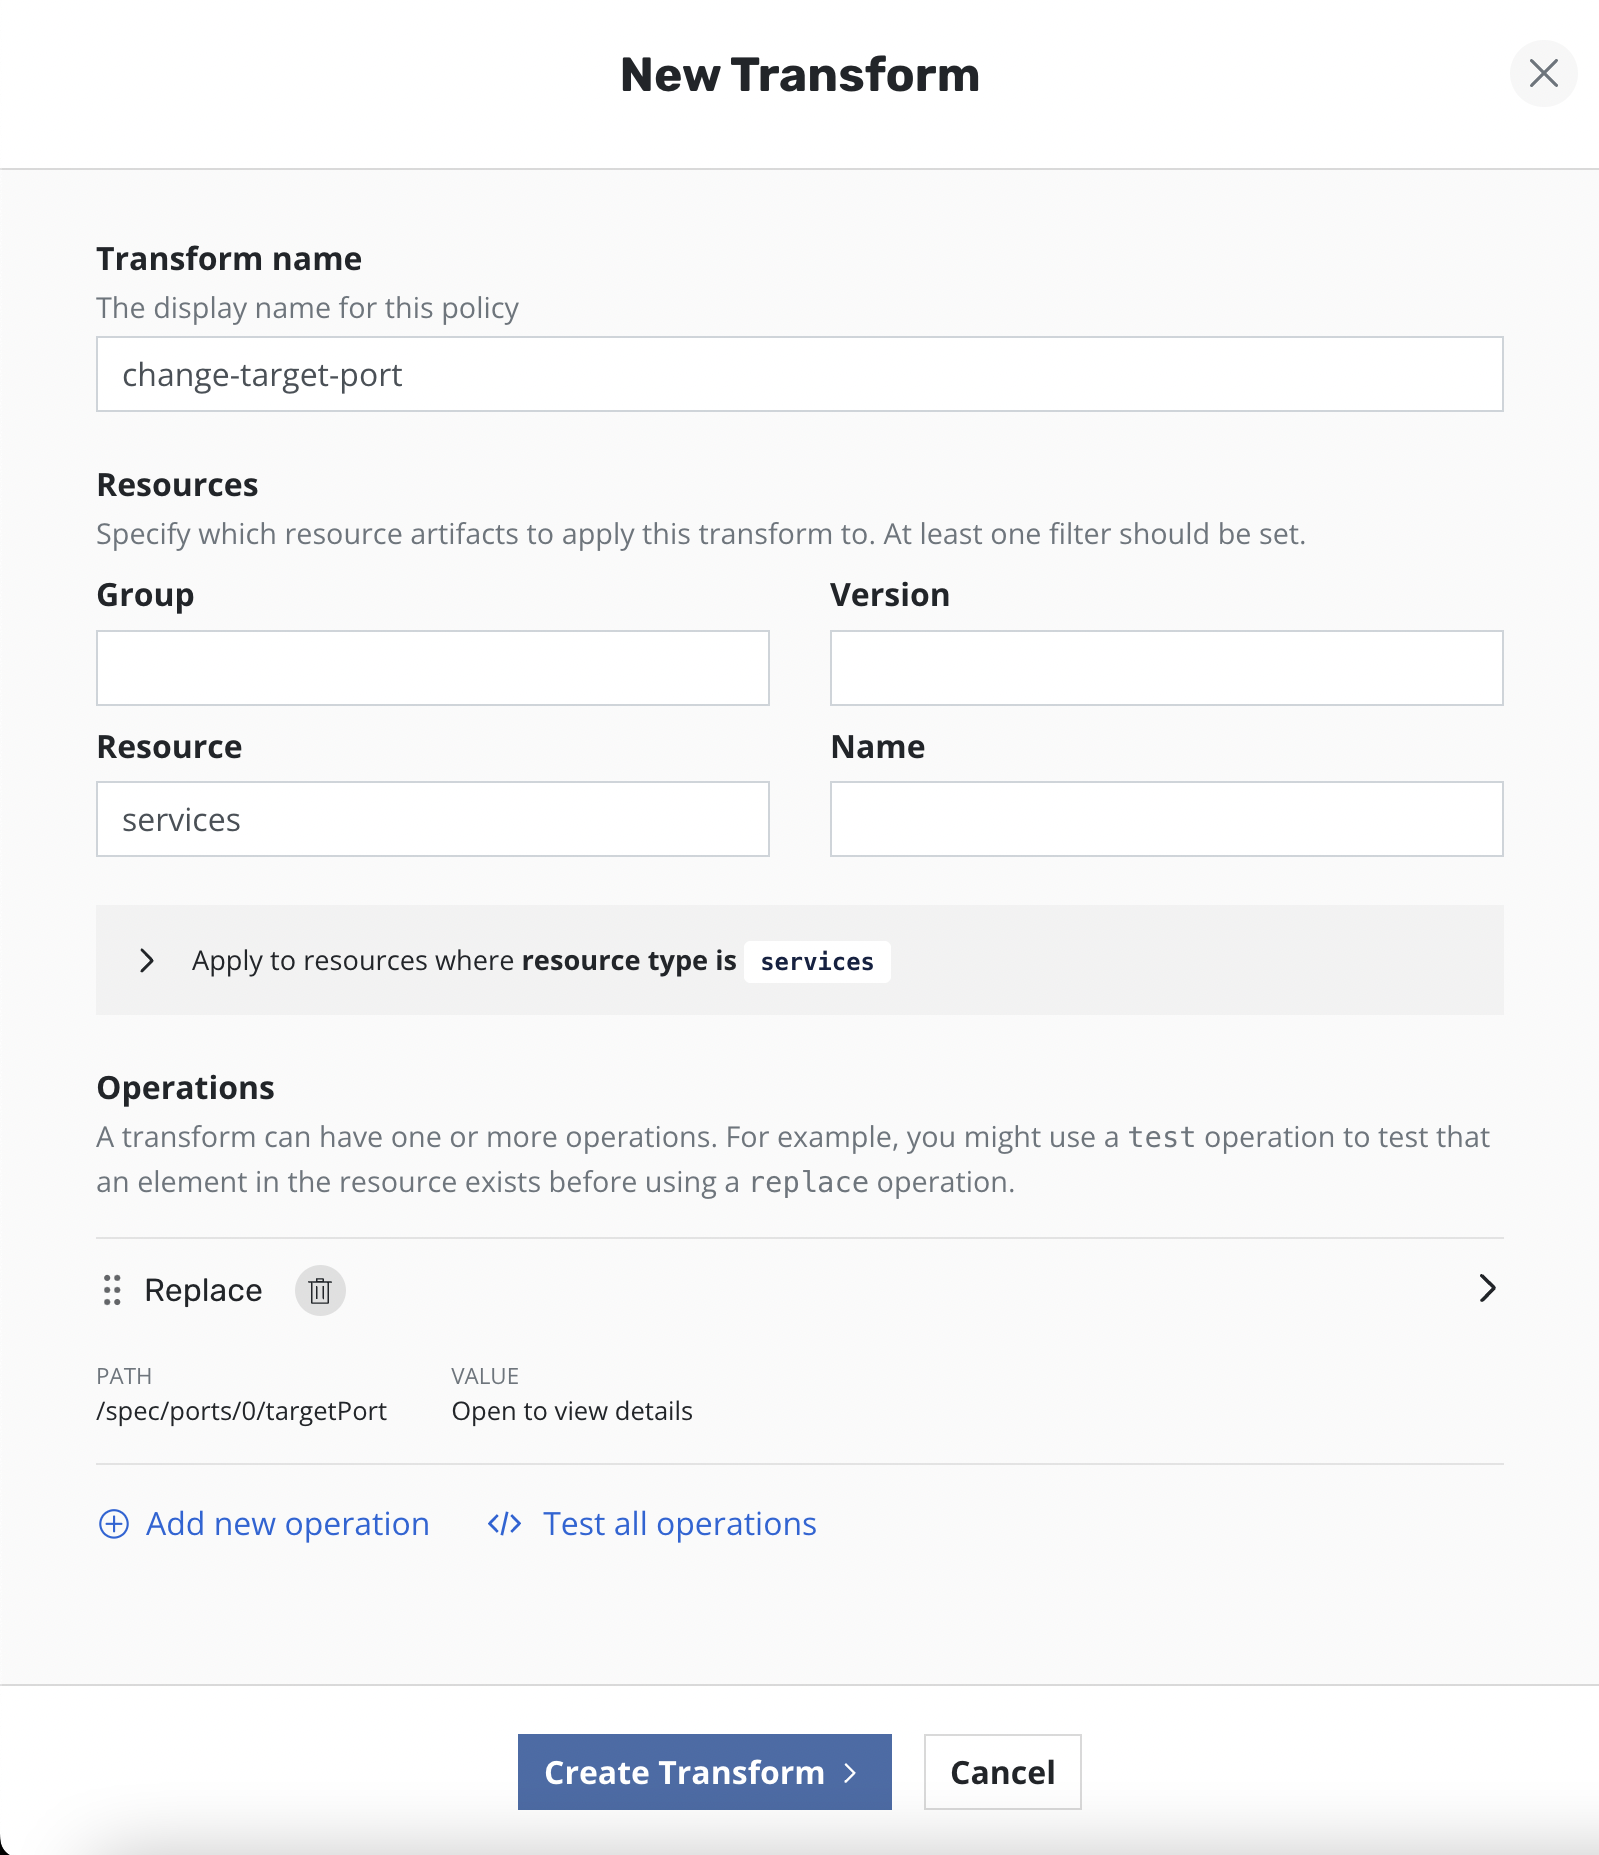
On the form, name the transform, select which resources the transform will be applied to, and then create one or more operations.
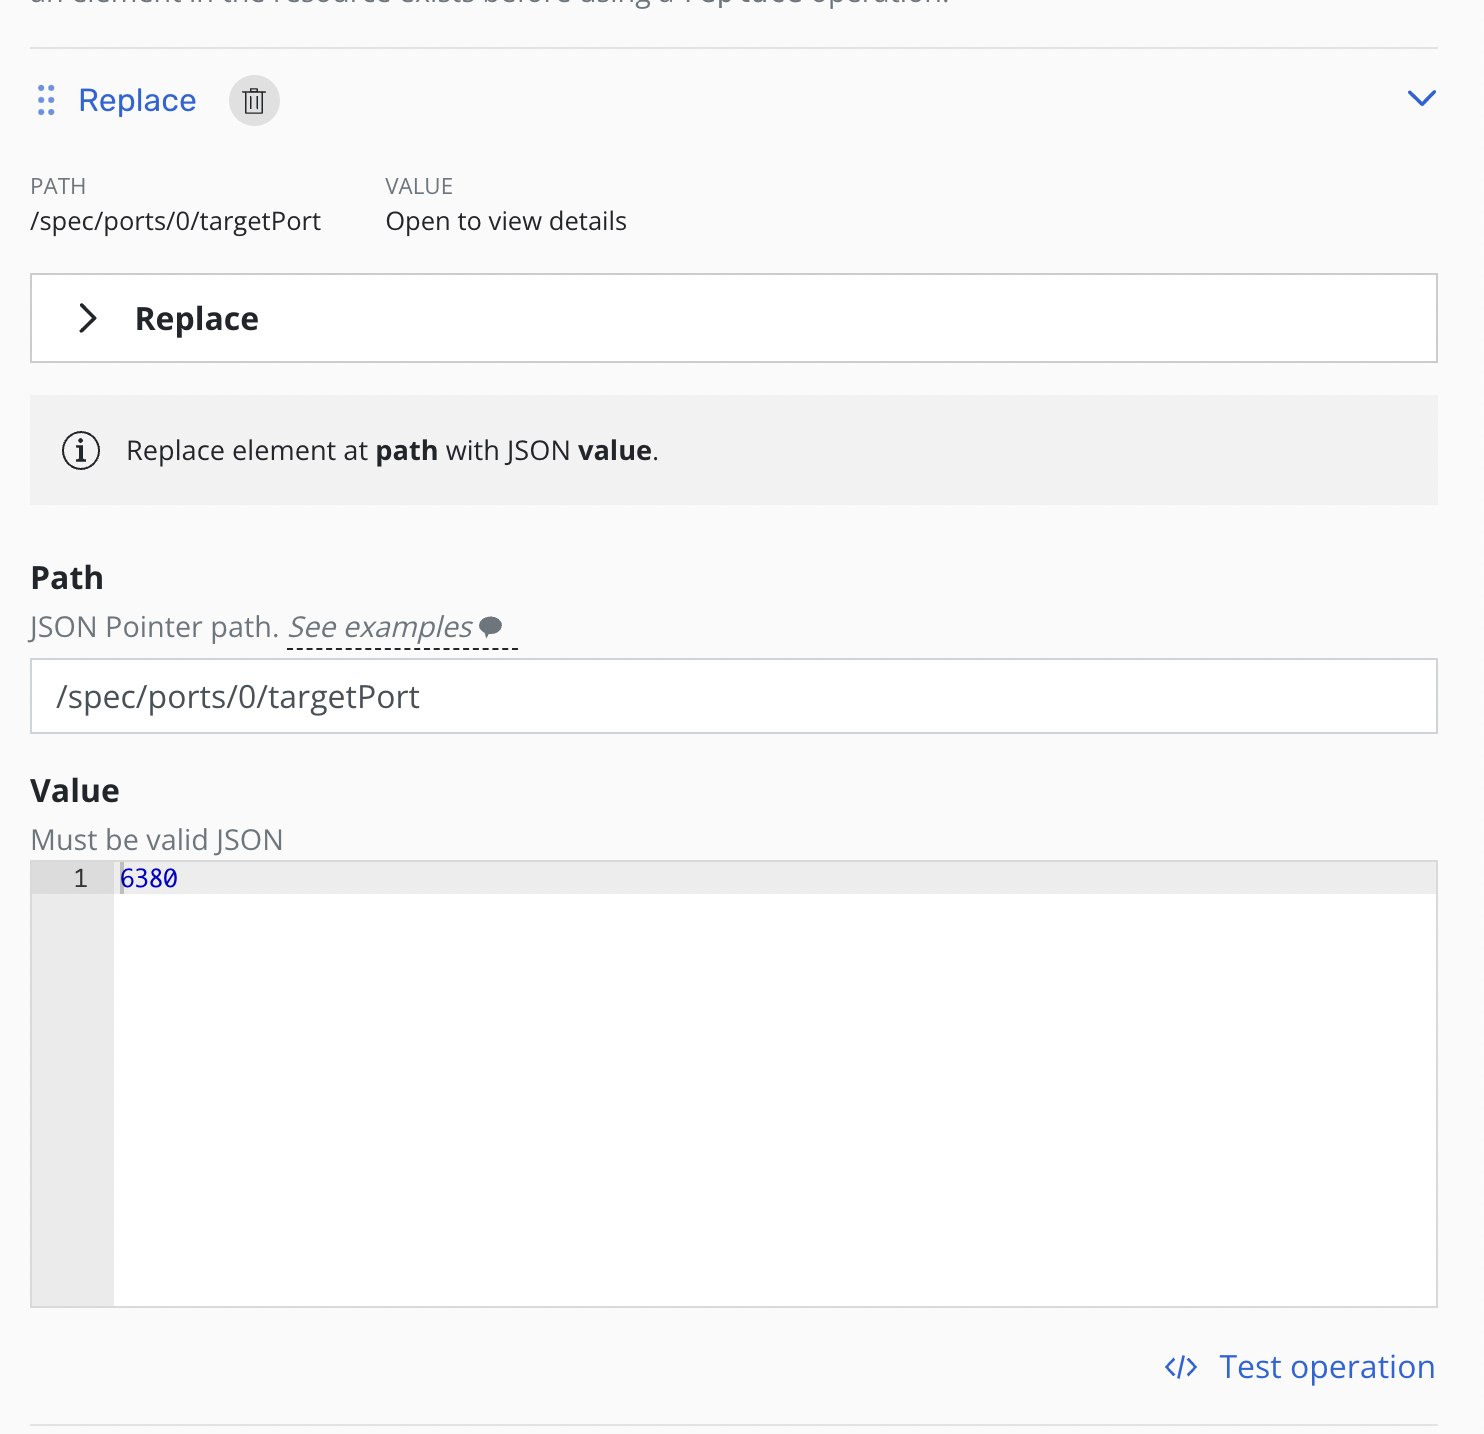
Each operation will have its own panel allowing customization and testing of the selected operation.
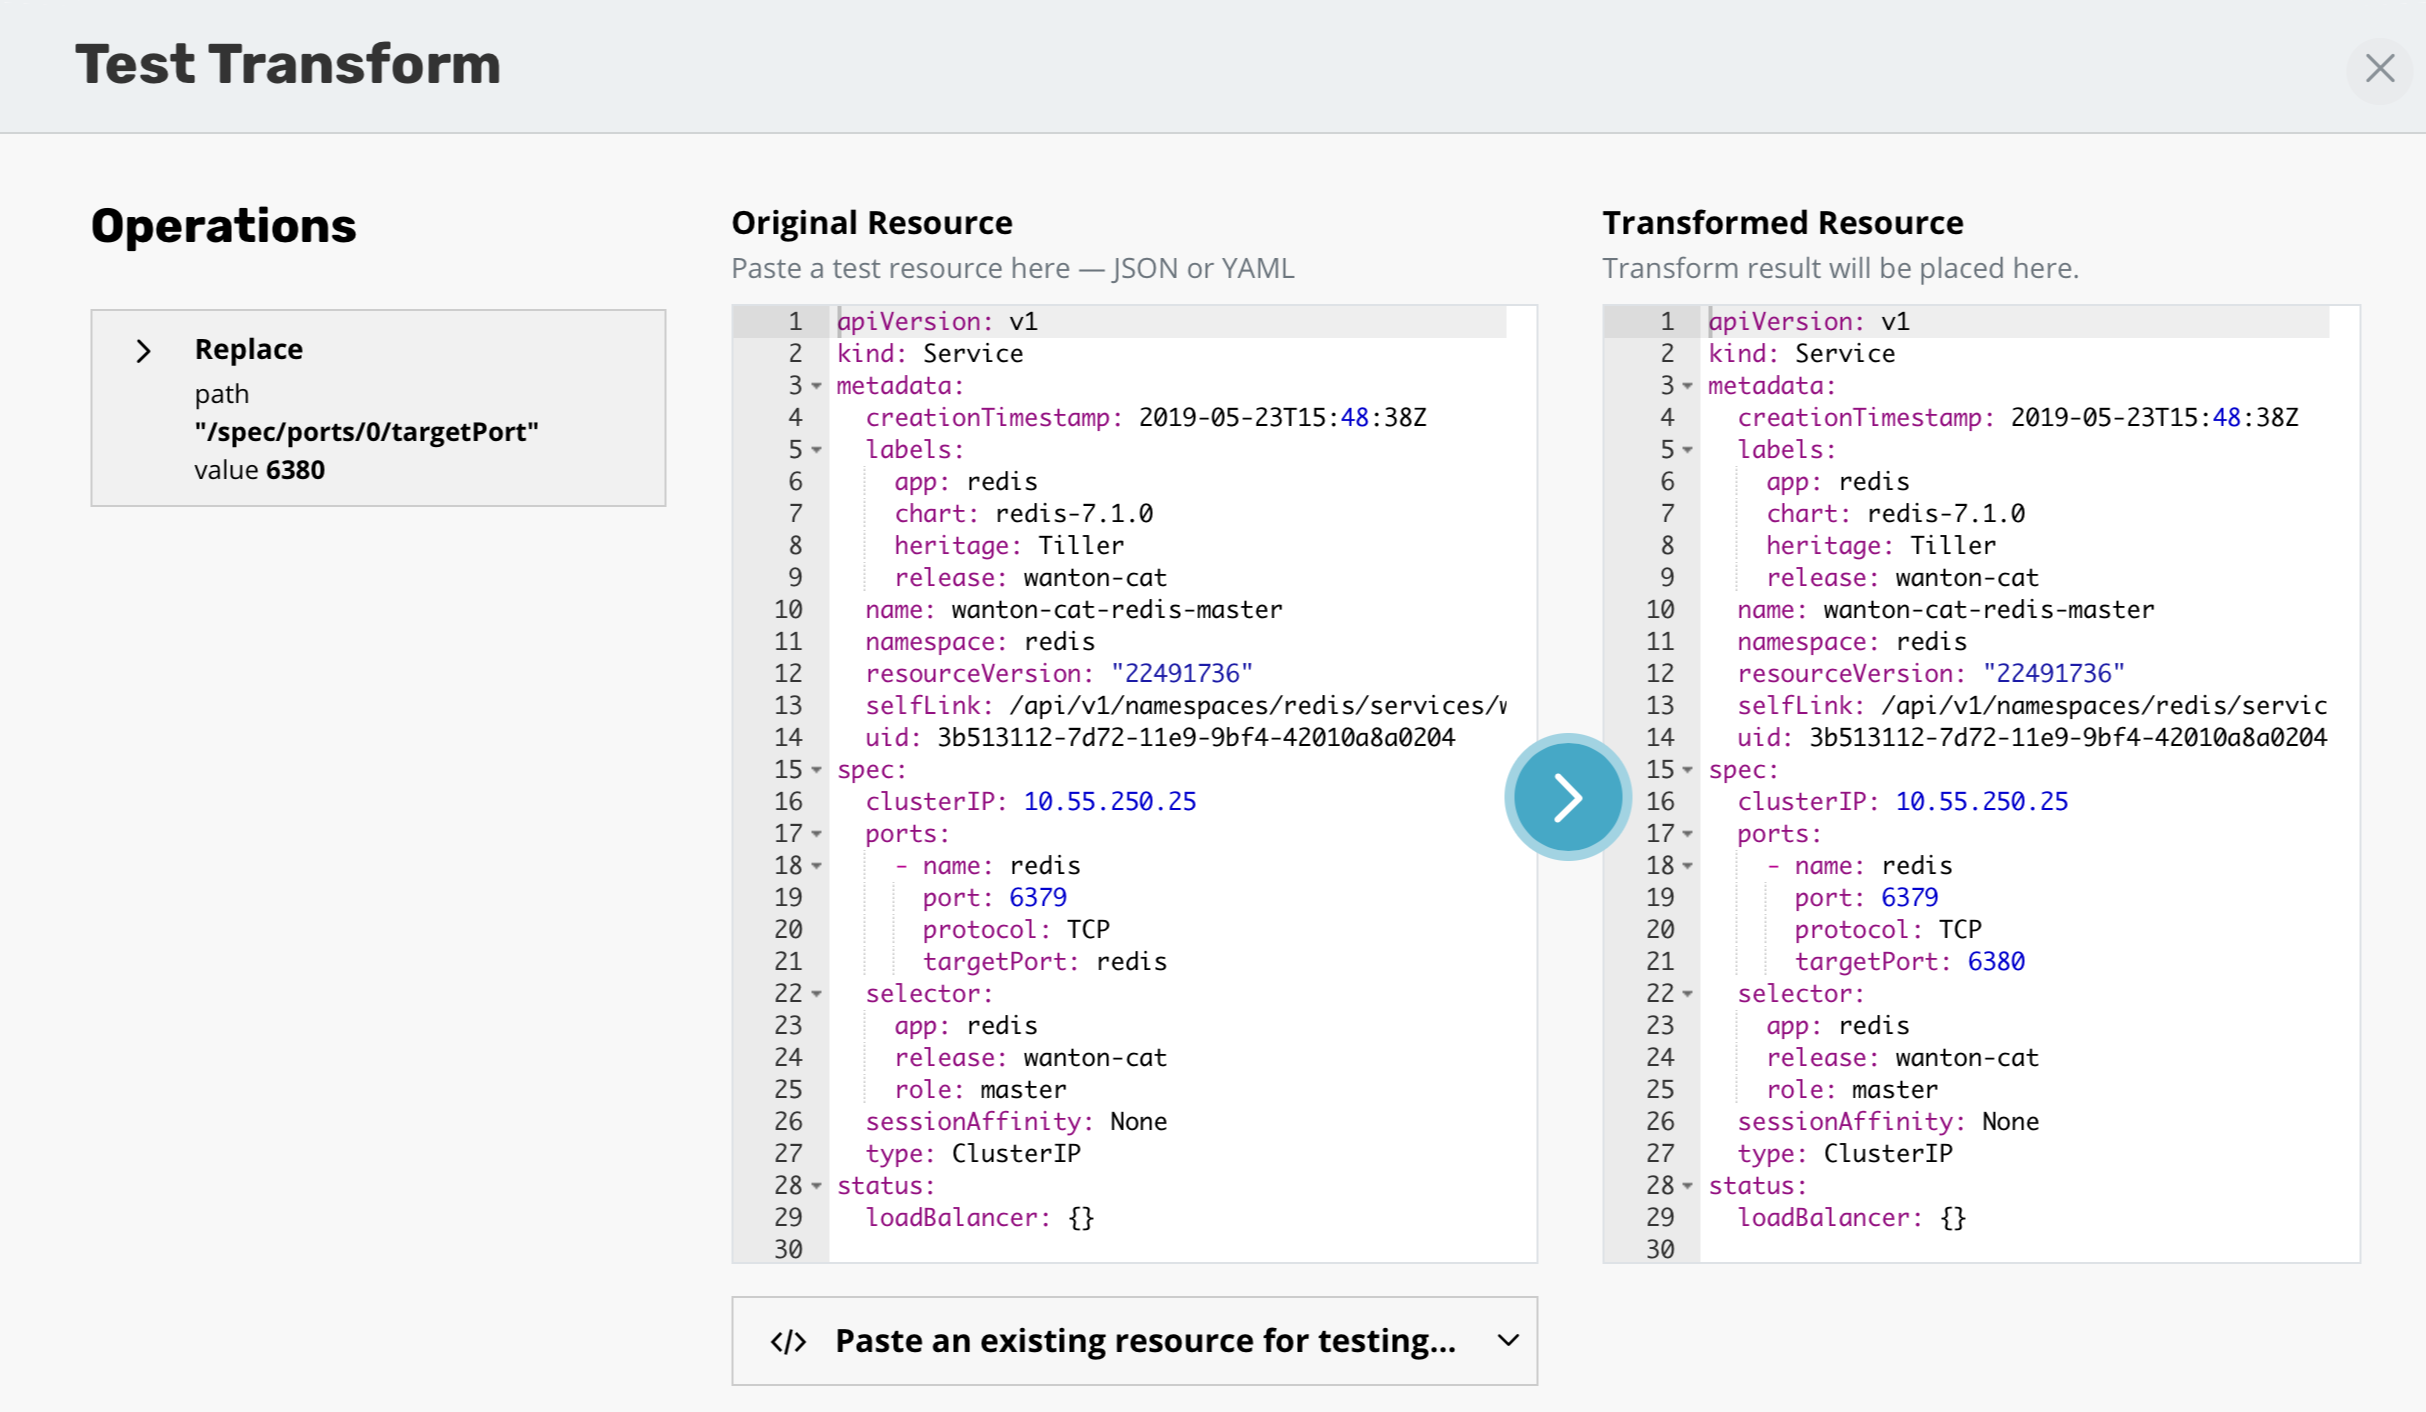
Operations can be tested against any resources to verify the outcome of the operations. The ability to apply transforms will provide flexibility in migration workflows between environments where more than just a like for like recovery is needed.
Extract transforms as transform set to reuse them
To make a transform set from a sequence of transforms already defined
click Extract this list as new transform set.
Type the name of new transform set and, optionally, its description.
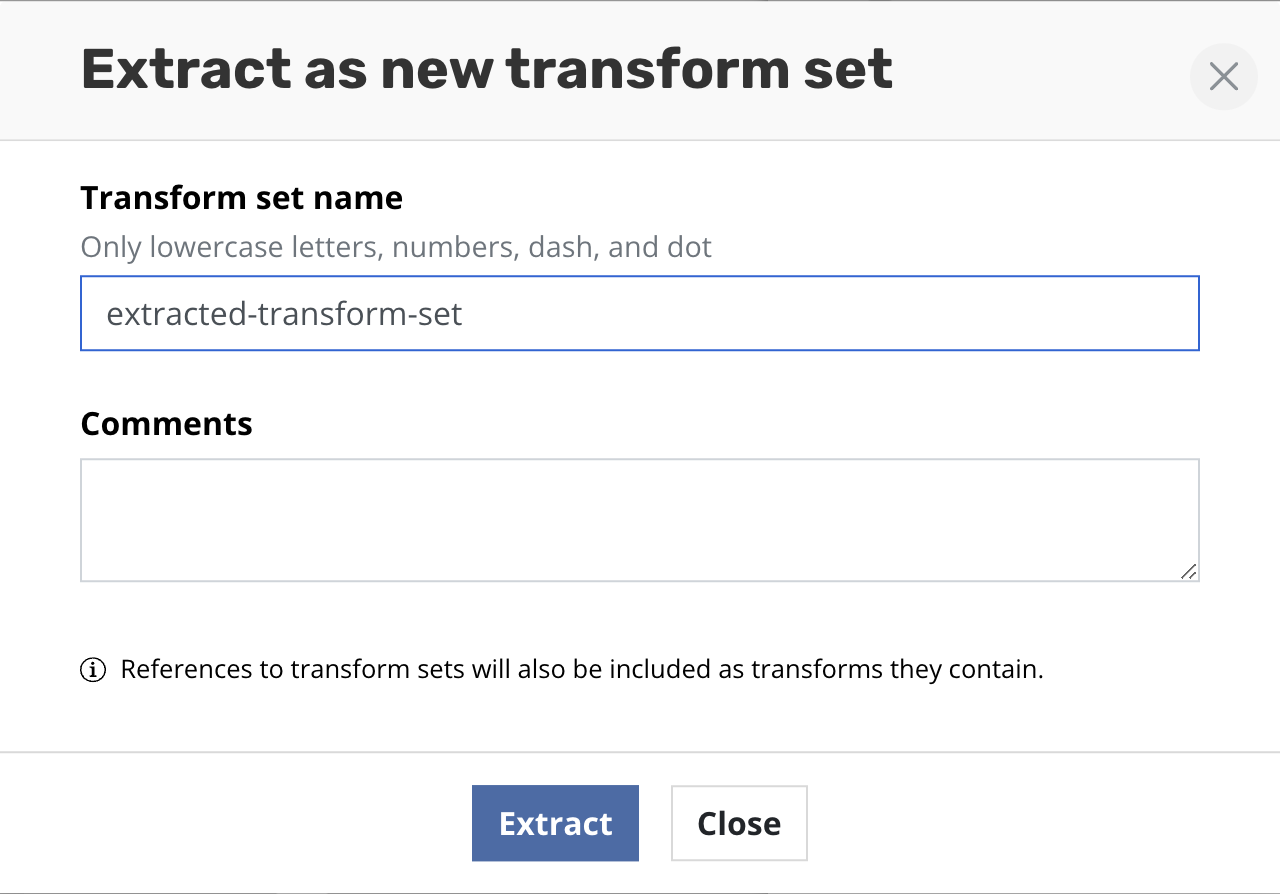
Click Create transform set. After successful creation all transforms
will be replaced with the reference of the created transform set.
Cloning Applications
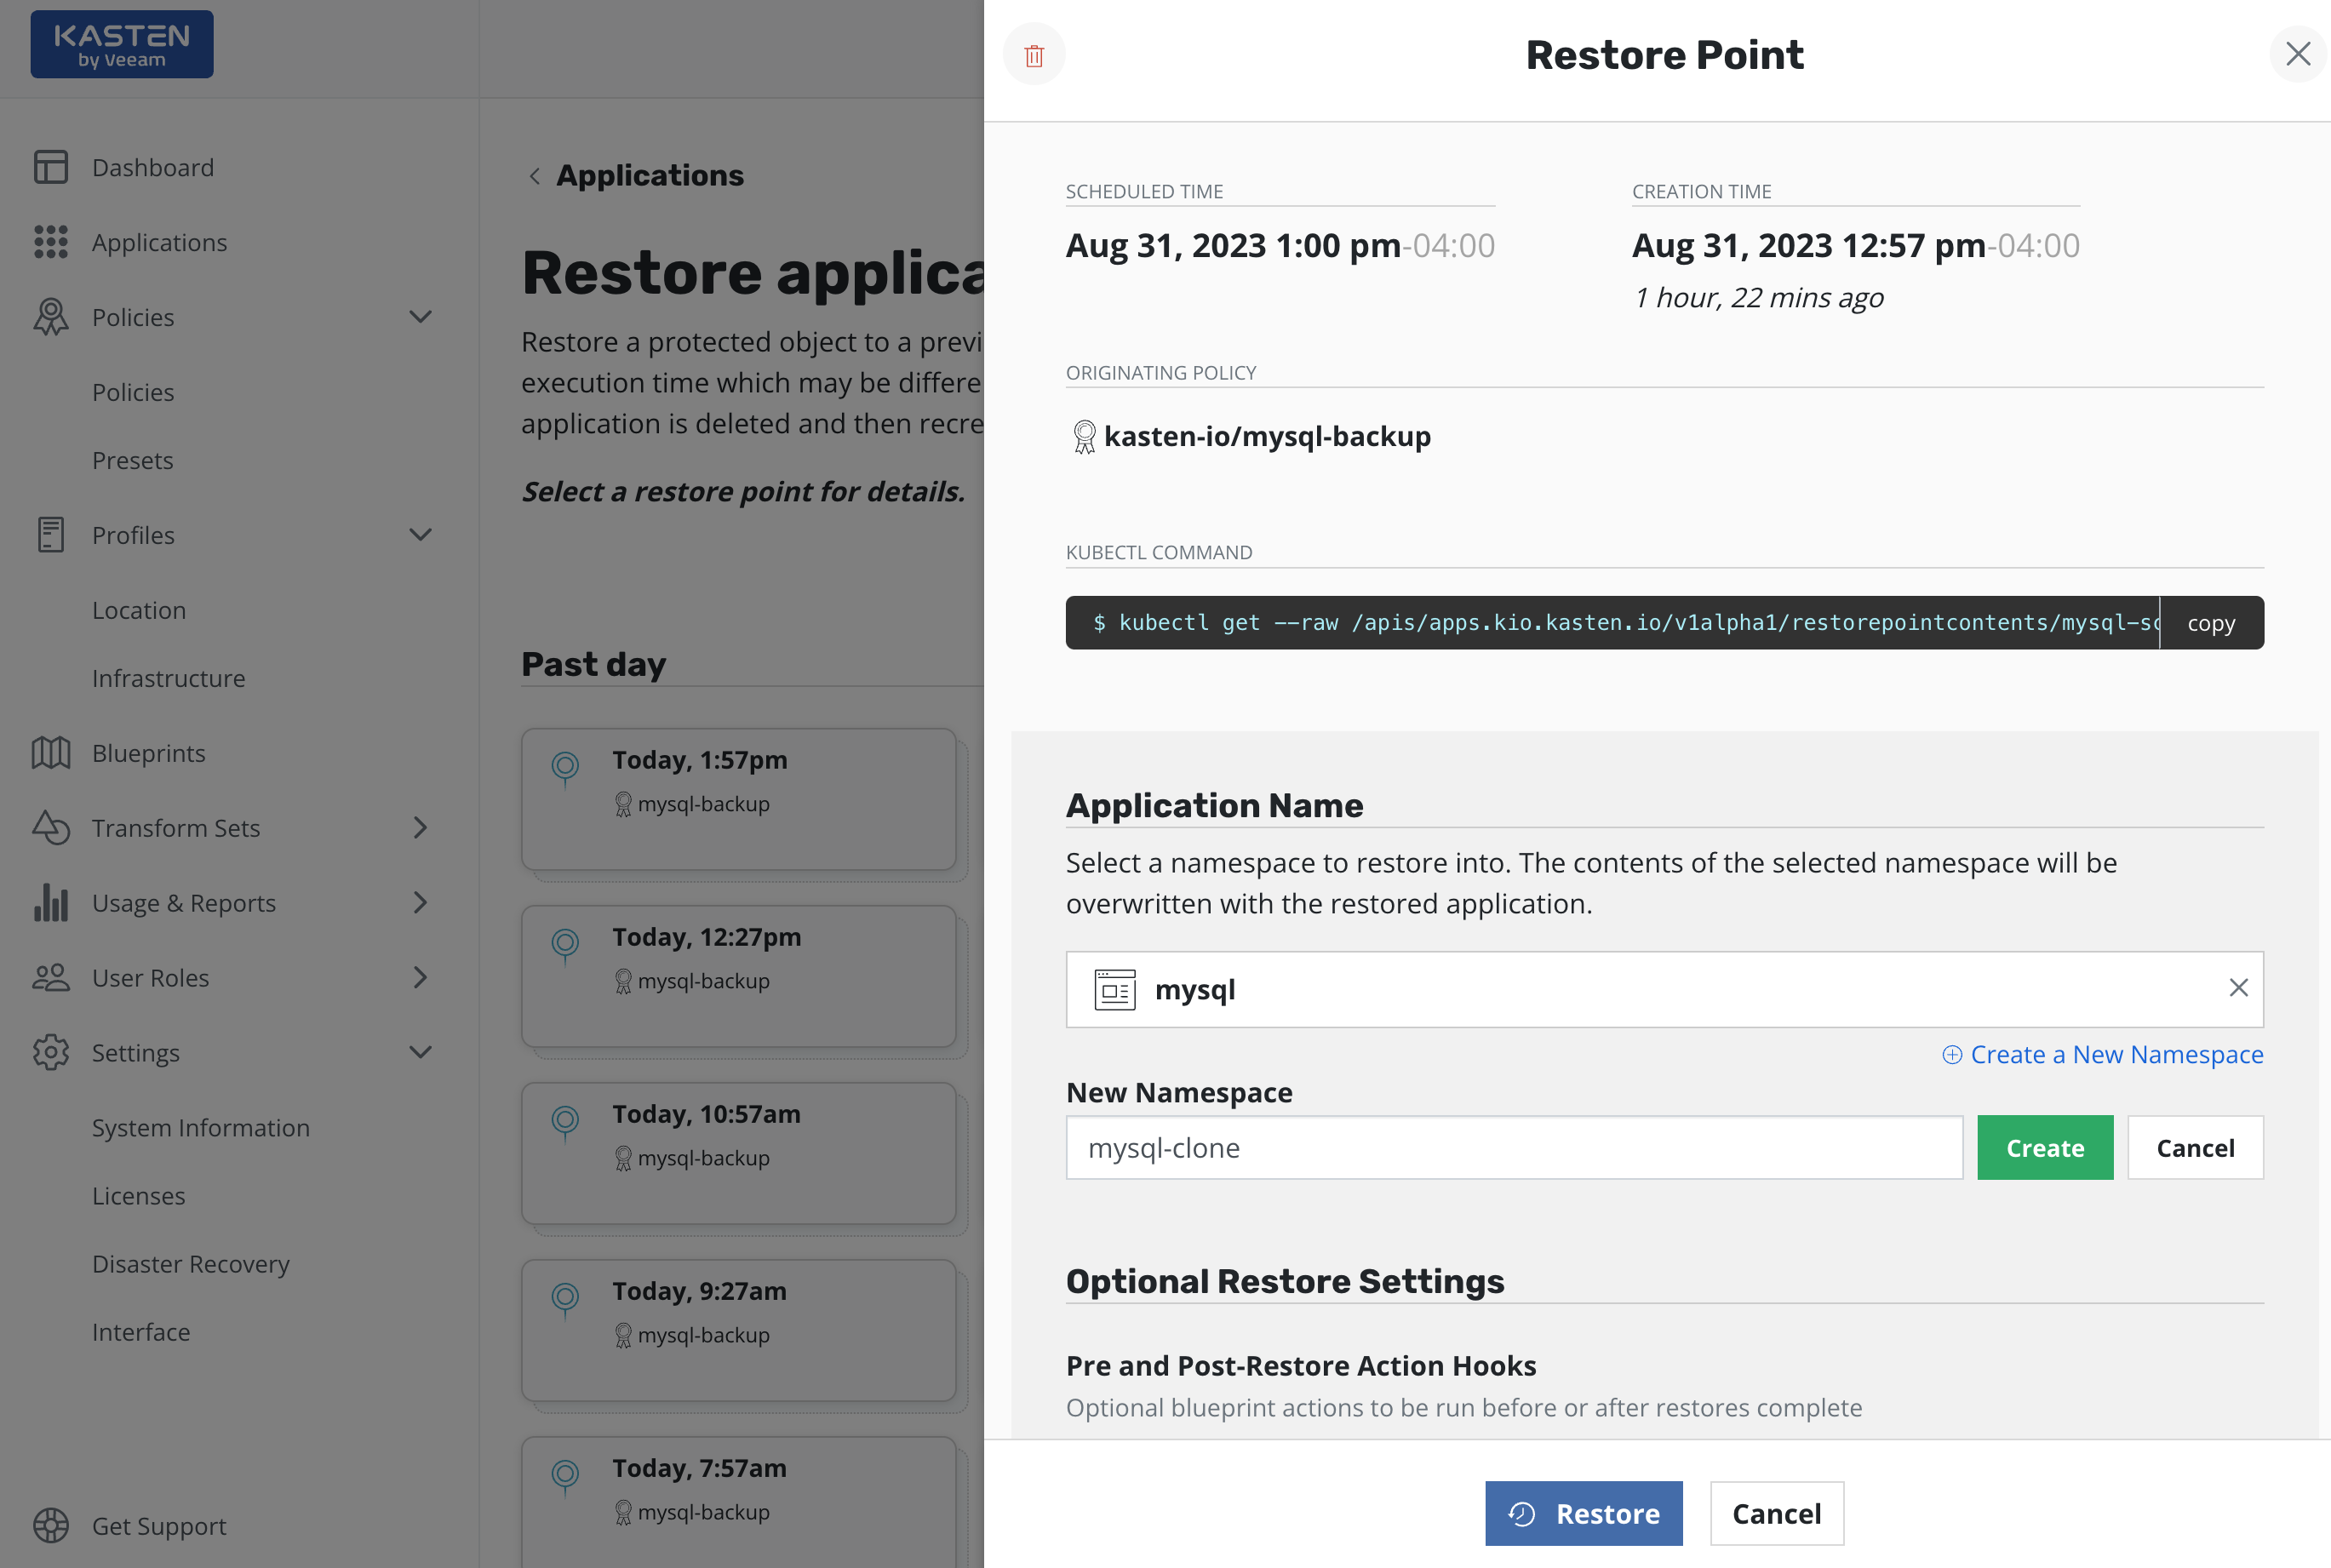
By default, Veeam Kasten restores applications into the original namespace the restore point was created from. However, as the above image shows, the target namespace can be changed and new namespaces can be created at this point. In particular, this functionality can be used to extract only a few files or subset of the originally gathered data with requiring a complete rollback of the primary application. Other use cases include debugging and test/dev purposes or for cloning.
PVC Renames
During restores it is possible to rename PVCs depending on how the workload has been configured. While preparing the restore, transformation(s) targeting the relevant PVC(s) and specifying the new name(s) should be created.
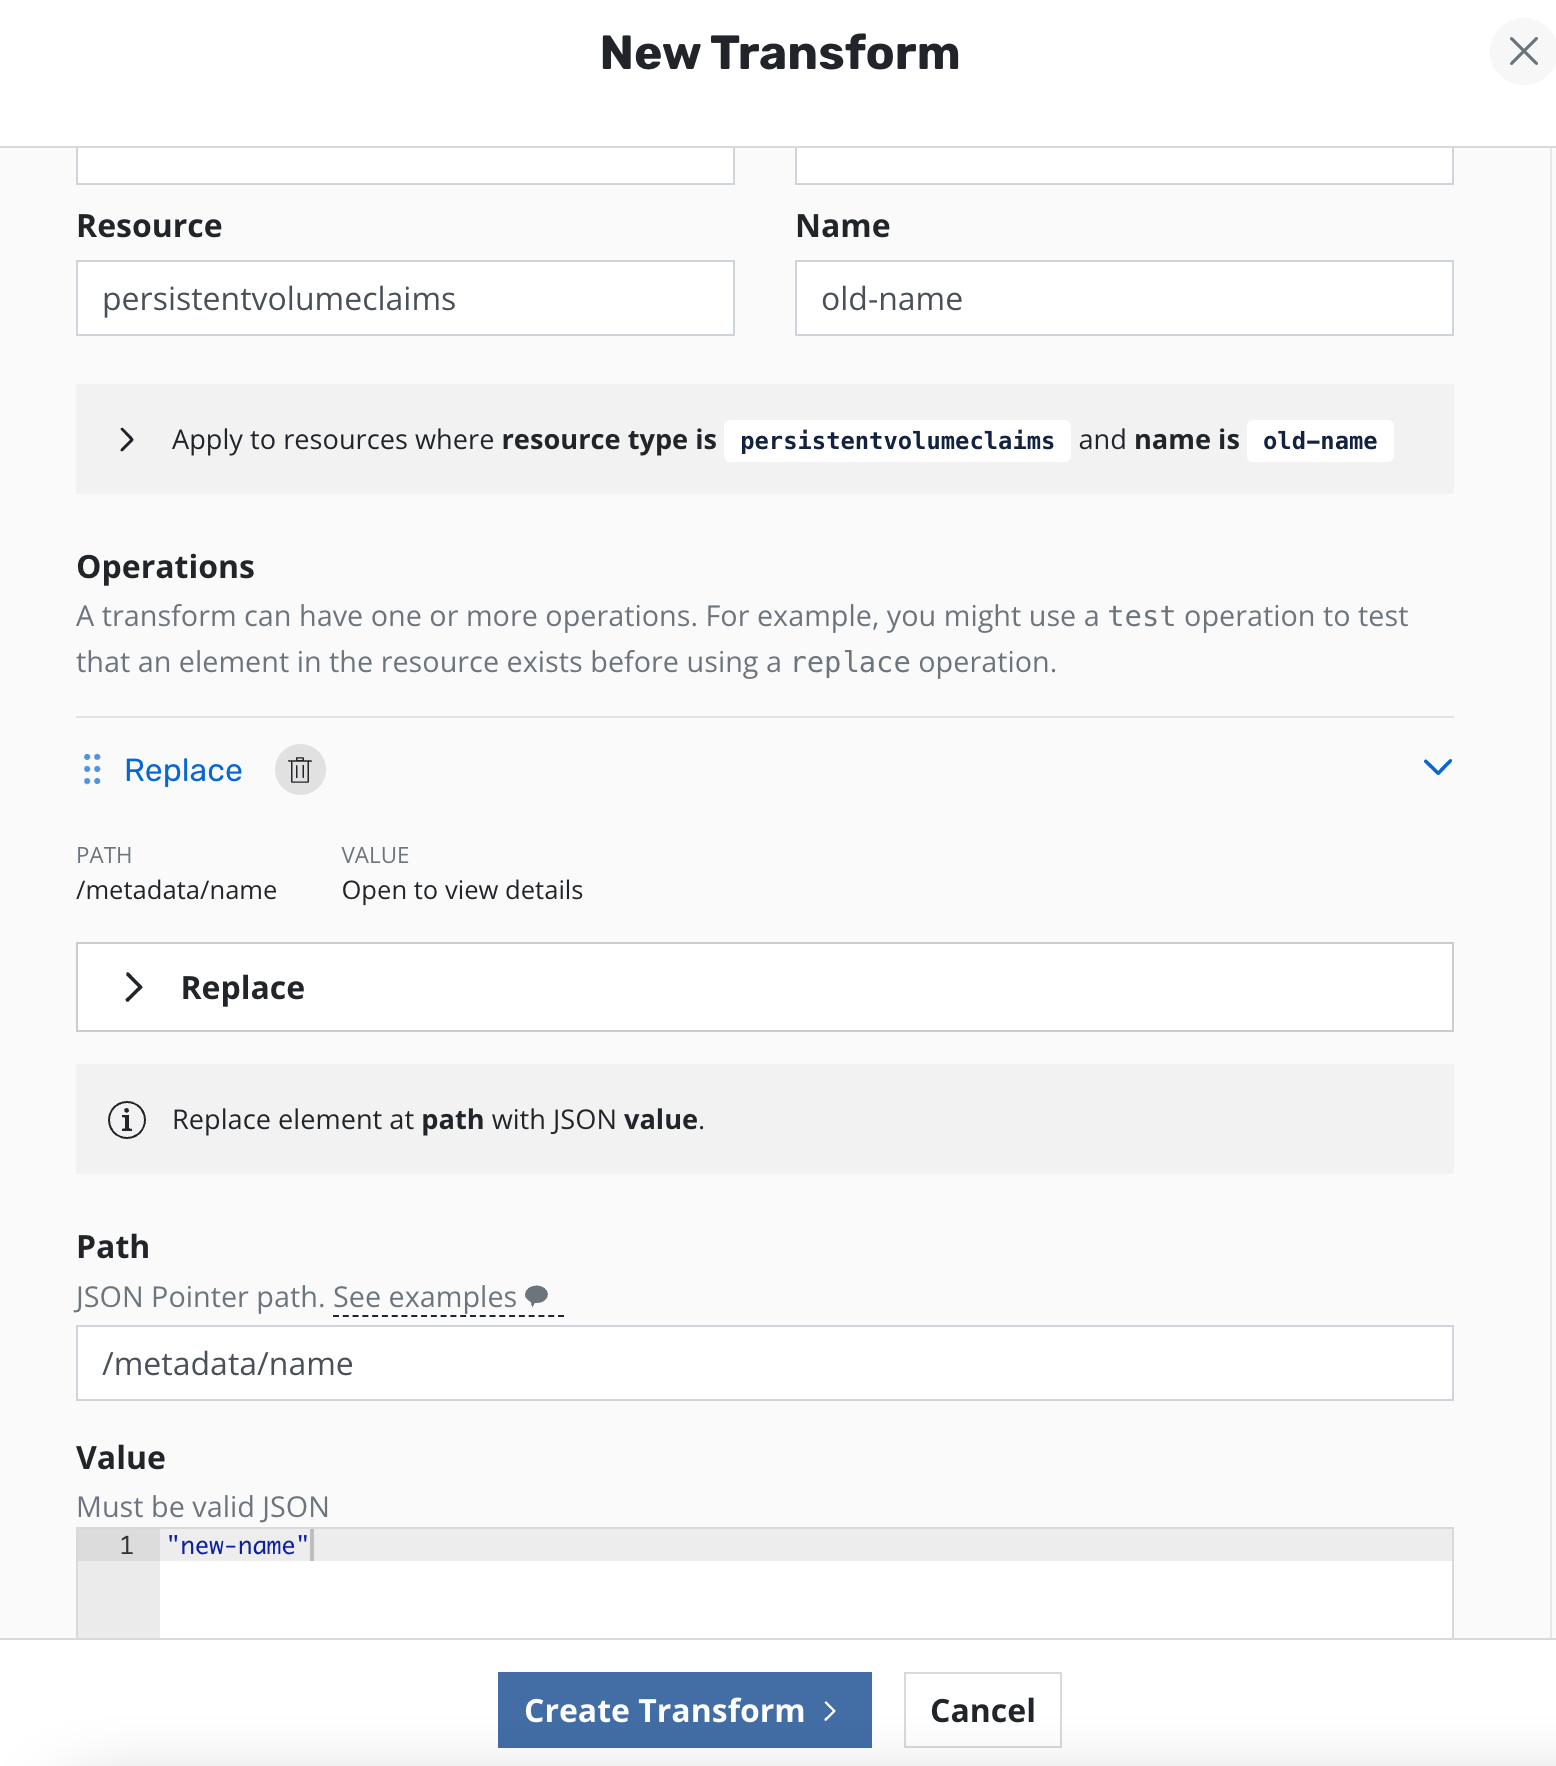
For it to restore successfully to a new PVC, all references to the PVCs
in other resources must also be transformed. For example, in a
deployment that specifies a PVC claim name, this must also be updated
e.g. replacing
/spec/template/spec/volumes/0/persistentVolumeClaim/claimName with
"new-name" in the example above. The same path can also be found in
some StatefulSets and DeploymentConfigs setups and should also be
updated in such cases.
If the StatefulSet makes use of volumeClaimTemplates then PVCs can
partially be renamed by changing
(/spec/volumeClaimTemplates/0/metadata/name) as well as the reference in the volume mounts (e.g. /spec/template/spec/containers/0/volumeMounts/0/name) along with renaming each PVC, assuming the replicas have separate PVCs. It is currently only possible to rename PVCs of a StatefulSet that uses volumeClaimTemplates` into a new namespace.
Renaming PVCs related to VirtualMachines involves renaming the PVCs and
related DataVolumes (to have matching names), as well as transforming
DataVolume references in the VirtualMachine resource. This also includes
transforming the ownerReferences on the PVC(s) to reference the new
DataVolume name. VirtualMachines can only be restored into a new
namespace.
Using an Alternate Location Profile
An exported restore point can be selected to restore an application from a location outside the cluster. By default, it is assumed that the restore point exists at the location it was originally exported to. However, the "Alternate Location Profile" option can be used to select a different location profile to restore from. This can be useful if, for example, restore points have been copied or moved to a different location.