Migrating Applications
Introduction
The ability to move an application across clusters is an extremely powerful feature that enables a variety of use cases including Disaster Recovery (DR), Test/Dev with realistic data sets, and performance testing in isolated environments.
In particular, the Veeam Kasten platform is built to support application migration and mobility in a variety of different and overlapping contexts:
- Cross-Namespace: The entire application stack can be migrated across different namespaces in the same cluster (covered in restoring applications ).
- Cross-Cluster: The application stack is migrated across non-federated Kubernetes clusters.
- Cross-Account: Mobility can additionally be enabled across clusters running in different accounts (e.g., AWS accounts) or projects (e.g., Google Cloud projects).
- Cross-Region: Mobility can further be enabled across different regions of the same cloud provider (e.g., US-East to US-West).
- Cross-Cloud: Finally, mobility can be enabled across different cloud providers (e.g., AWS to Azure).
Mobility Configuration
Some additional infrastructure configuration is needed before migration between two clusters can be enabled.
- Required: Object storage or NFS/SMB file storage configuration
- Use-Case Specific: Cross-account and Kanister configuration
External Storage Configuration
For two clusters to share data, each Veeam Kasten instance needs access to the object storage location, NFS/SMB file storage location, or Veeam Backup & Replication repository used to store the application restore point data to be migrated between clusters.
For legacy Kasten policies that export volume data to a Veeam repository and export application metadata to a separate Kasten repository, the destination cluster requires read access to both locations.
Cross-Cloud Configuration
When migrating applications across different cloud providers, including hybrid environments, Veeam Kasten should have support for storage system snapshots on the originating side.
Orchestrated Application Failover
Moving applications across clusters can be used for performing production failovers. More info about preparing an application to cross-cloud failover can be found here.
Cloud-Provider Configuration
The following per-cloud provider configuration is required when cross-account/project/subscription migration within the same cloud-provider is needed.
AWS
To use IAM roles, there are two options: first, if Veeam Kasten was
installed with an IAM role, that can be used by selecting the
Authenticate With AWS IAM Role option. Alternatively, if an IAM role
needs to be specified at profile creation time, the
Execute Operations Using an AWS IAM Role option should be selected. As
a result, Veeam Kasten will generate and use temporary security
credentials for executing operations.
If cross-account and/or cross-region volume migration is desired, select
the Advanced Export Settings option while creating or editing the
location policy for entering additional destination information:
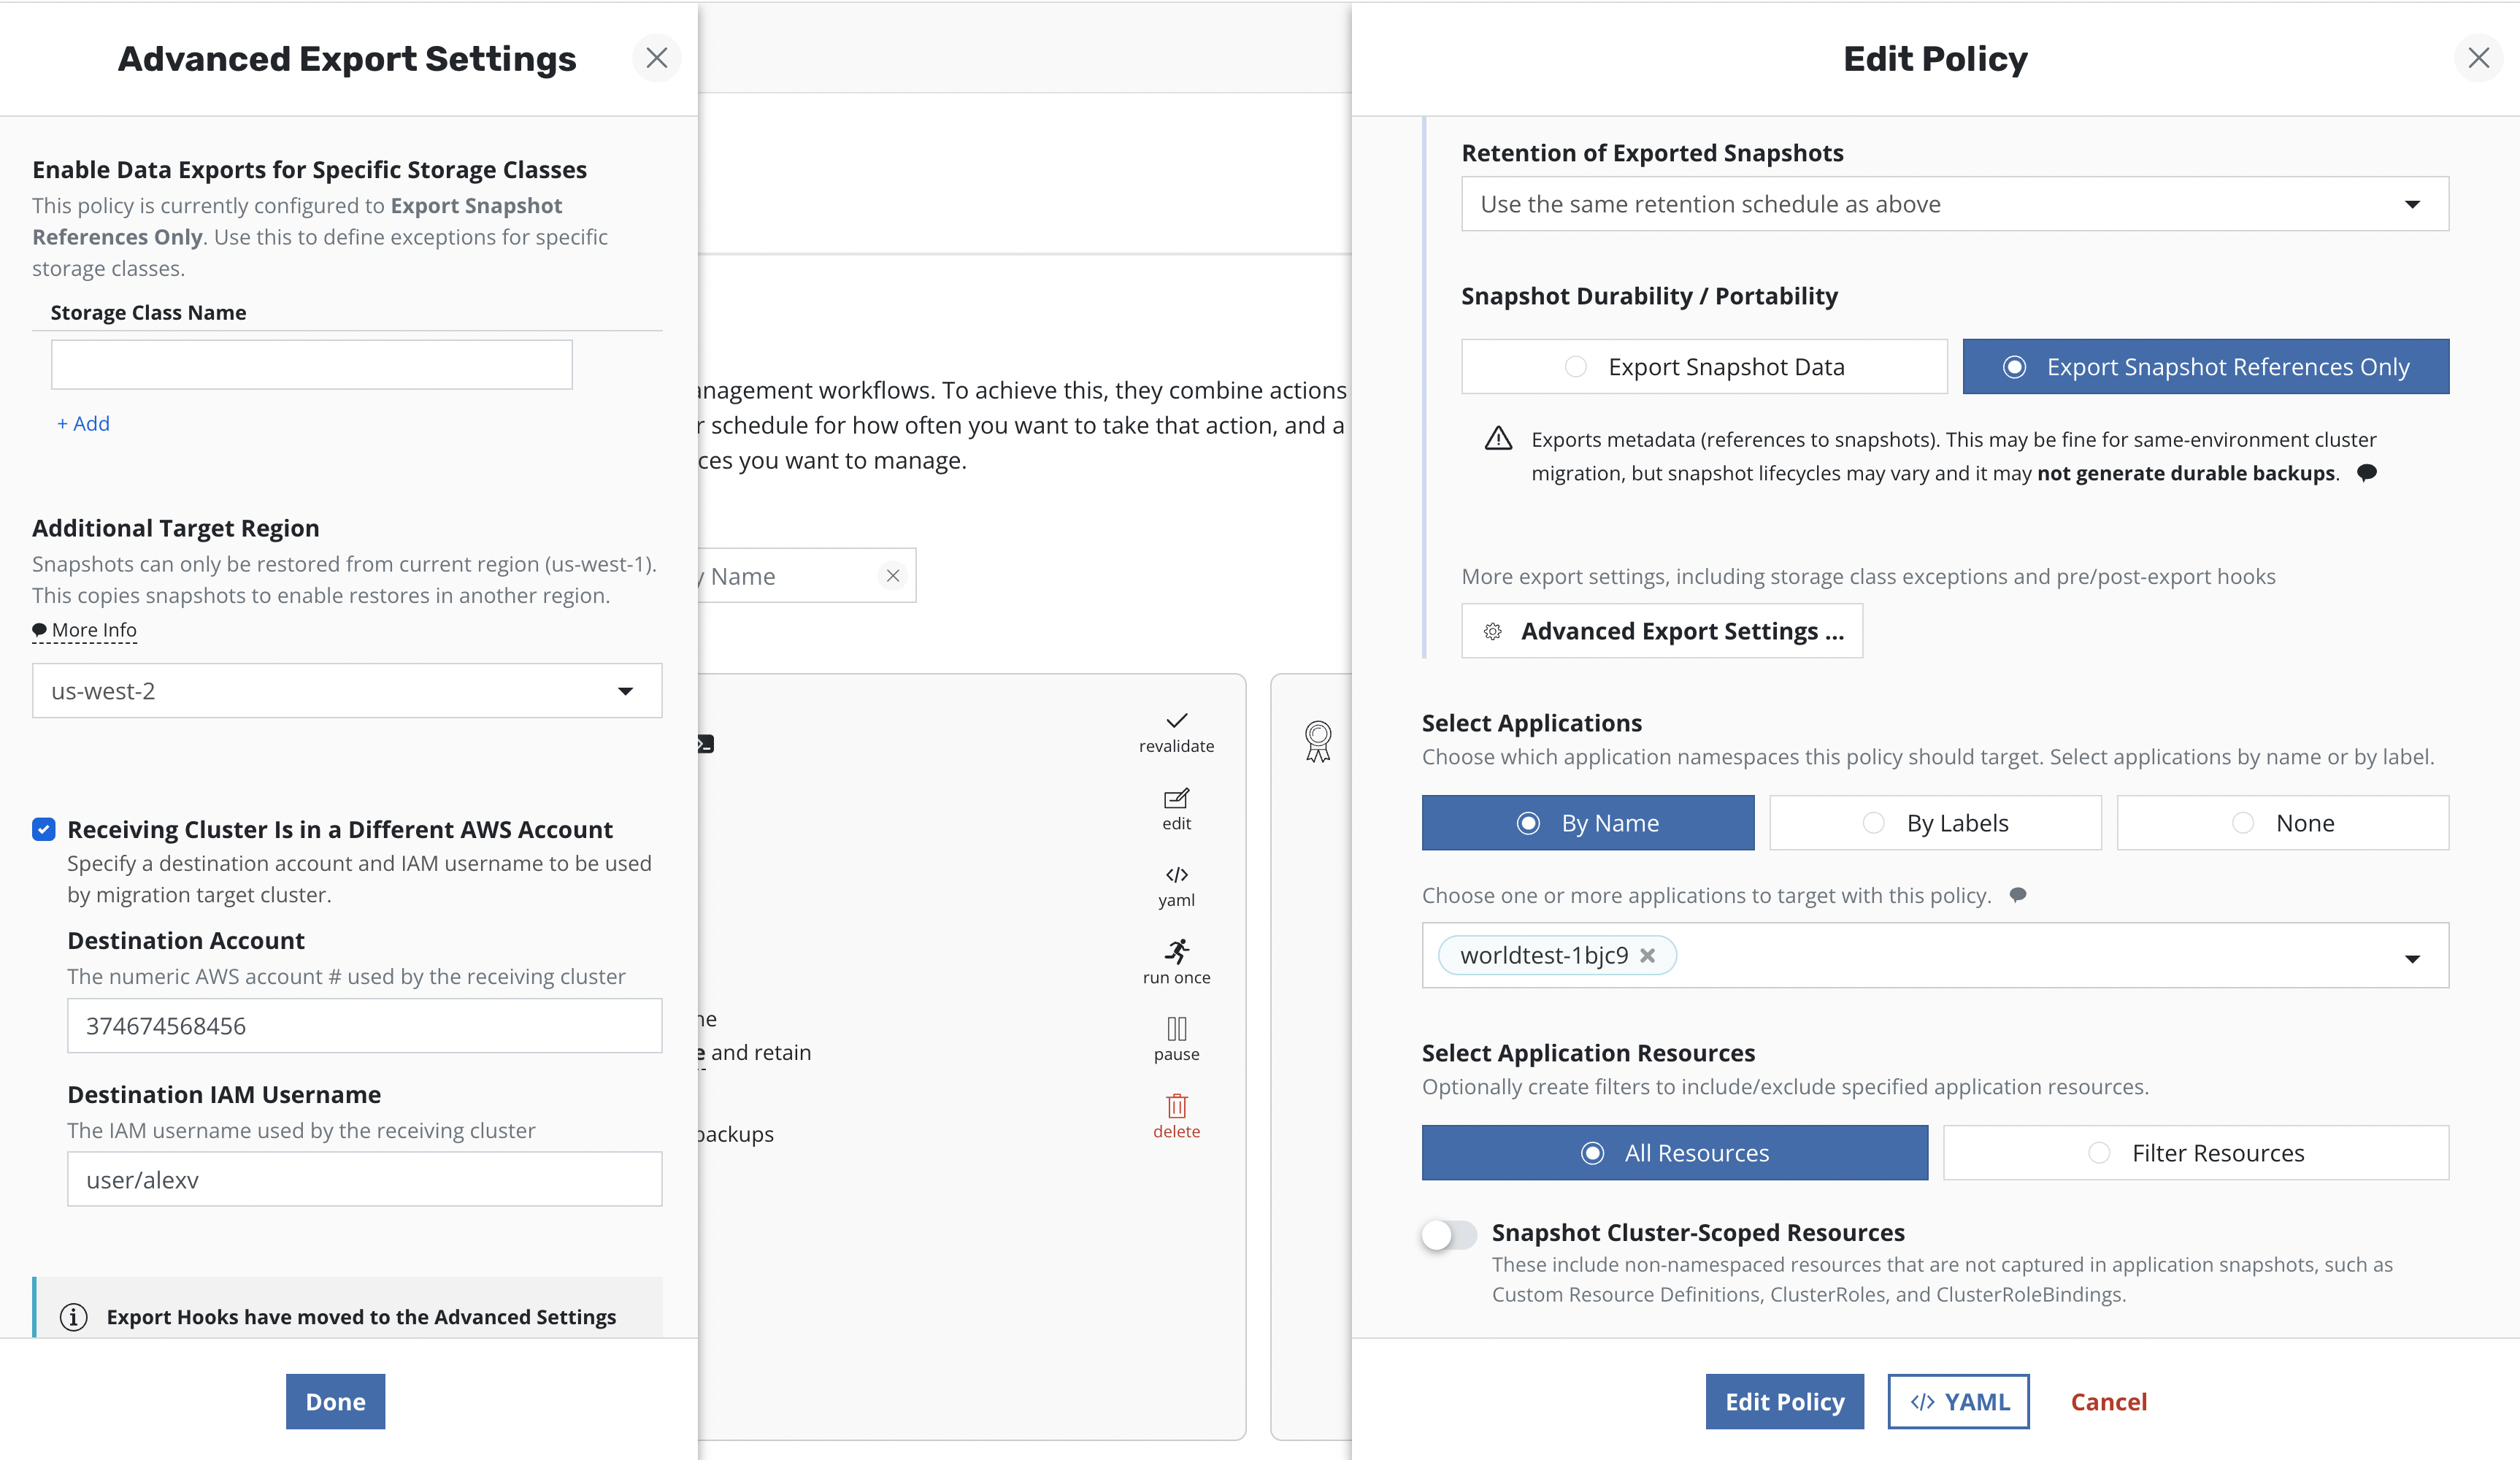
In an AWS environment, if the destination cluster is in a different region, specify the destination region here, and Veeam Kasten will make a cross-region copy of the underlying EBS snapshots.
If a different target account at the destination is desired, specify it
here. Veeam Kasten needs an IAM user created within the destination
account (e.g., k10migrate). The destination AWS account
ID
is also needed. During the creation of the export policy, the username
should be specified as <AWS Account ID>/<User Name>
Both the native provider and the CSI provider are supported.
Google Cloud
Currently, due to underlying provider limitations, optimized migration is only supported among different clusters in the same project. For migration across clusters running within different accounts, please follow the documentation for cross-cloud migration.
Both the native provider and the CSI provider are supported.
Microsoft Azure
In an Azure environment, a destination region that is different from source can be specified in the export policy in the same way as mentioned for AWS above for a cross-region copy of the underlying snapshots.
A destination resource group may also be specified. This is particularly useful when migrating CSI provisioned volumes.
All the objects created for an AKS cluster belong to a resource group created specifically for it. When a CSI driver takes snapshots, these also belong to this resource group. In order for other clusters to use these snapshots, their service principals must have the [Disk Snapshot Contributor] role on that resource group.
az role assignment create --assignee <service principal ID> --role 'Disk Snapshot Contributor' --resource-group <resource group>
Optimized migration across different Azure subscriptions will be available in the near future. If migration across clusters running within different subscriptions is needed, please follow the documentation for cross-cloud migration for the current release.
Both the native provider and the CSI provider are supported.
Exporting Applications
Policy-Based Exports
The workflow for exporting applications into another cluster is very
similar to the workflow followed for protecting applications
. When a policy is created to
capture an application, simply also select the
Enable Backups via Snapshot Exports option shown above.
If selected, one ExportAction is created for each BackupAction when the export schedule is triggered. Once all the ExportActions finish for that scheduled time, the metadata is uploaded to the location specified by the Profile. After this is uploaded, these backups are available for import.
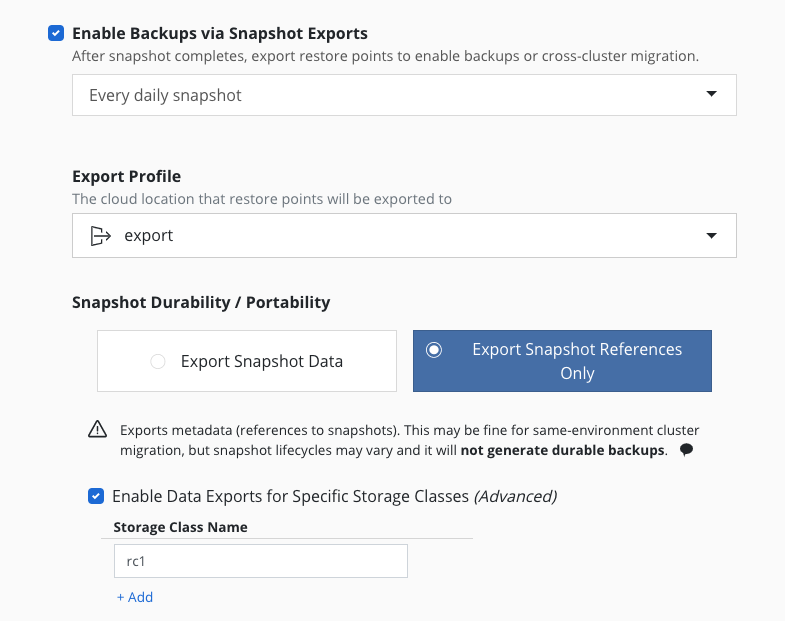
The Export Snapshot Data option stores the exported data and metadata
to the store configured above, but the Export Snapshot References Only
option stores only metadata about the application restore points. Below
these options, the Advanced Export Settings button opens up additional
options for specifying storage classes that override the Snapshot Data
or Snapshot References Only setting.
For example, if there is a cluster where multiple storage providers are
in use, and all of the storage classes in this cluster can be exported
by reference, then the Export Snapshot References Only option is all
that is needed; but if one of the storage classes in this cluster is
only visible inside the cluster (e.g., a Rook Ceph setup with a
StorageClass named rc1), the Export Snapshot References Only option
can still be used, but that one particular StorageClass (rc1) needs to
be listed as an exception to the portability setting, because its data
needs to be exported. The image above shows the settings for this
example.
If migration is desired across Kubernetes clusters in different clouds
or between on-premises and public cloud environments, you need to enable
the Export Snapshot Data option in order to migrate both the
application data and metadata. Without it, the application data will not
be exported and the subsequent import will fail.
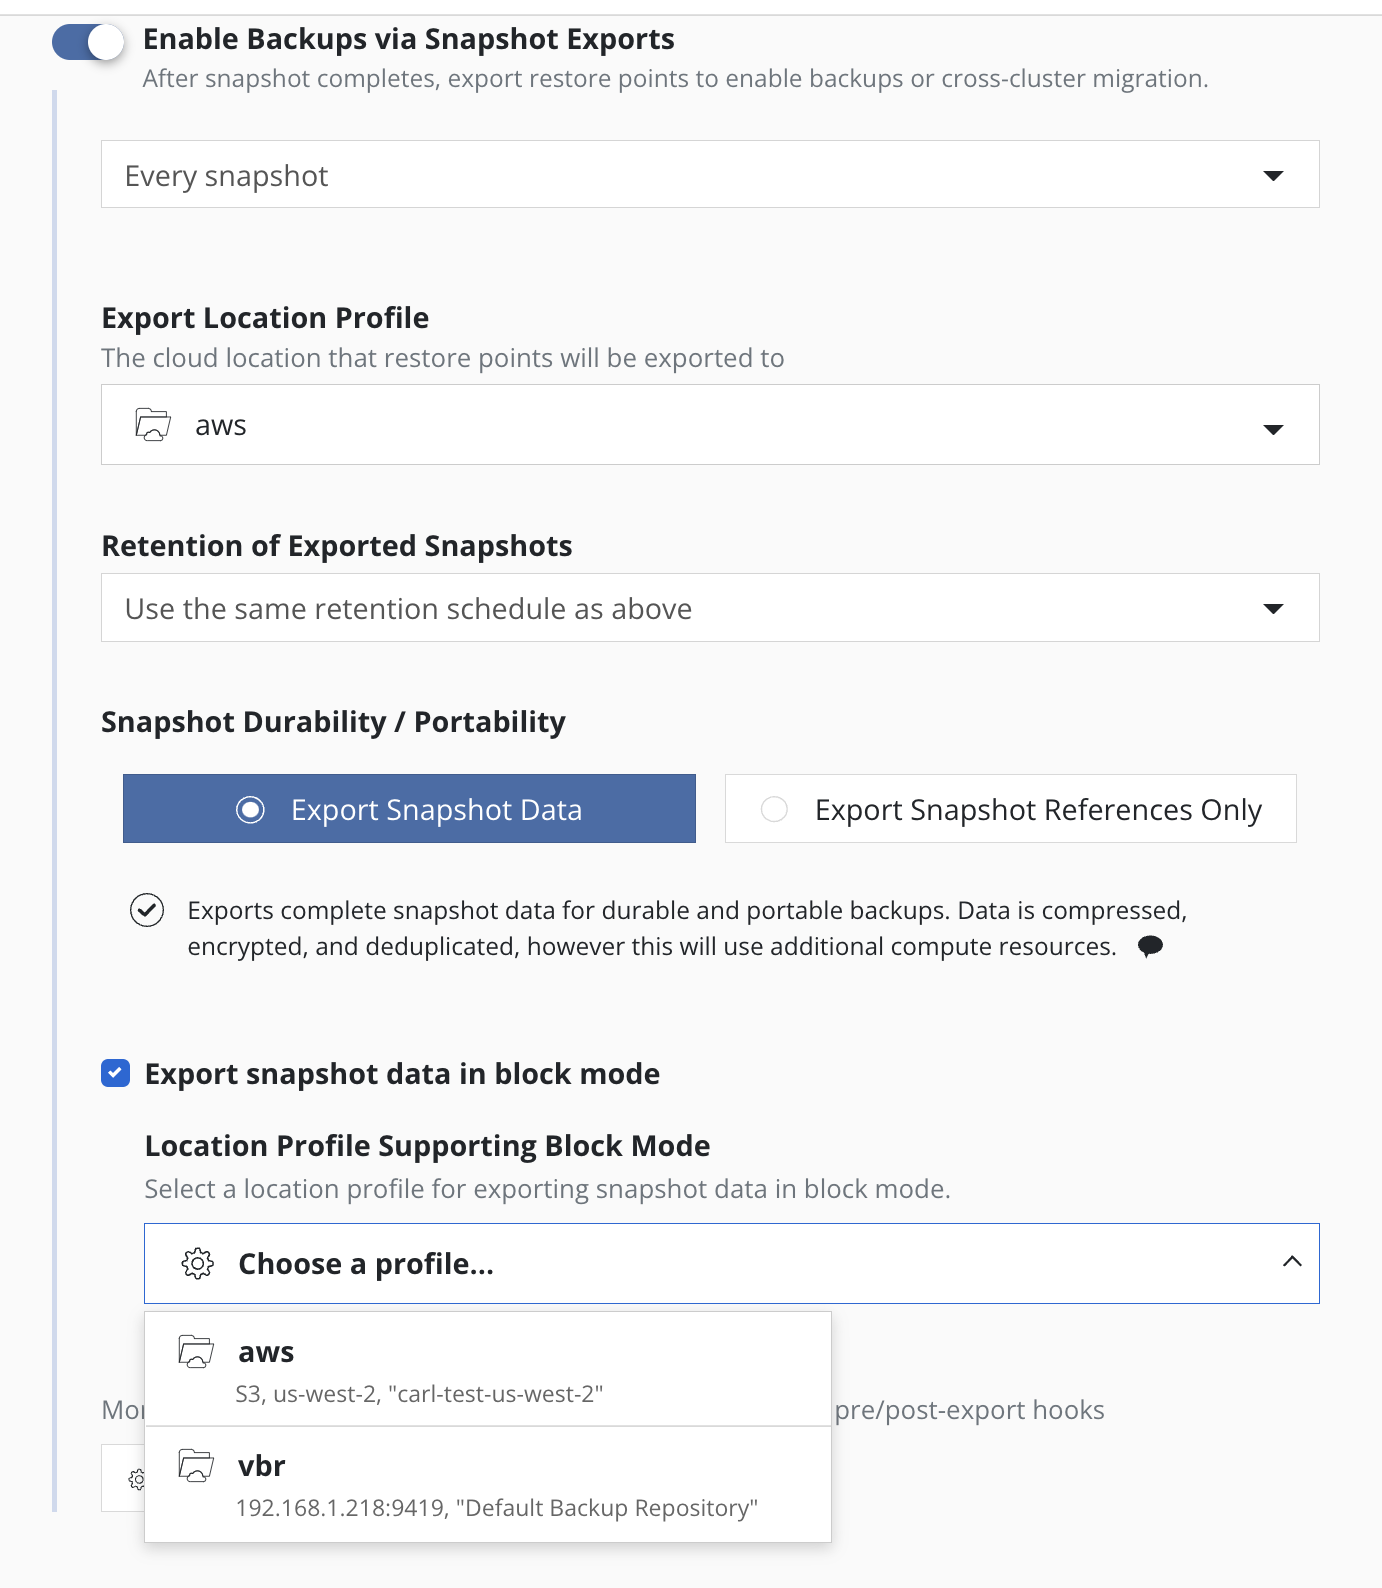
When Export Snapshot Data is selected then the Export Location
Profile specifies a Location Profile where the exported data and metadata will be stored. This
profile contains the location of an object storage bucket (e.g., using
AWS S3, Google Cloud Storage, Azure blob, or any other S3-compliant
object store) or an NFS/SMB file storage location to export the needed data.
The default is to export snapshot data to this location in
filesystem mode,
but with some cluster infrastructures snapshot data can alternatively be
exported in block mode, by enabling the Export snapshot data in block mode option
and selecting an appropriate destination location profile from the
Location Profile Supporting Block Mode list.
Within Advanced Export Settings, additional options become available
when the source and destination clusters are in different regions of a
public cloud provider that supports cross-region snapshot copies (e.g.,
AWS and Azure). Follow the instructions
here to enter the
destination information.
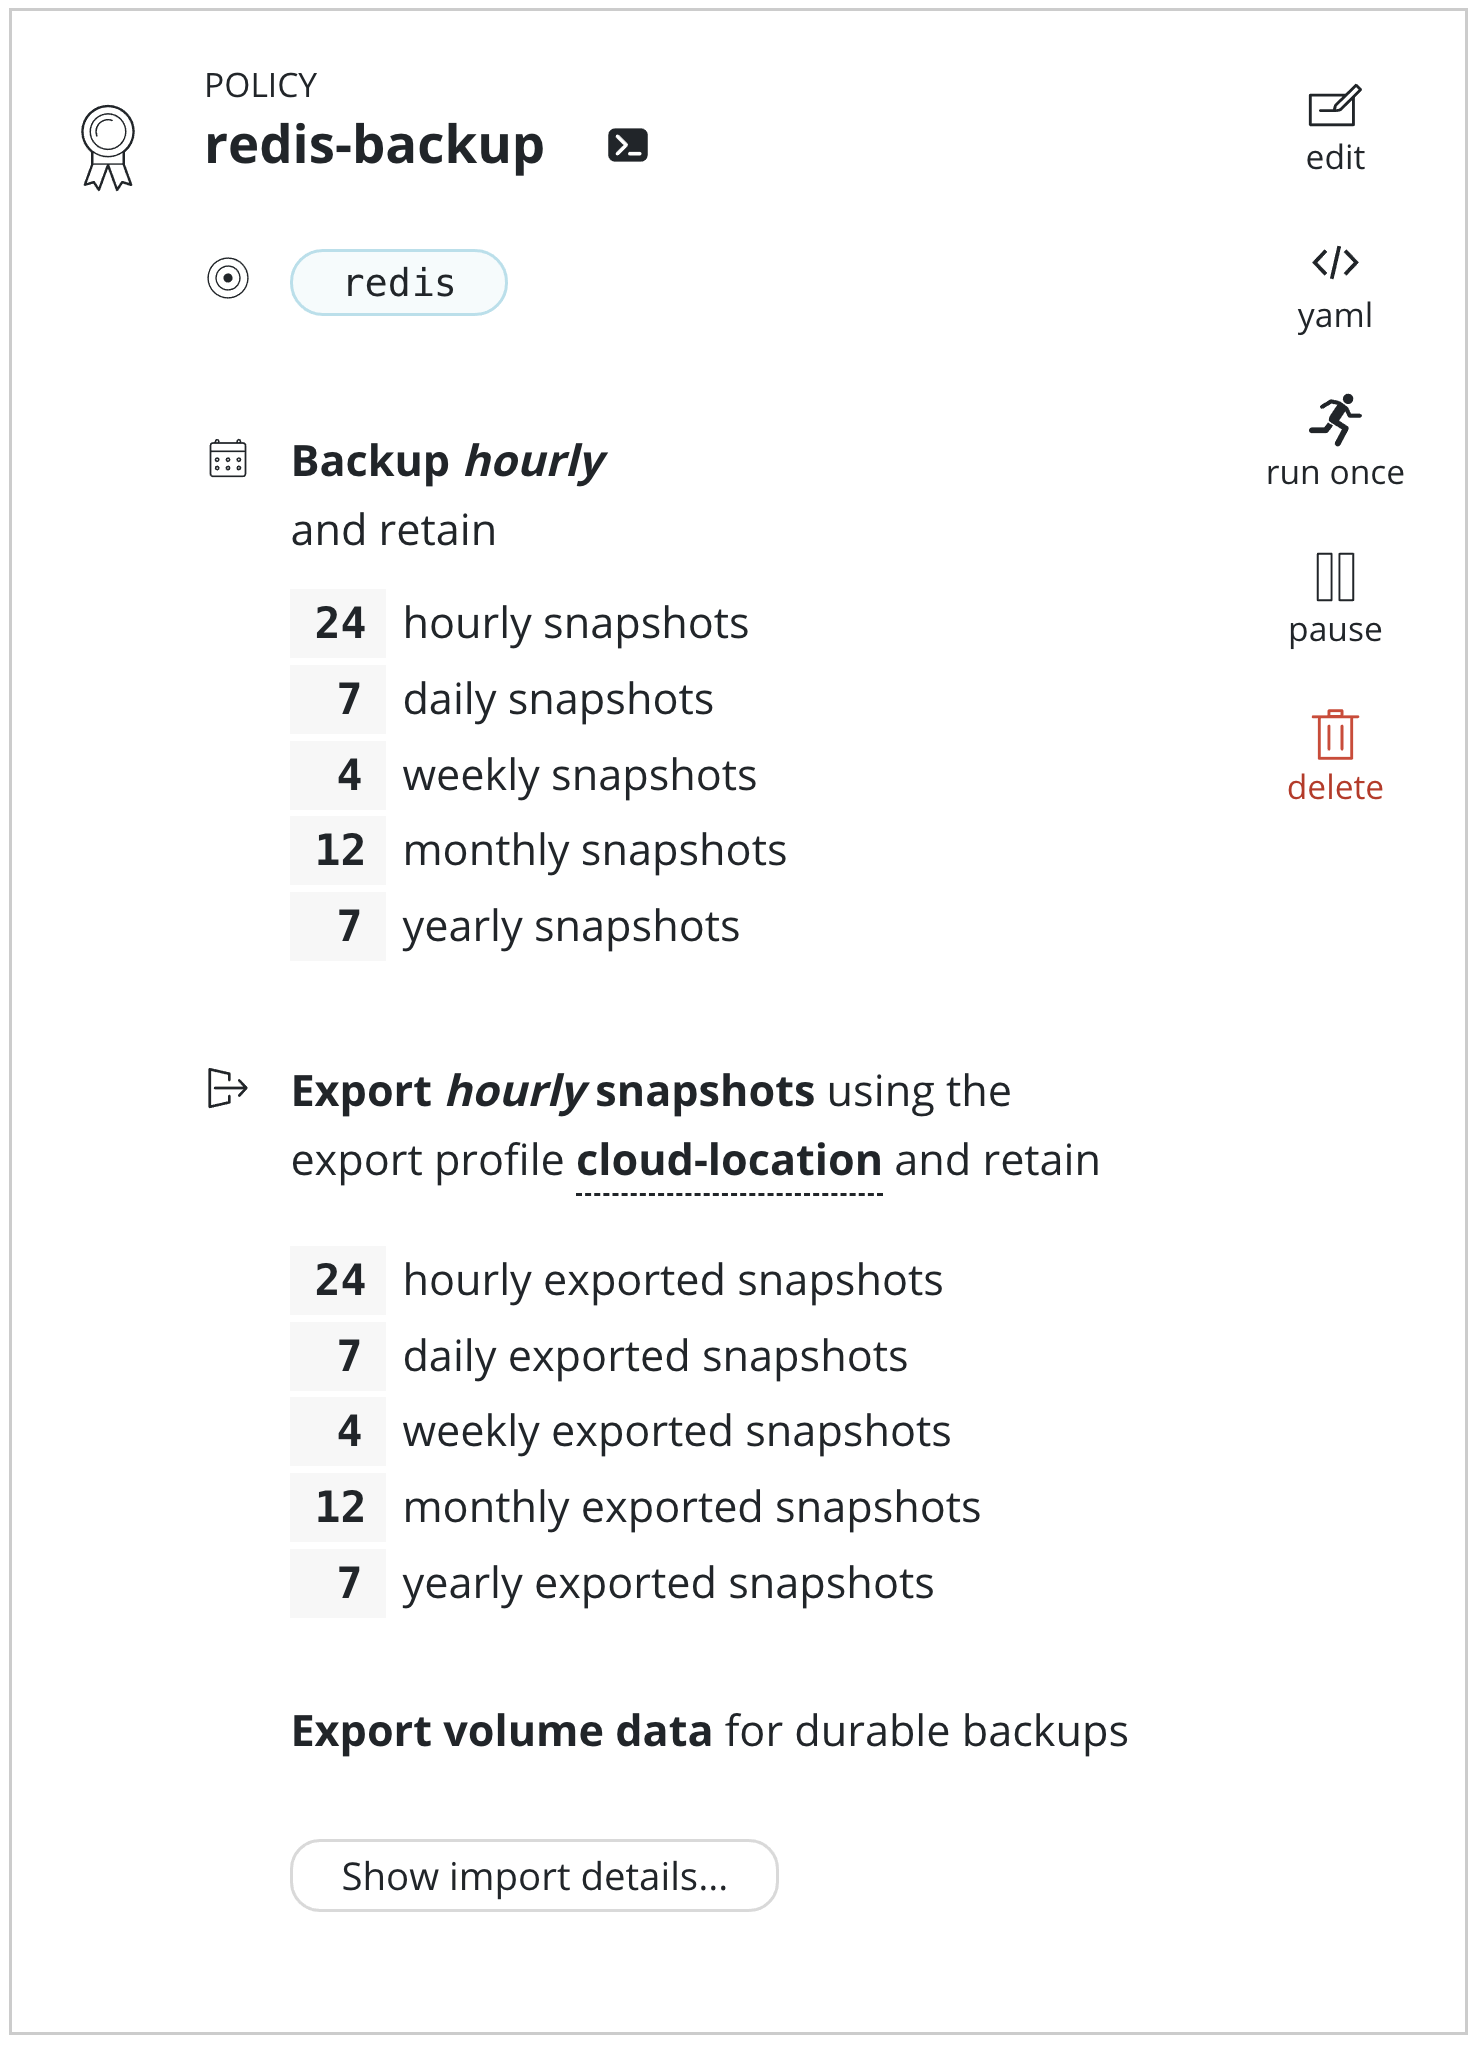
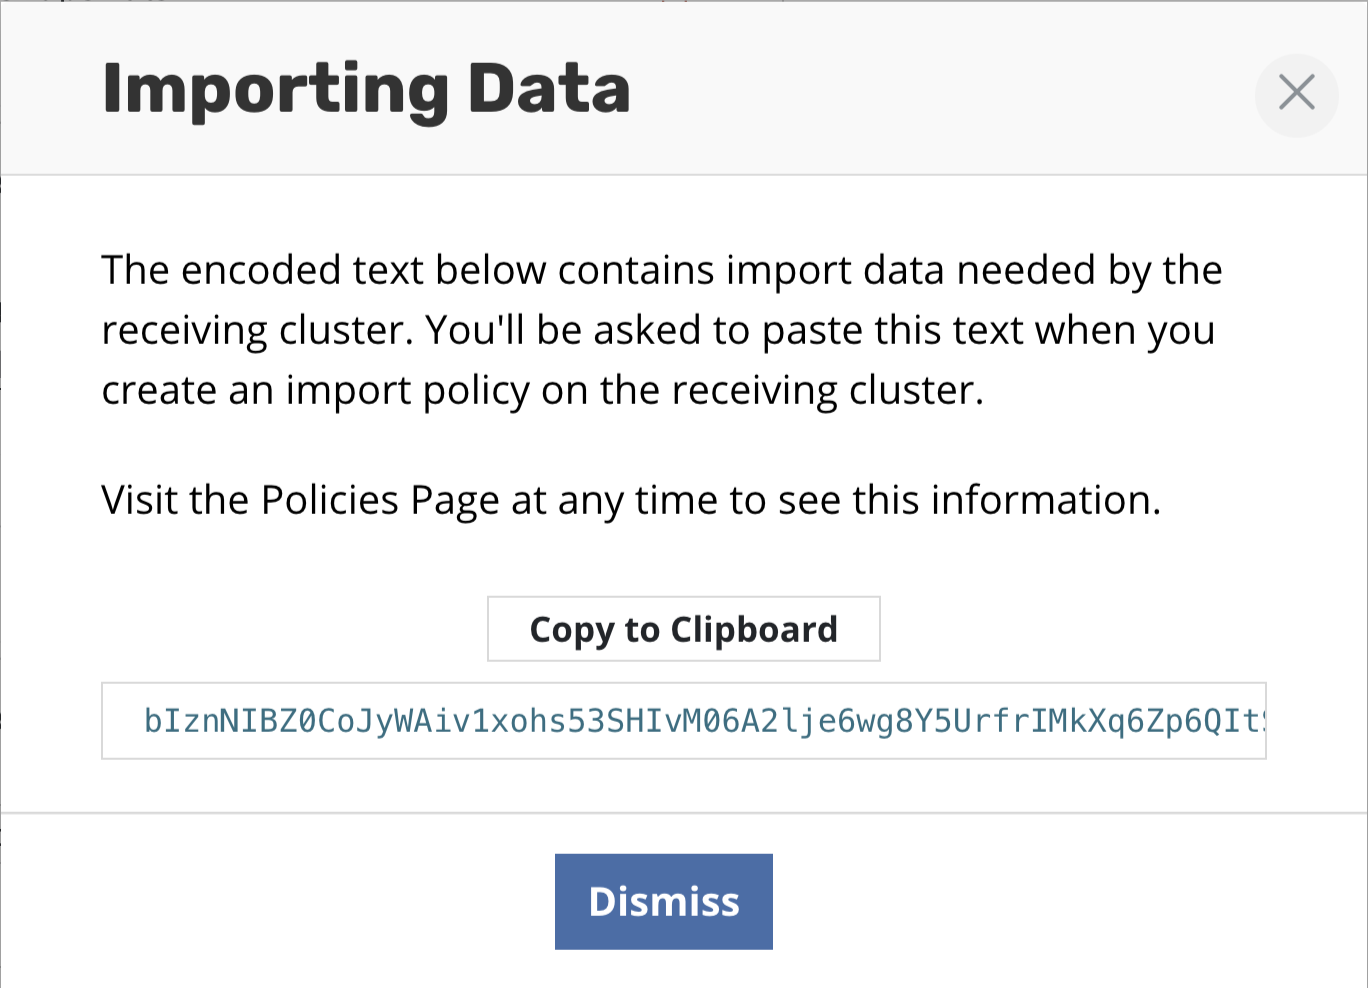
When this application is imported into another cluster, as described
below, initial handshake configuration will be required. This can be
obtained from the policy by clicking Show import details and will
result in the below encoded configuration being displayed.
Manual Exports
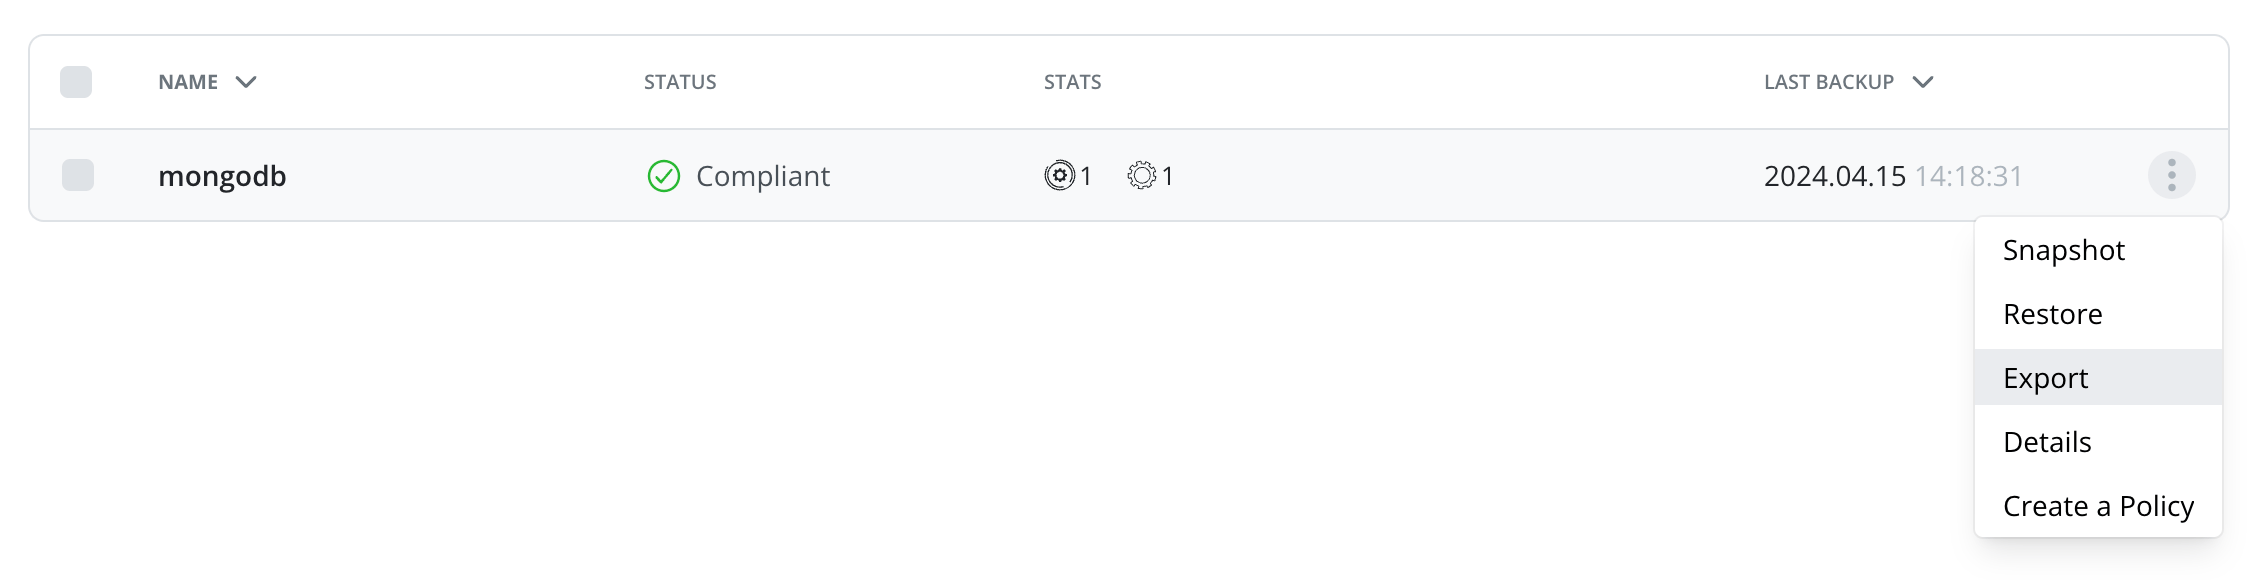
Apart from policy-driven exports, it is also possible to manually create
a one-off application export. From the Applications page, simply click
on the Export icon.
After a restore point is selected, you will be presented with information about the application snapshot being migrated (e.g., time, originating policy, artifacts) and, more importantly, the option to configure the destination by selecting a mobility profile.
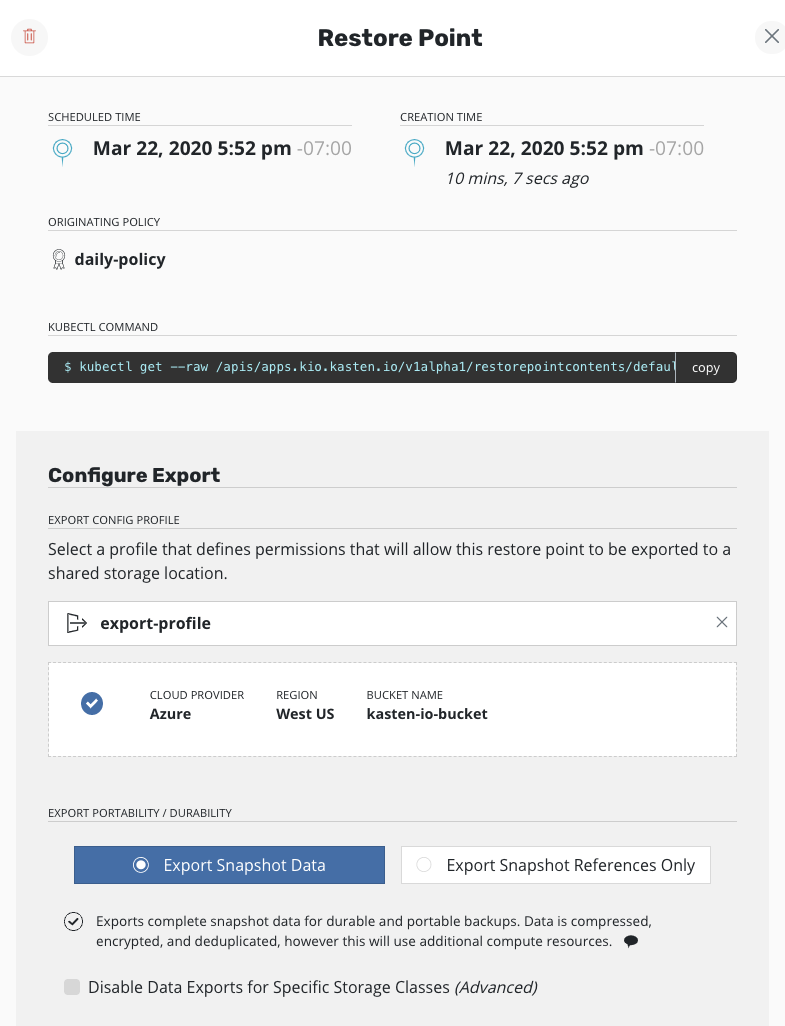
The option to select export portability and other
Advanced Export Settings follows. Refer back to the
above section
for information relating to these options.
Finally, click on Export. After confirming the export, the encoded
import configuration required by the destination cluster will be
presented.
Importing Applications
Import policies are only supported for importing applications into a cluster that is different than where the application was captured from. The protecting applications section has more details.
The Applications with block mode exports section contains additional details and constraints for when such applications are involved.
Importing an application snapshot is again very similar to the policy
creation workflow for
protecting applications . From
the Policies page, simply select Create New Policy.
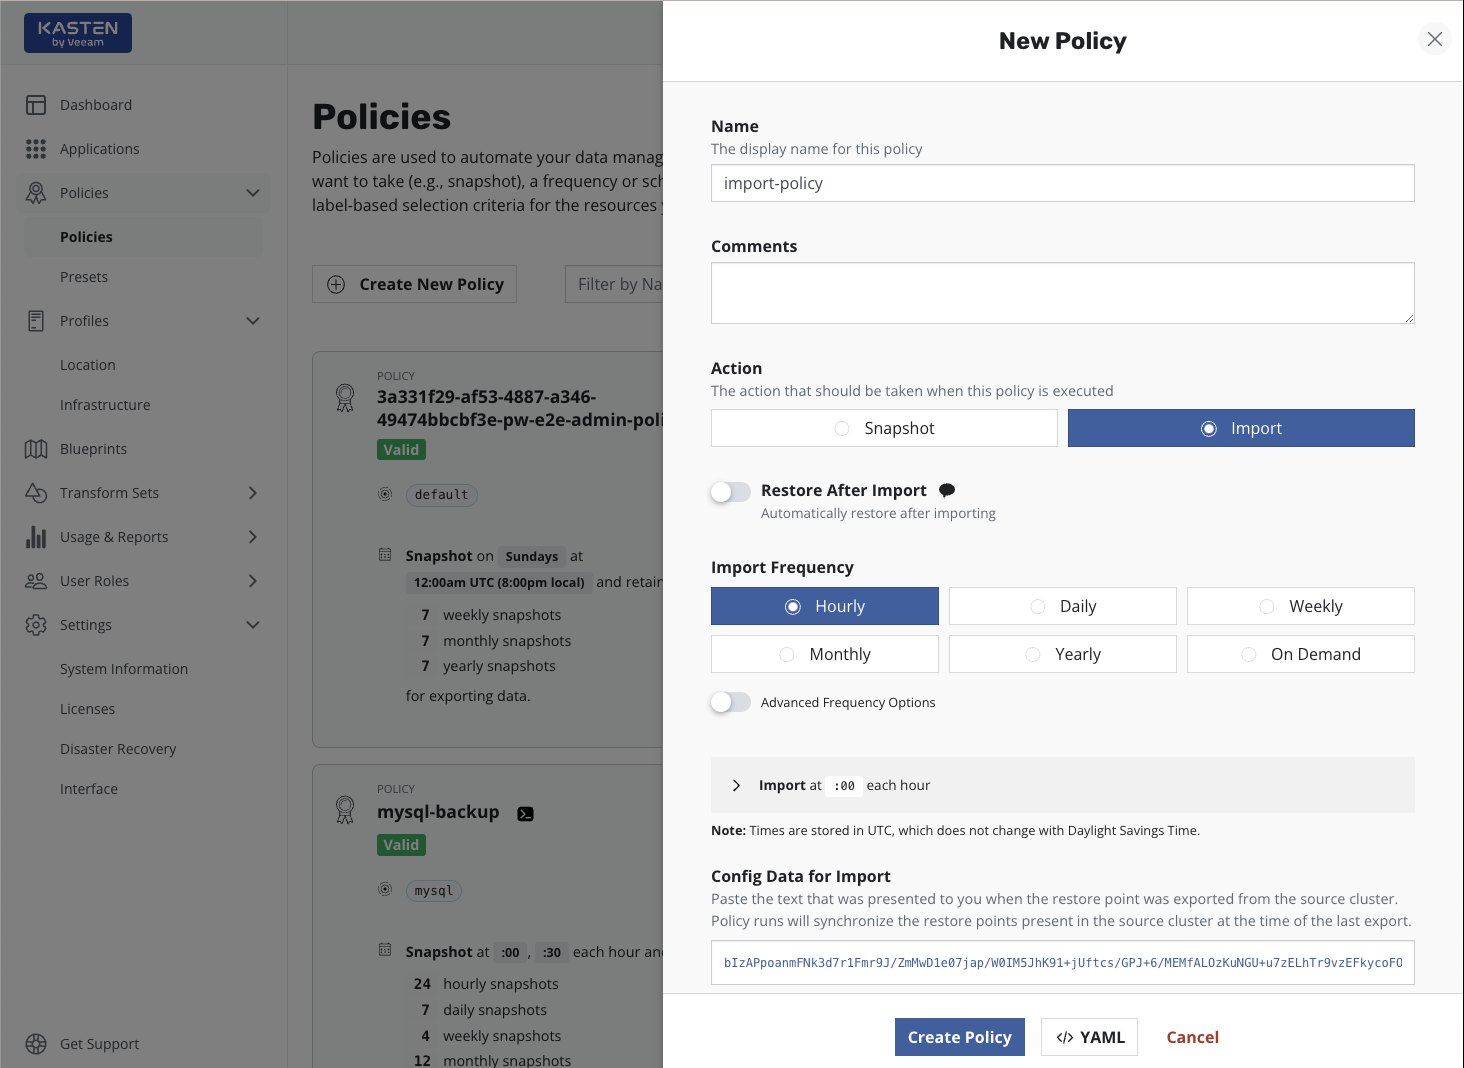
To import applications, you need to select Import for the action.
While you need to also specify a frequency for the import, this simply
controls how often to check the shared object storage or NFS/SMB file
storage location. If data within the store is not refreshed at the same
frequency, no duplicate work will be performed, and multiple restore
points may be imported by a single action if there is any catching-up to
do.
Care should be taken when auto-restoring the application during import. In particular, ensure that the newly restored application does not conflict with the application running in the source cluster. Examples of potential conflicts include accidental credential reuse, access to and use of external services, and services conflicting for exclusive ownership of shared resources.
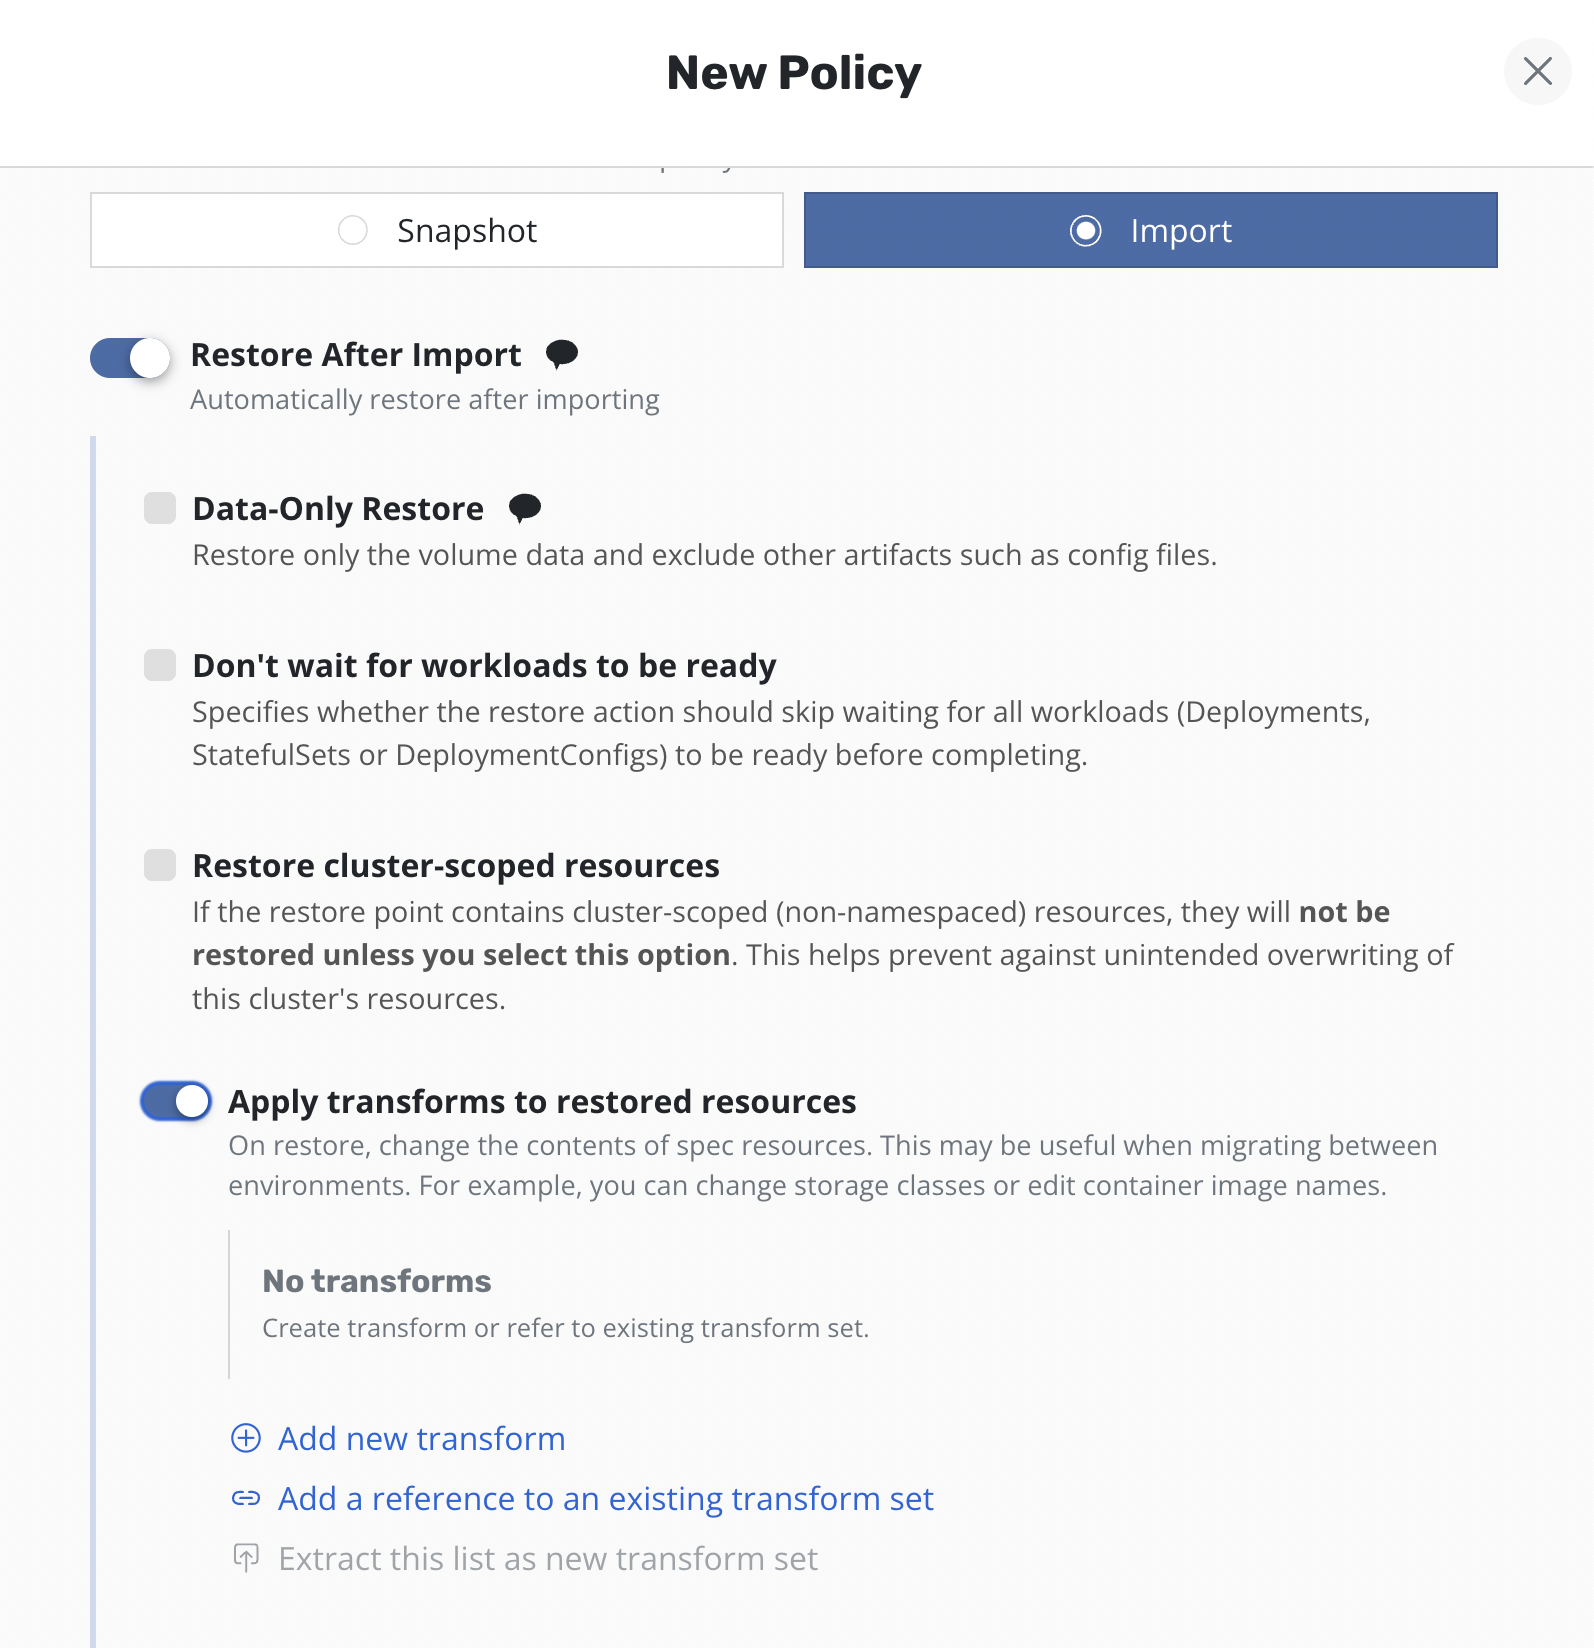
It is also possible to select Restore after Import to bring the
application up in this cluster after the metadata import is complete.
You will also need to paste the text block displayed by the source cluster's export policy (or shown during a manual export) to allow Veeam Kasten to create the data export/import relationship for this application across the clusters. Finally, similar to the export workflow, a location profile also needs to be selected. The destination cluster usually only needs read and list permissions on all the data in the shared storage system.
When selecting a location profile in the Profile for Import section,
the list of location profiles will show a "Matching Profile". This is
the original export location, which should contain the exported restore
points. A list of "Other Profiles" is also shown. Selecting a profile
from the "Other Profiles" section can be useful if, for example, a
restore point has been cloned or moved from its original export
location.
For legacy Kasten policies that export volume data to a VBR repository
and export application metadata to a separate Kasten repository, the non-VBR
location profile should be specified as the Profile for Import.
For imports that include either volume data from a VBR repository or both volume and application metadata from a VBR repository, the Veeam Repository Location Profile on both the source and destination clusters must have identical names for restores to complete successfully.
After the Create Policy button is clicked, the system will start
scheduling jobs based on the policy definition. If new data is detected,
its metadata will be imported into the cluster, automatically associated
with the application stack already running, and be made available as a
restore point. Note that unless Restore after Import is selected, only
metadata is brought into the cluster. If the data volumes reside in an
object store or NFS/SMB file store (e.g., after a cross-cloud migration),
they will not be converted into native volumes until a restore operation
is initiated.
The normal workflow for restoring applications can be followed and, when given the choice, simply select a restore point that is tagged with the import policy name.
Running an import policy keeps the list of local restore points in-sync with the retention settings of the originating policy. If a restore point is marked for retirement by the source cluster, it will be cleaned up; exported data and metadata will be deleted. Accordingly, the next time the import policy runs, that retired restore point will be removed from the destination cluster, reflecting the fact that it can no longer be used to restore the application.
Transforming restored resources
By default, Veeam Kasten restores Kubernetes resources as they exist in the restore point. However, there are times when the restore target does not match the environment of the backup. For these situations, Veeam Kasten allows Kubernetes resource artifacts to be transformed on restore.
For example, if a restore point was created in one cloud provider and it should be restored into a cluster in a different cloud provider, it might be necessary to use a transform that updates the container image URLs in some resources, or one that changes storage class settings.
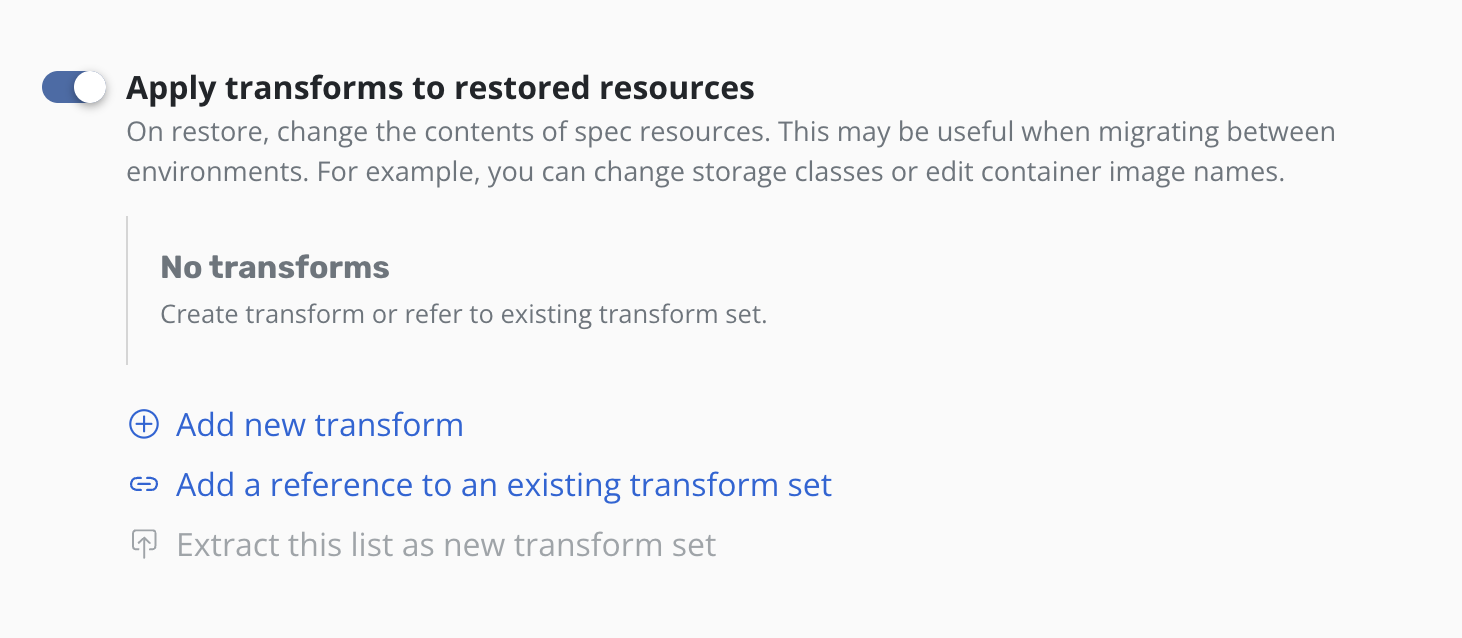
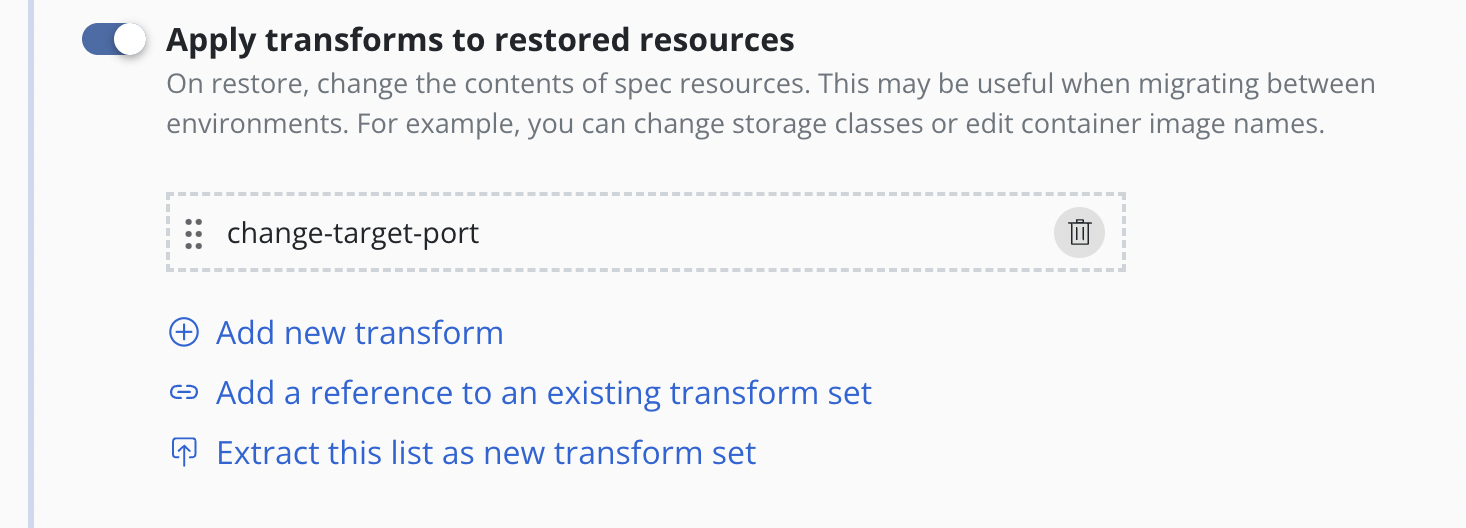
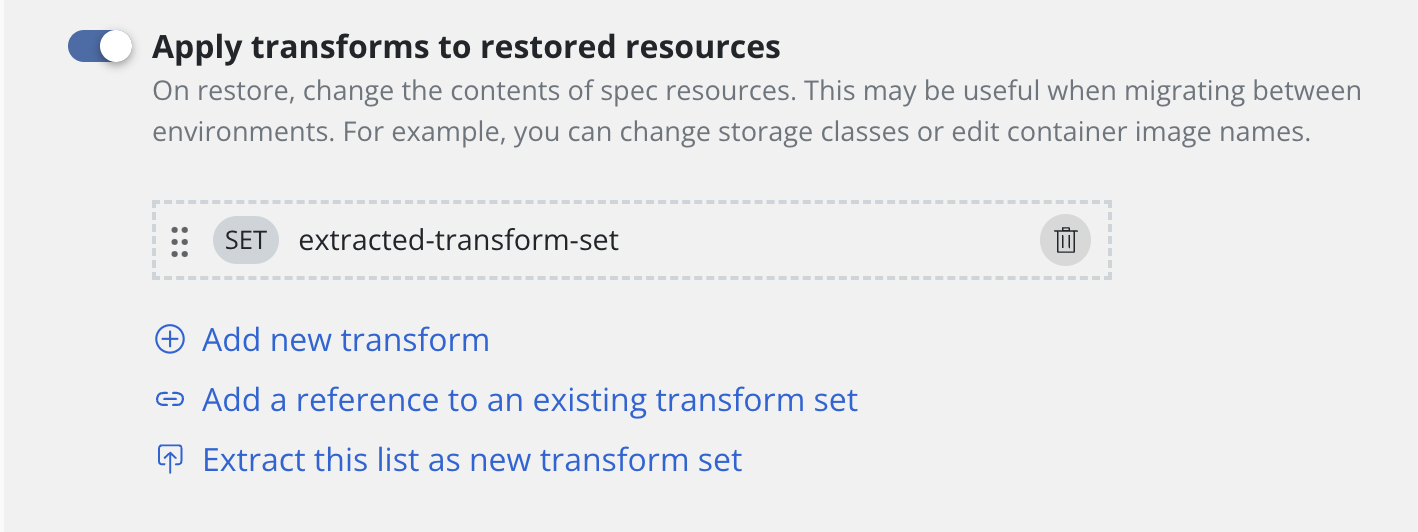
To apply transforms to the restored application, enable
Apply transforms to restored resources under Restore After Import.
Add new custom transform
The complete API specification for transforms can be found here.
Clicking the Add new transform will open a form for creating a new
transform.
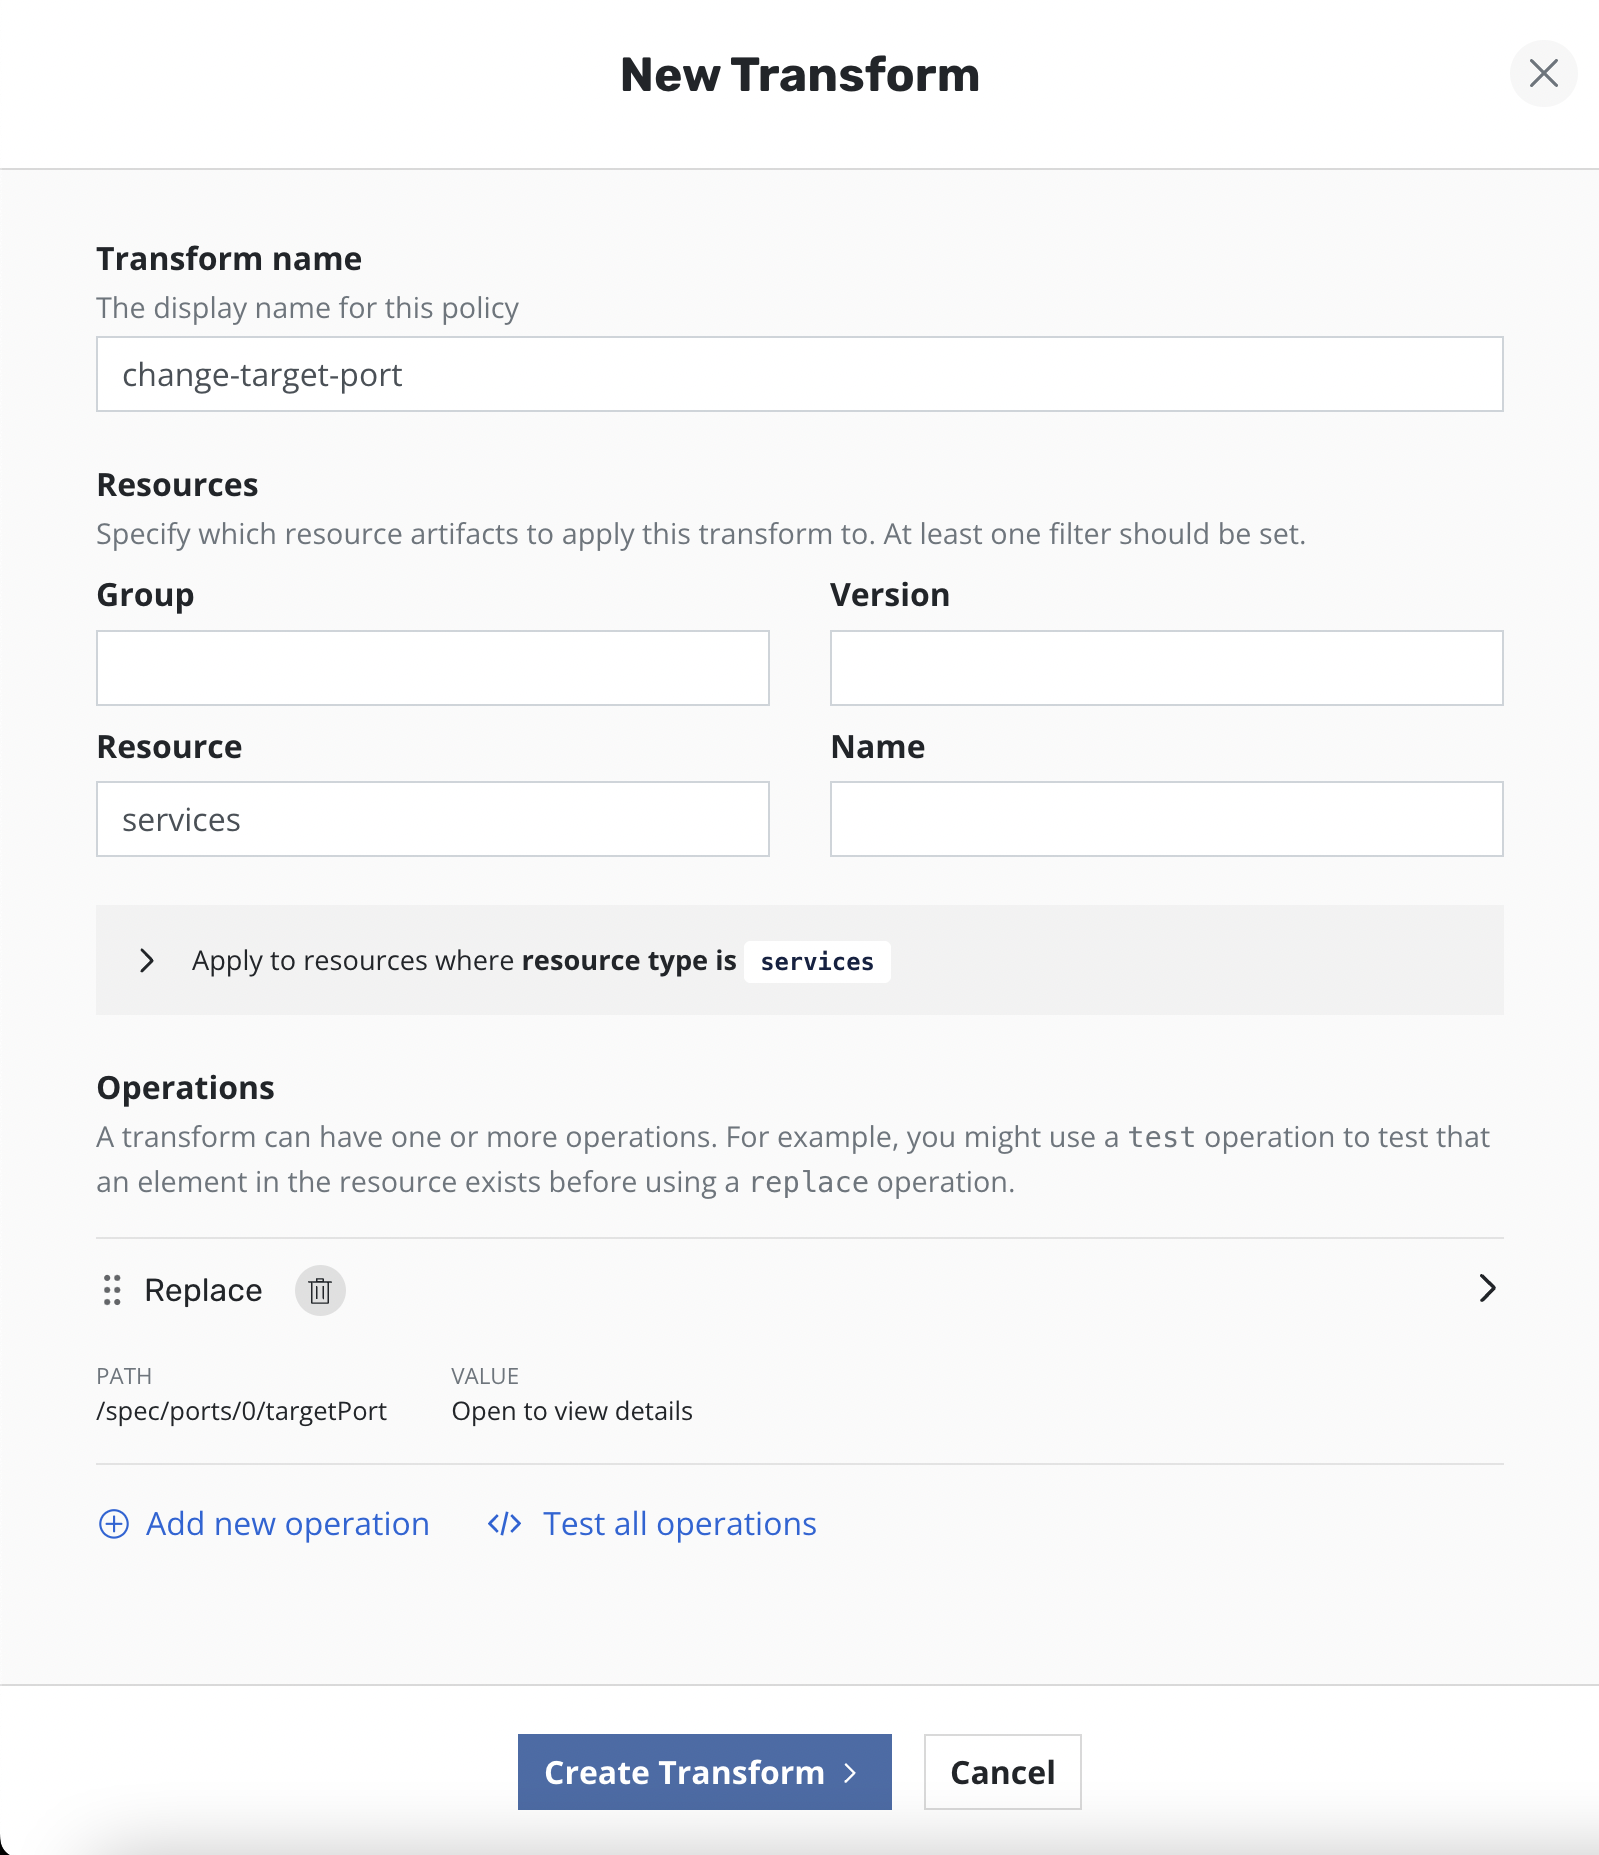
On the form, name the transform, select which resources the transform will be applied to, and then create one or more operations.
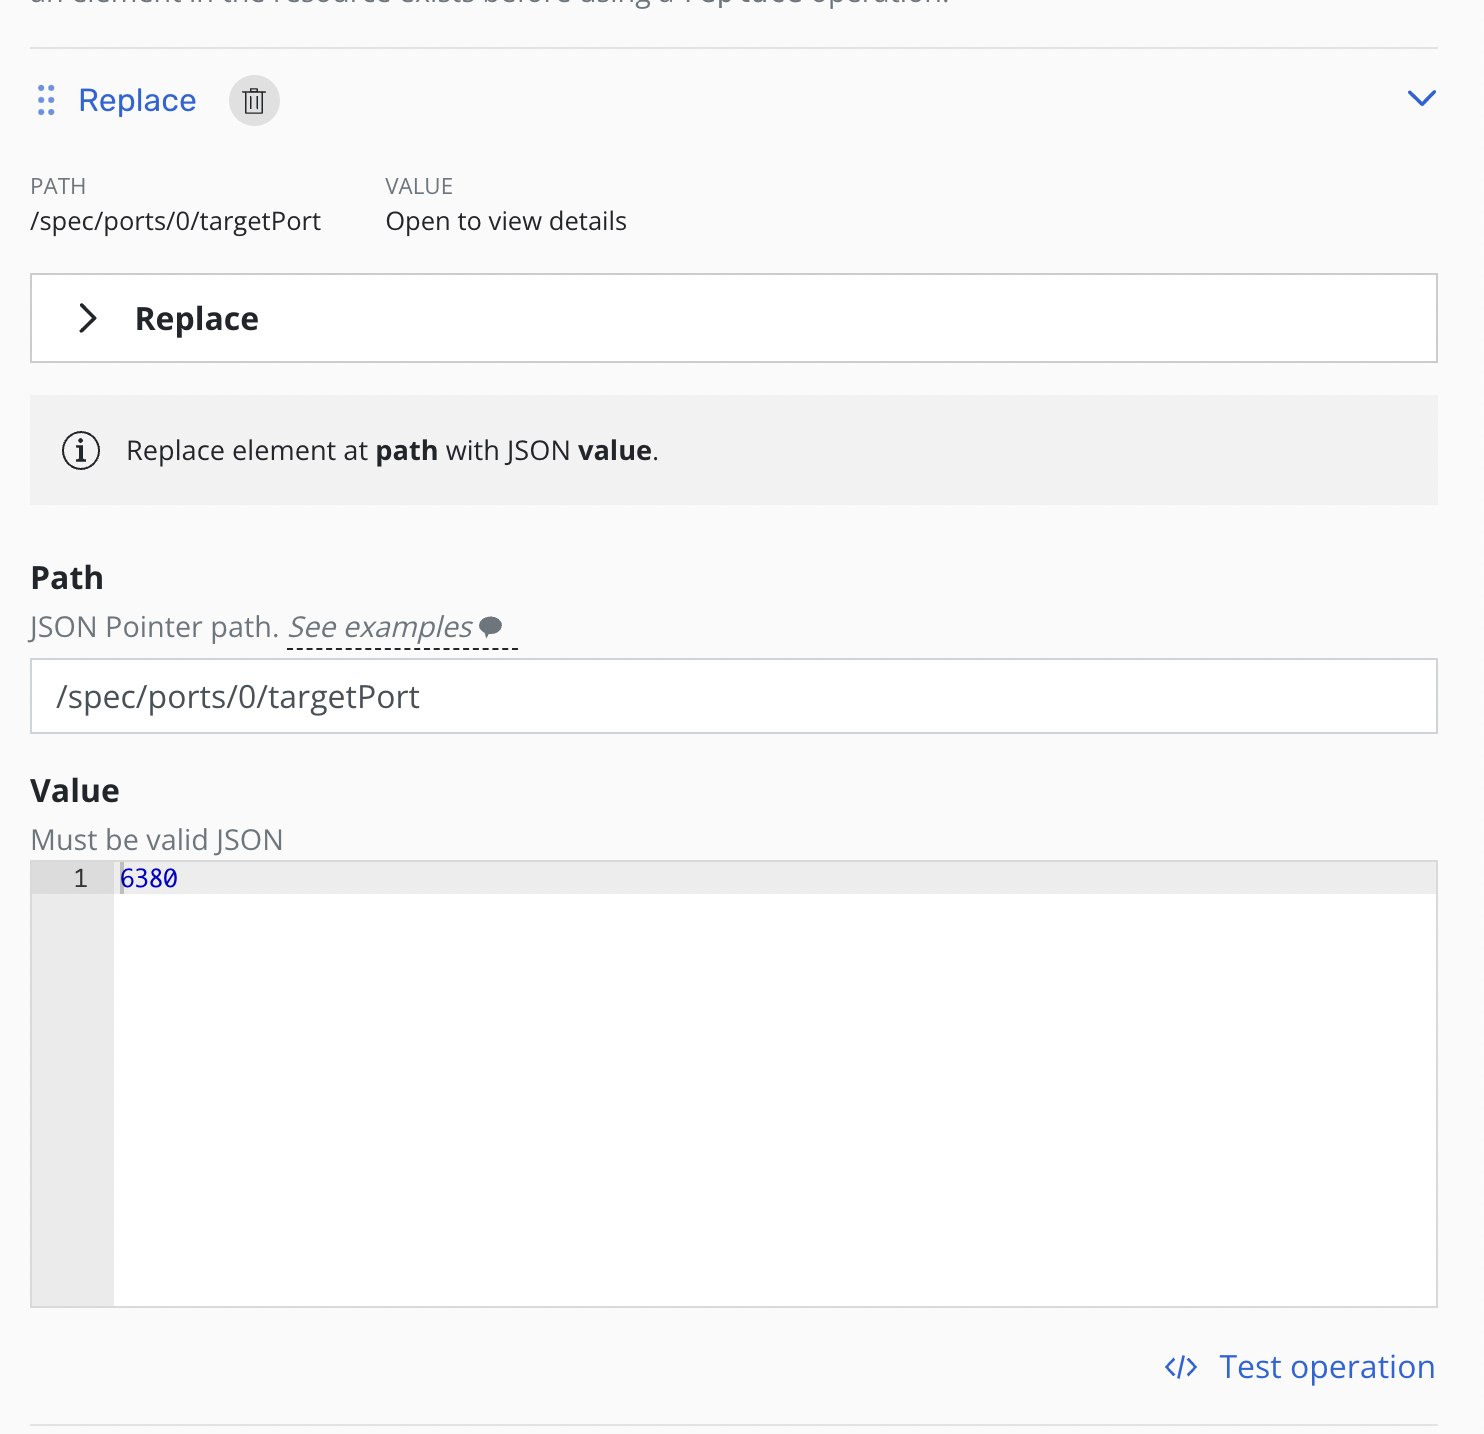
Each operation will have its own panel allowing customization and testing of the selected operation.
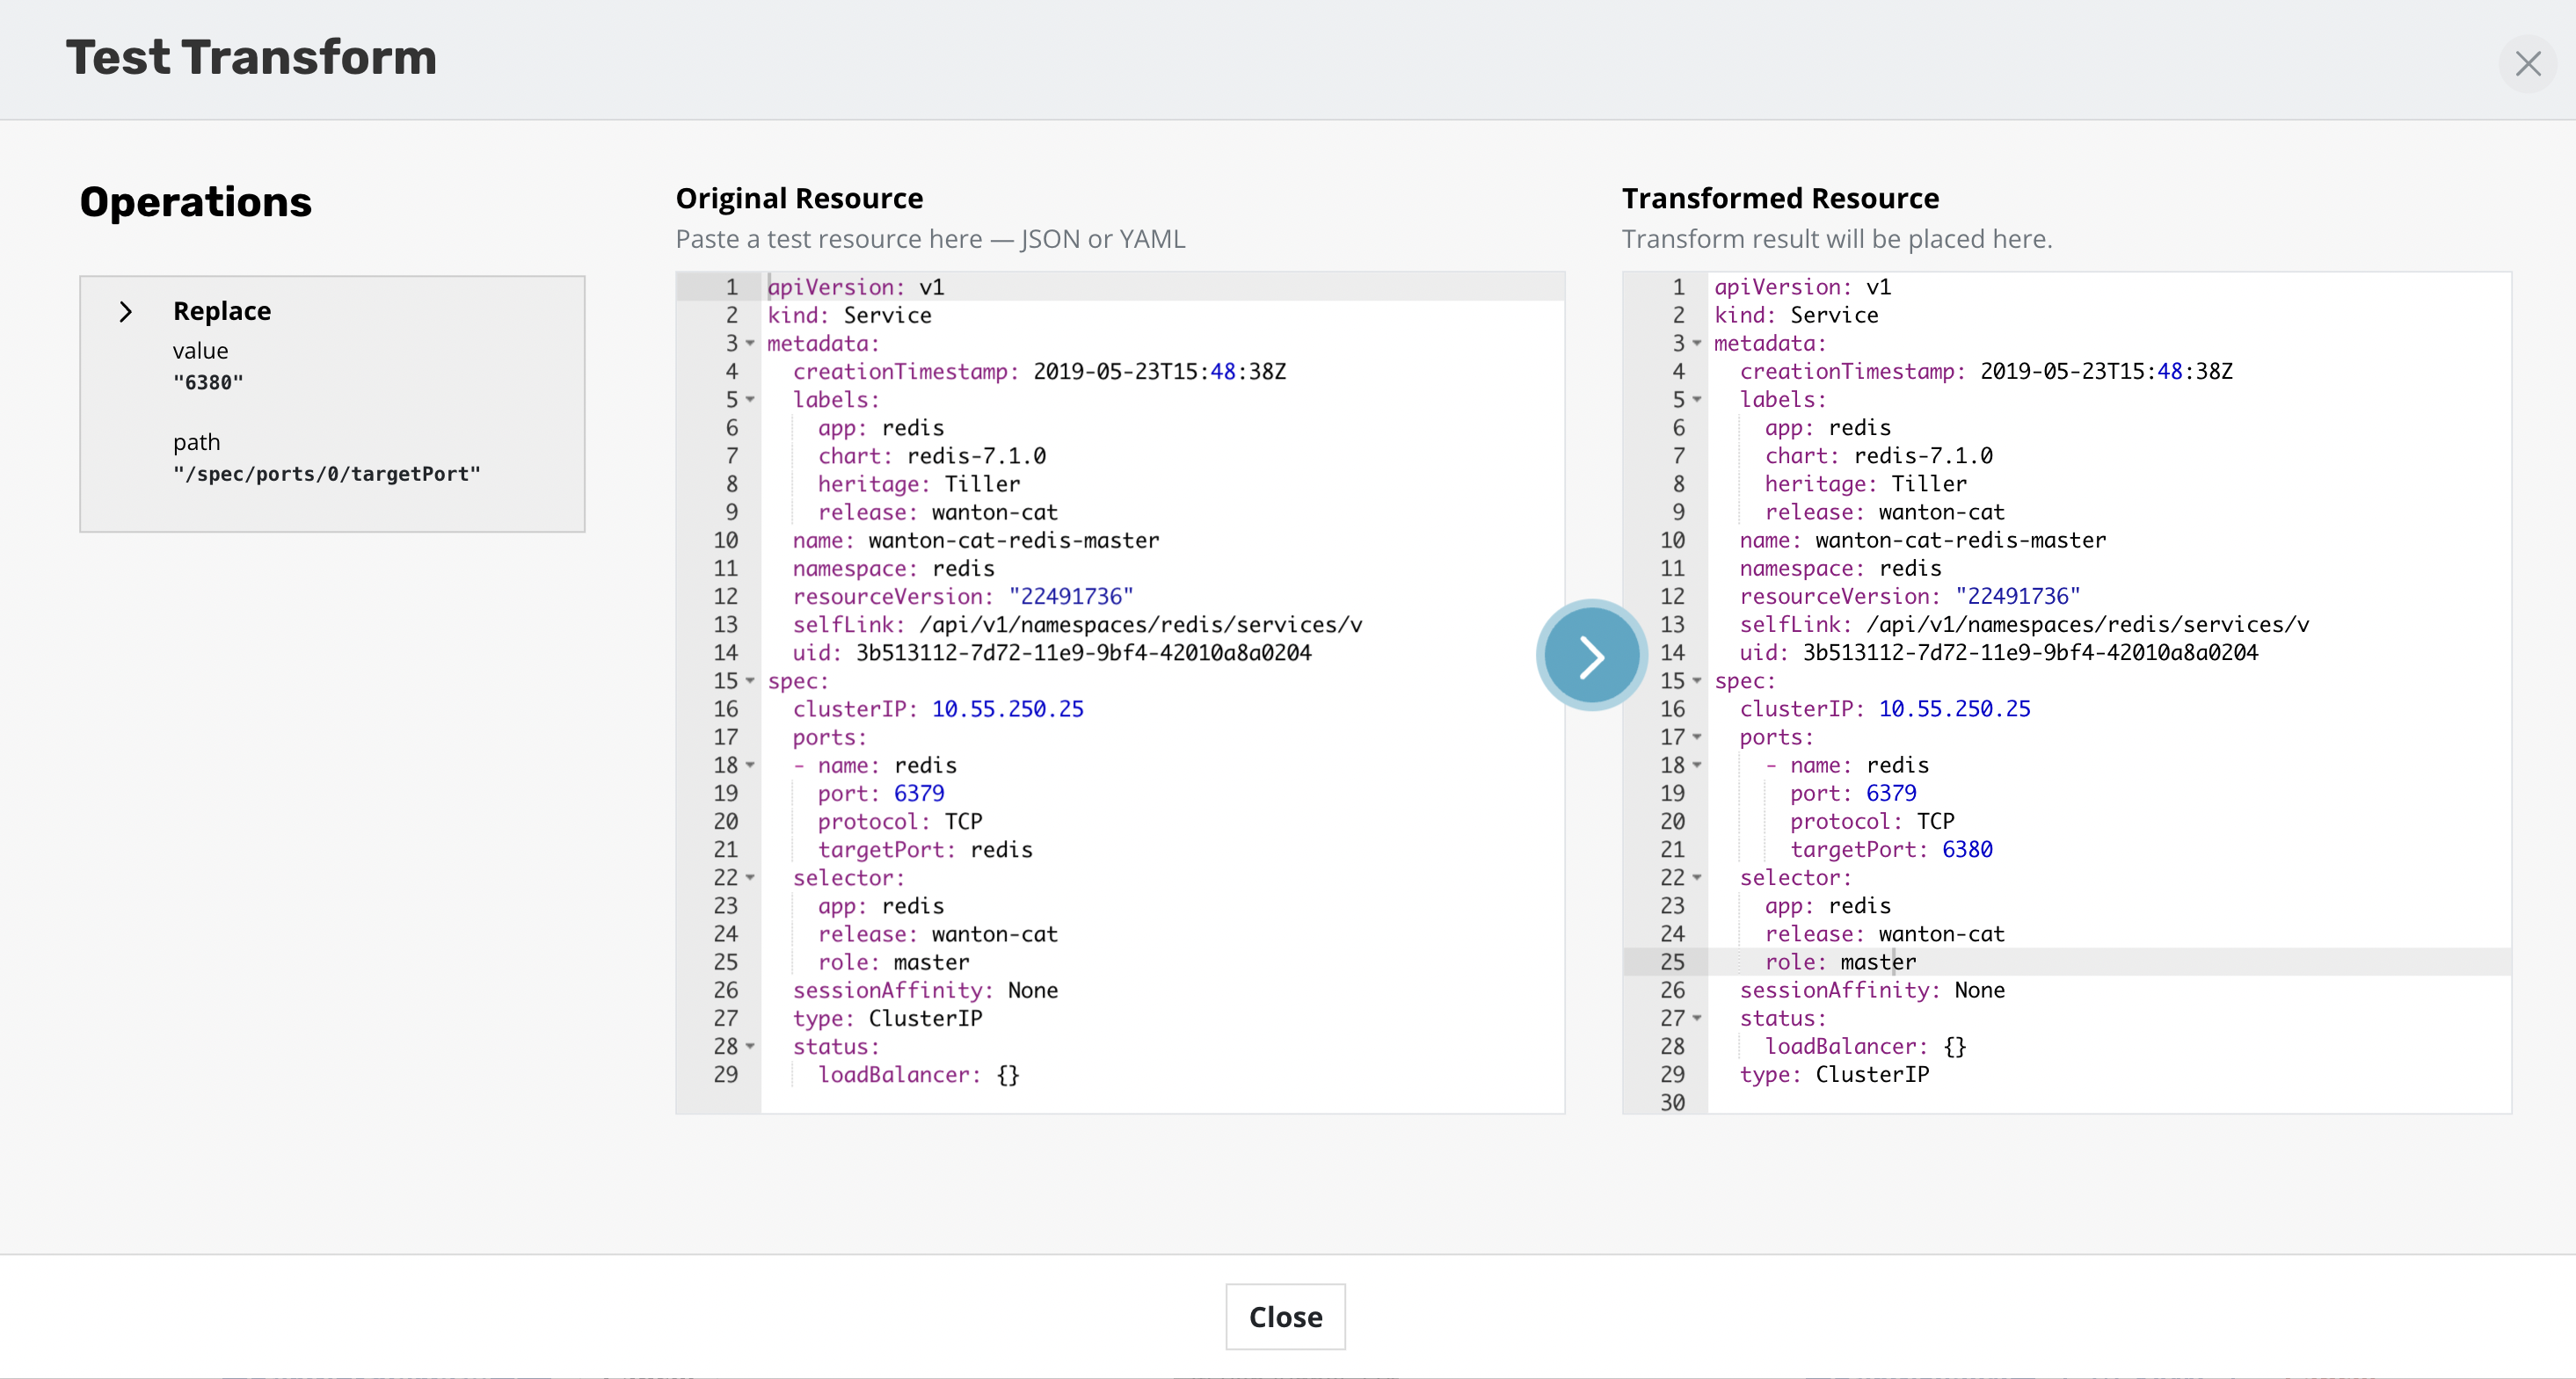
Operations can be tested against any resources to verify the outcome of the operations. The ability to apply transforms will provide flexibility in migration workflows between environments where more than just a like for like recovery is needed.
Add transforms using transform sets
A complete guide of how to setup a transform set can be found here.
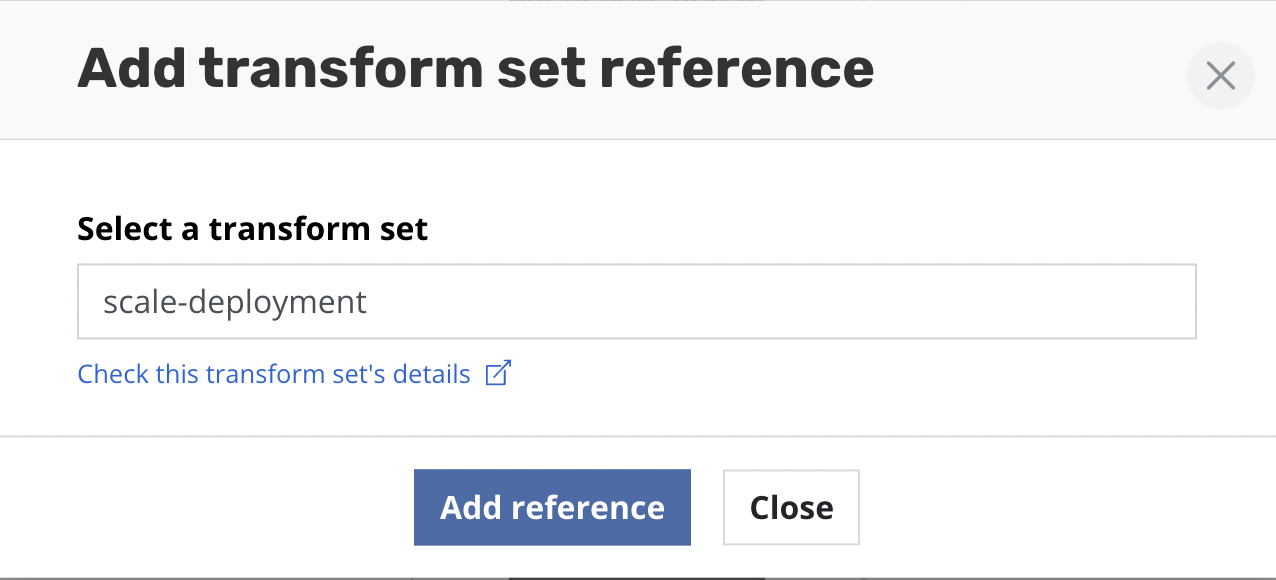
Clicking the Add a reference to an existing transform set will open a
form for selecting a transform set.
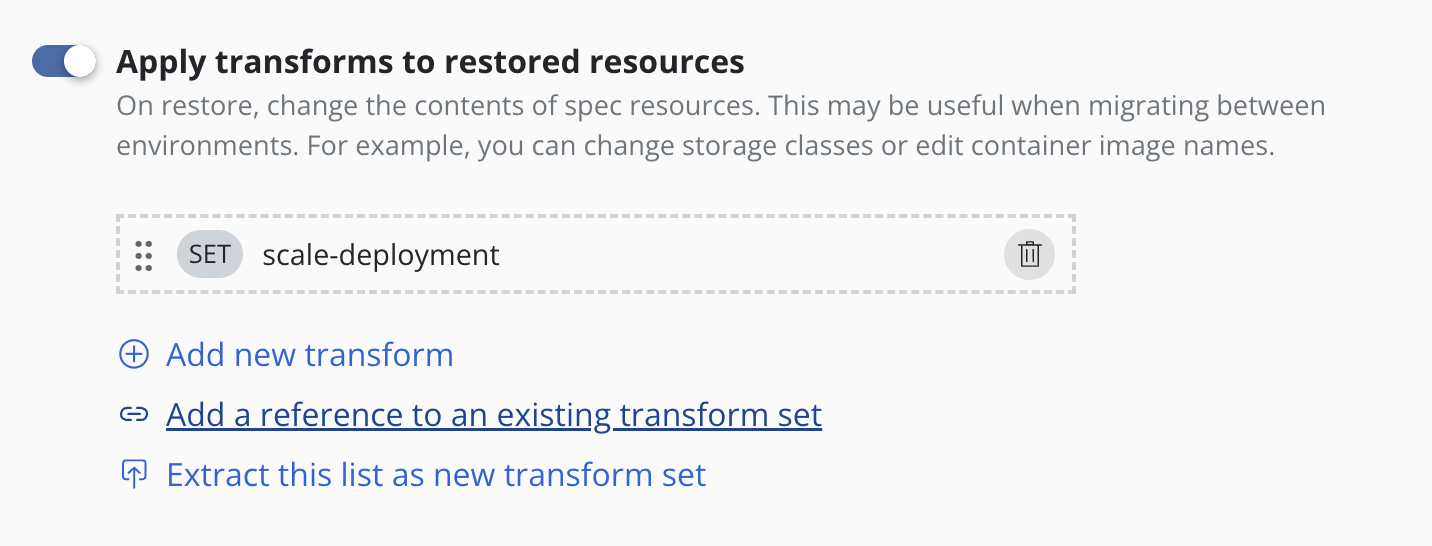
Type the name of the transform set and click Add reference.
A reference to the transform set will then be added to the form. The
SET label helps identify transforms which are stored and referenced
rather than those that are created inline via Add new transform.
Extract transforms as transform set to reuse them
To make a transform set from a sequence of transforms already defined
click Extract this list as new transform set.
Type the name of new transform set and [optionally] its description.
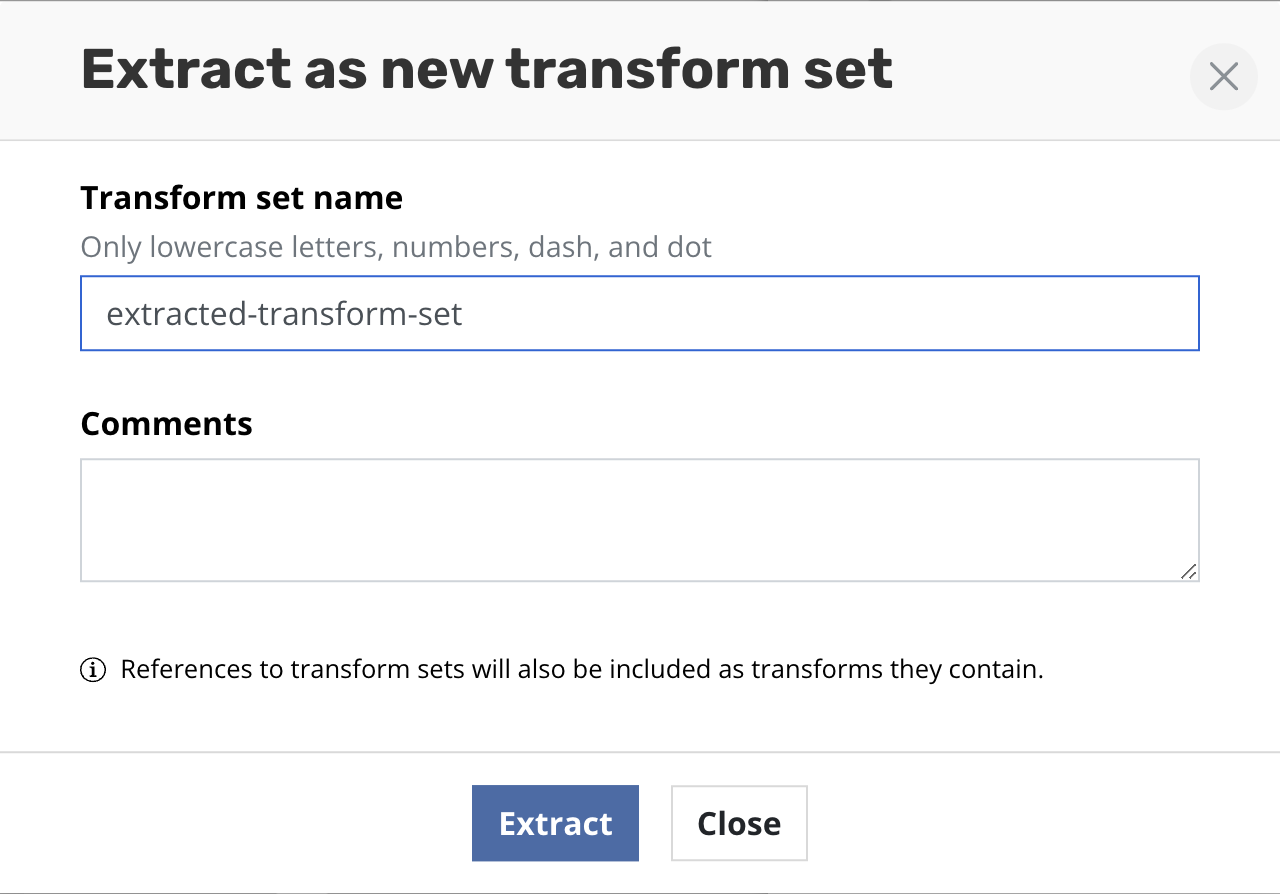
Click Create transform set. After successful creation all transforms
will be replaced with the reference of the created transform set.
Migration Considerations
While migrating applications across clusters, regions, and clouds is significantly simpler with Veeam Kasten, there are still other considerations to be aware of that might impact a migration workflow. The sections below cover these considerations in detail for a smoother migration process.
Non-Application Resources
While the Veeam Kasten platform will protect all resources that are discovered in the application namespace, it intentionally does not gather resources that are not part of an application namespace but only found at the cluster level. Examples of such resources include Custom Resource Definitions or CRDS (but not the actual Custom Resources or CRs), Storage Classes, or Cluster Role Bindings. Veeam Kasten assumes that these resources will be deployed as a part of cluster creation by the administrator or the cluster deployment process. This is of particular importance when migrating applications to a new cluster as the absence of these resources could cause application restore failures.
Related to the issue of cluster-wide resources, there are Kubernetes resources that are only found in a namespace but have a resource conflict with other applications in the same cluster. While generally discouraged for production usage, a commonly observed resource that falls in this category is the NodePort service. Once claimed by an application, a subsequent request for the same NodePort will conflict and be disallowed. Whenever possible, Veeam Kasten attempts to work around such limitations by resetting such settings on restore to a cluster-provided non-conflicting value. For example, with NodePort, Veeam Kasten will allow Kubernetes to pick a port from the default port range allocated to the NodePort service.
Finally, applications sometimes will have dependencies that are external to the cluster (e.g., DNS entries) that might not be visible to Kubernetes or Veeam Kasten. However, it is possible to work with such external resources through the use of post-restore hooks available in Veeam Kasten and Kanister blueprints.
Availability and Failure Zones
For migrations across Kubernetes clusters that are spread across different availability (or failure) zones, Veeam Kasten, for stateful applications in the destination cluster, tries to maintain the same fault independence as the source cluster. However, this can be hard or not possible when either the destination cluster has fewer availability zones than the source cluster or does not have nodes deployed in all availability zones.
To help work around these issues, Veeam Kasten adopts a number of techniques to simplify the redeployment process. As far as possible, Veeam Kasten will attempt to only place volumes in availability zones where it has already discovered worker nodes belonging to the destination cluster.
In the case of migration in the same region, Veeam Kasten will attempt to first place volumes in the same zones that the source cluster had selected. If that is not possible, it will assign volumes to other availability zones where it has found worker nodes.
For cross-region migration, Veeam Kasten will first attempt to map availability zones between the source and destination regions and, assuming the worker nodes are found in those zones, provision volumes according to that mapping. If a mapping is not possible (e.g., the source cluster used more available zones than the destination cluster has available), it will provision volumes into one of the other discovered zones in the destination cluster.
In the unlikely case that Veeam Kasten is unable to either find worker nodes or discover zones, it will fallback to assigning volumes to zones that it knows exist in that region.
Finally, note that the above approach can potentially run into scheduling issues where the destination cluster might have either insufficient or no compute resources in a given zone. If you run into this issue, the simplest solution is to provision more worker nodes across your desired available zones.
Applications with Block mode exports
Migrating an application whose snapshot data was exported in block mode format can be done across clusters that have storage classes with PersistentVolumes that can be exported by Veeam Kasten in this manner. See Block Mode Exports for details on how to identify such storage classes to Veeam Kasten.
If the source cluster type is different from the destination cluster type, then a resource transformation will be required to change the storage class initially configured for the application in the source cluster to one that is available in the target cluster. The selected storage class in the target cluster must support Dynamic Volume Provisioning and Block Volume Mode, and must be identified to Veeam Kasten in the manner described in Block Mode Exports.
Veeam Kasten will use available infrastructure specific network APIs to write data to the volume directly if possible (for example, in vSphere clusters); otherwise, Veeam Kasten will mount the volume in Block mode and directly write the data to the raw device. After the volume data is restored, Veeam Kasten will ensure that the volume is mounted in the application with whatever volume mode was configured initially.
In the particular case of migrating snapshot data from a Veeam Repository Location, an identically named location profile as used as the export block mode destination must exist in the importing cluster.