Veeam Kasten Disaster Recovery
As Veeam Kasten is a stateful application running on the cluster, it must be responsible for backing up its own data to enable recovery in the event of disaster. This backup is enabled by the Veeam Kasten Disaster Recovery (KDR) policy. In particular, KDR provides the ability to recover the Veeam Kasten platform from a variety of disasters, such as the unintended deletion of Veeam Kasten or its restore points, the failure of the underlying storage used by Veeam Kasten, or even the accidental destruction of the Kubernetes cluster on which Veeam Kasten is deployed.
Configuring Veeam Kasten Disaster Recovery Mode
The KDR mode specifies how internal Veeam Kasten resources are protected. The mode must be set before enabling the KDR policy. Changes to the KDR mode only apply to future KDR policy runs.
Starting in Veeam Kasten v8.0.0, all installations default to Quick DR (Local Catalog Snapshot) mode.
Quick DR (Local Catalog Snapshot) mode should only be enabled if the storage provisioner used for Veeam Kasten PVCs supports both the creation of storage snapshots and the ability to restore the existing volume from a storage snapshot. See Comparing Available KDR Modes for details on alternate configuration options.
-
To enable Legacy DR mode, install or upgrade Veeam Kasten
with the
--set kastenDisasterRecovery.quickMode.enabled=falseHelm value. -
To enable Quick DR mode, install or upgrade Veeam Kasten
with the
--set kastenDisasterRecovery.quickMode.enabled=trueHelm value. - See Enabling Veeam Kasten Disaster Recovery via UI or Enabling Veeam Kasten Disaster Recovery via CLI for details on configuring catalog snapshot behavior for Quick DR mode.
Comparing Available KDR Modes
Refer to the details below to understand the key differences between each mode:
Legacy DR
Legacy DR mode has been deprecated and will be removed in a future release. All clusters should be migrated a supported Quick DR configuration.
Recommended Usage
- Supported for backwards-compatibility only
Actions Performed Per KDR Policy Run
- Exports a full copy of the catalog database
Resources Available to Recover
-
Enables recovery of specified Veeam Kasten custom resources
-
Enables recovery of local restore points, exported restore points, and action history on any cluster
NoteIt is expected that local restore points will be non-restorable when a KDR recovery of the exported catalog snapshot is performed on a different cluster, as applicable storage snapshot references are typically unavailable.
Quick DR (Local Catalog Snapshot)
Recommended Usage
- Recommended when storage used for Veeam Kasten PVCs supports both the creation of storage snapshots and the ability to provision a volume using a storage snapshot
Actions Performed Per KDR Policy Run
- Creates a local snapshot of the catalog PVC
- Incrementally exports minimally required data only from the catalog database
Resources Available to Recover
- Enables recovery of specified Veeam Kasten custom resources
- Enables recovery of exported restore points on any cluster
- Enables recovery of local restore points, exported restore points, and action history only where the local catalog snapshot is available for restore (i.e. in-place recovery on the original cluster)
Compared to Legacy DR
- Offers faster KDR policy runs by reducing amount of exported data
- Consumes less repository storage by reducing amount of exported data
- Offers faster KDR recovery when leveraging local storage snapshot
- Protects additional Veeam Kasten custom resource types
Quick DR (Exported Catalog Snapshot)
Recommended Usage
- Recommended when storage used for Veeam Kasten PVCs supports the creation of storage snapshots but cannot provision a volume using a storage snapshot
- Recommended when there is a need to reduce retention of local storage snapshots without impacting retention of exported backups
- This mode may be selected for any snapshot-capable storage in order to provide the highest level of resilience
Actions Performed Per KDR Policy Run
- Creates a local snapshot of the catalog PVC
- Incrementally exports minimally required data only from the catalog database
- Performs an incremental export of the catalog PVC snapshot data
Resources Available to Recover
-
Enables recovery of specified Veeam Kasten custom resources
-
Enables recovery of local restore points, exported restore points, and action history on any cluster
NoteIt is expected that local restore points will be non-restorable when a KDR recovery of the exported catalog snapshot is performed on a different cluster, as applicable storage snapshot references are typically unavailable.
Compared to Legacy DR
- Offers comparable KDR policy run completion times
- Consumes less repository storage by exporting incremental catalog data
- Offers faster KDR recovery when leveraging local storage snapshot
- Offers comparable KDR recovery when leveraging exported storage snapshot
- Protects additional Veeam Kasten resource types
Quick DR (No Catalog Snapshot)
Recommended Usage
- Recommended when no available cluster storage supports snapshot creation (i.e. only Generic Storage Backup is used)
- Alternatively, this mode may be selected if there is no requirement to recover local restore points or action history
Actions Performed Per KDR Policy Run
- Incrementally exports minimally required data only from the catalog database
Resources Available to Recover
- Enables recovery of specified Veeam Kasten custom resources
- Enables recovery of exported restore points on any cluster
Compared to Legacy DR
- Offers faster KDR policy runs by reducing amount of exported data
- Consumes less repository storage by reducing amount of exported data
- Offers faster KDR recovery by reducing amount of imported data
- Protects additional Veeam Kasten custom resource types
- Does not support recovery of local restore points and action history
KDR Protected Resource Matrix
| Veeam Kasten Resource | Quick DR | Legacy DR |
|---|---|---|
| Actions | Yes(1) | Yes |
| Local Restore Points | Yes(1) | Yes |
| Exported Restore Points | Yes | Yes |
| Policies | Yes | Yes |
| Basic User Policies | Yes | No |
| Profiles | Yes | Yes |
| Blueprints | Yes | Yes |
| Blueprint Bindings | Yes | No |
| Policy Presets | Yes | No |
| Transform Sets | Yes | No |
| Multi-Cluster Primary | Yes | No |
| Multi-Cluster Secondary | Yes | No |
| Reports | No | No |
| ActionPodSpecs | No | No |
| AuditConfig | No | No |
| StorageSecurityContext | Yes | No |
| StorageSecurityContextBinding | Yes | No |
For Quick DR, resources marked with (1) can only be restored if a local or exported catalog snapshot is available to be restored.
Enabling Veeam Kasten Disaster Recovery via UI
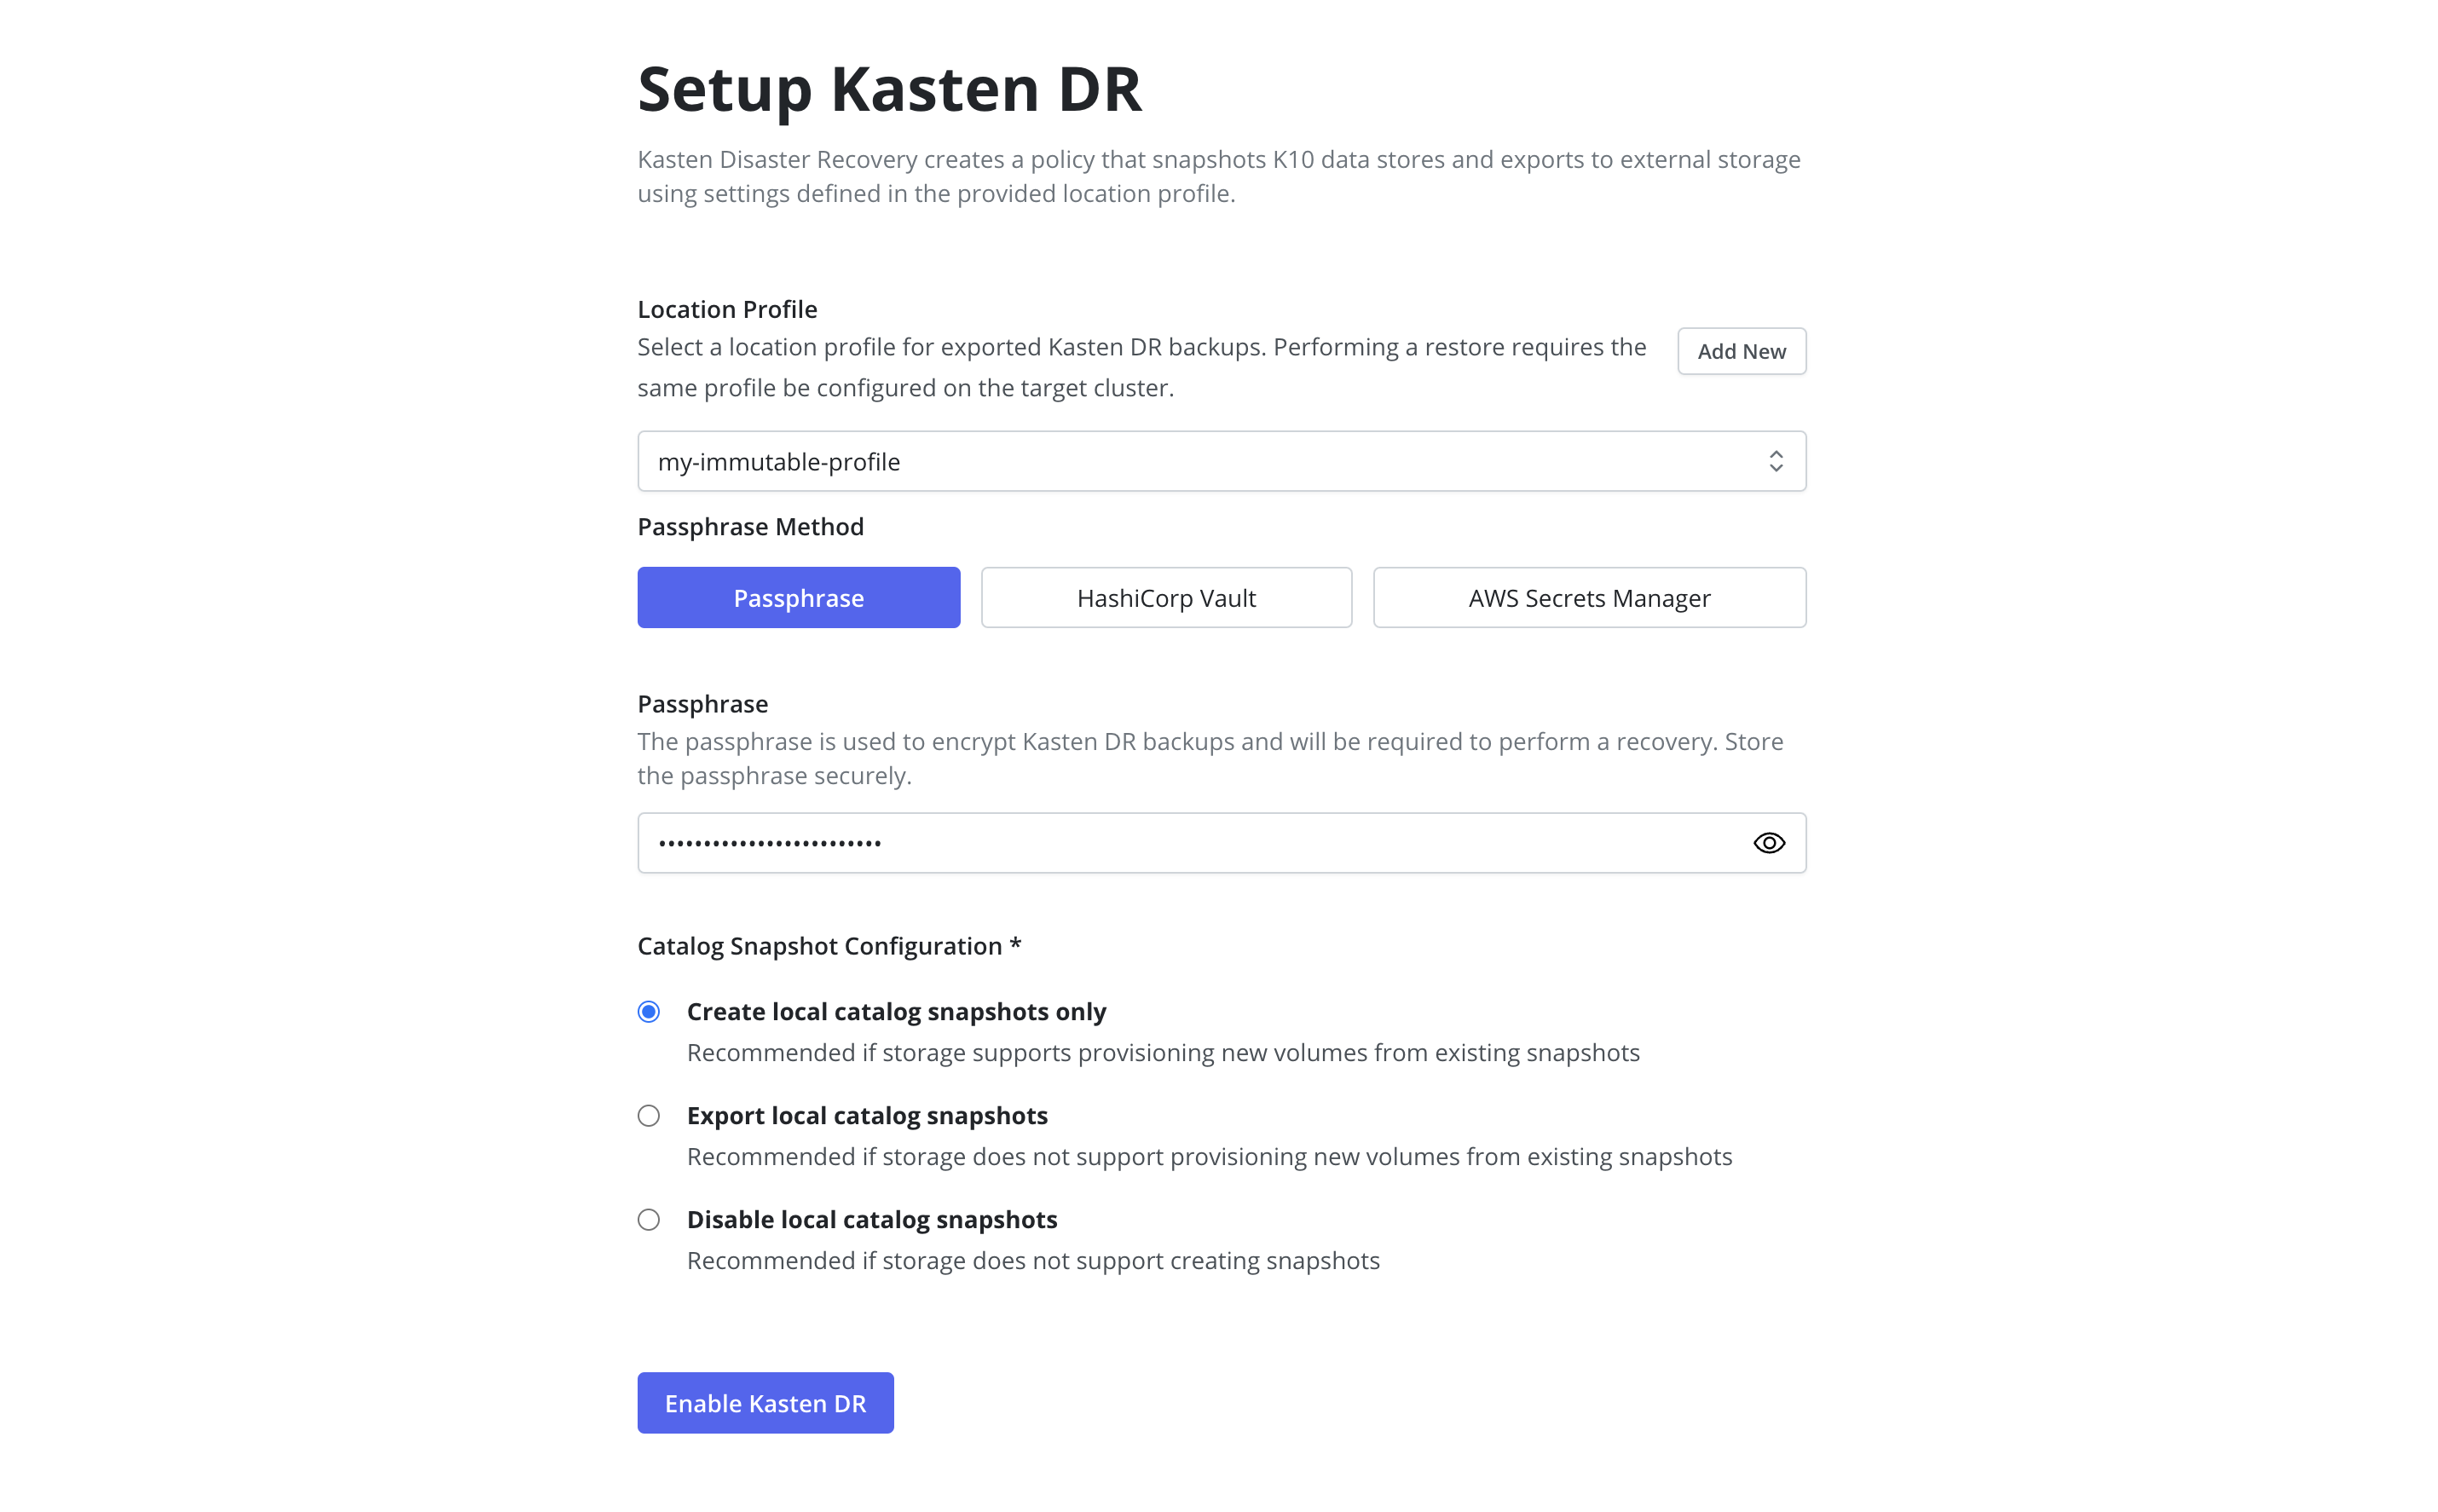
Enabling Veeam Kasten Disaster Recovery (KDR) creates a dedicated policy within Veeam Kasten to back up its resources and catalog data to an external location profile.
The Veeam Kasten Disaster Recovery settings are accessible via the
Setup Kasten DR page under the Settings menu in the navigation
sidebar.
-
Specify a location profile to which KDR backups will be exported.
It is strongly recommended to use a location profile that supports immutable backups to ensure restore point catalog data can be recovered in the event of incidents including ransomware and accidental deletion.
NoteVeeam Repository location profiles cannot be used as a destination for KDR backups.
-
Select and configure the desired passphrase method that will be used to encrypt KDR backups:
Passphrase
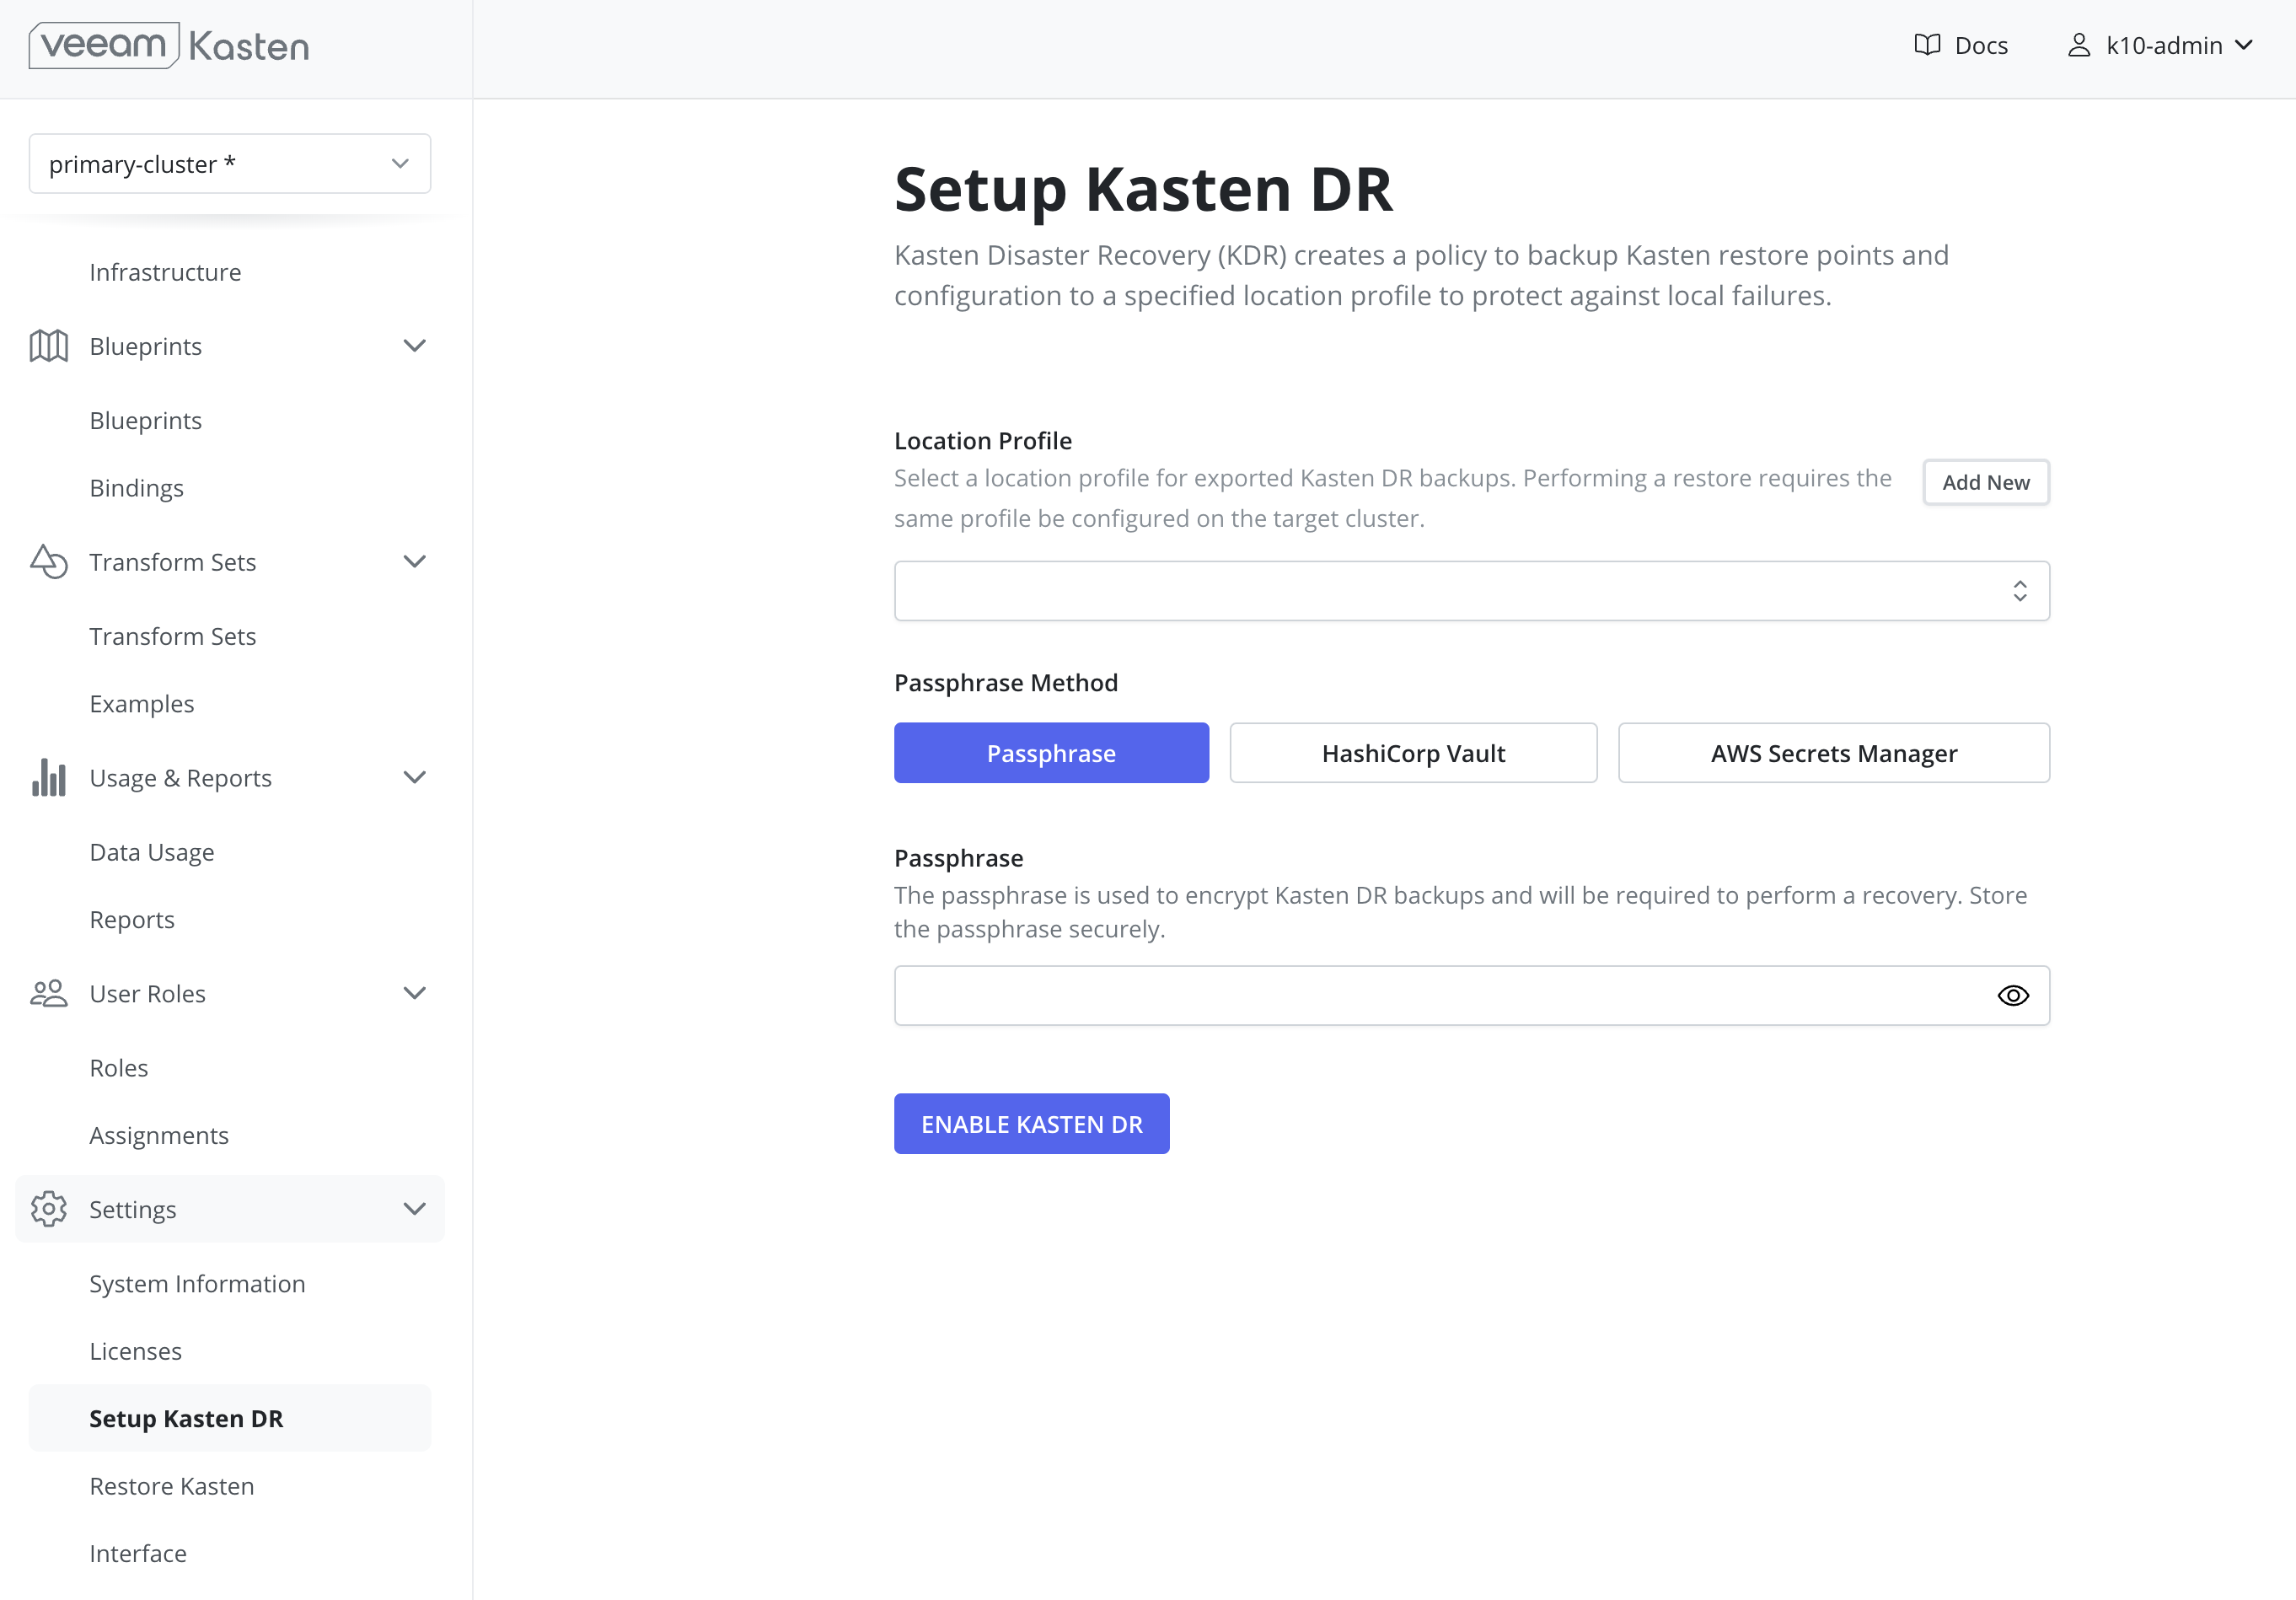 warning
It is critical that this unmanaged passphrase be stored securely outside of the cluster as it will be required to perform any future recoveries.
HashiCorp Vault
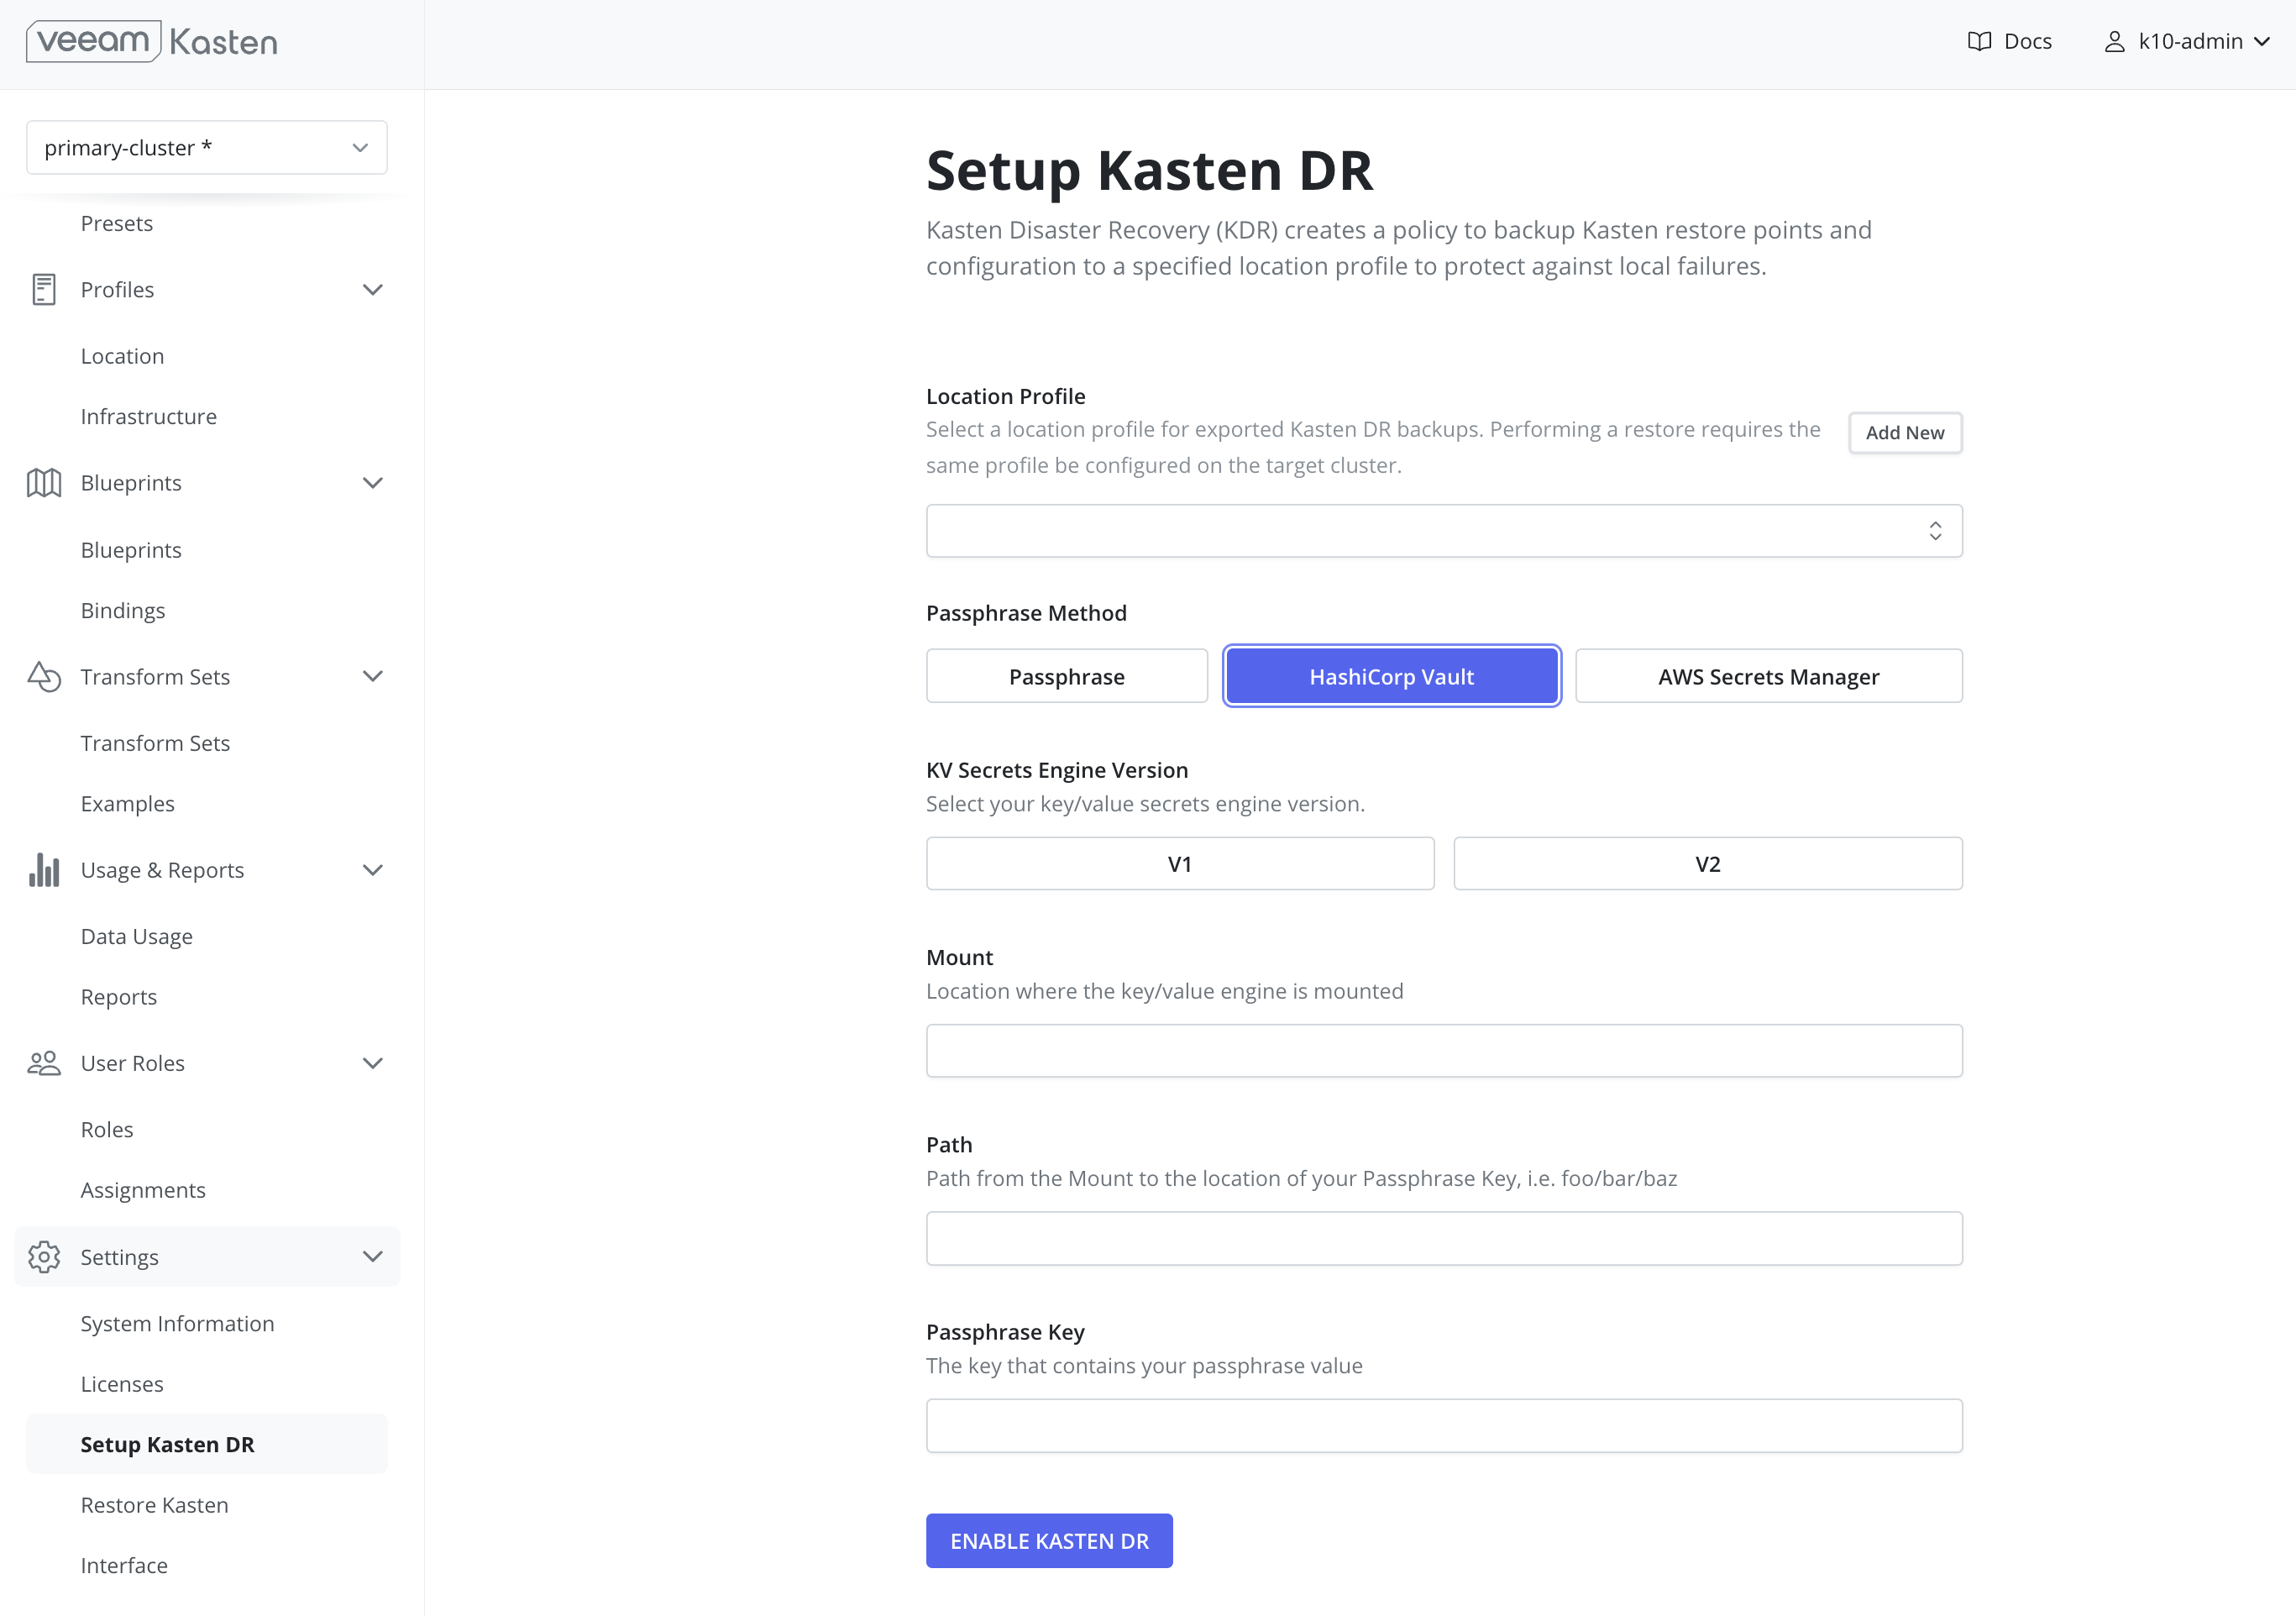 Note
NoteUsing HashiCorp Vault requires that Veeam Kasten is configured to access Vault.
AWS Secrets Manager
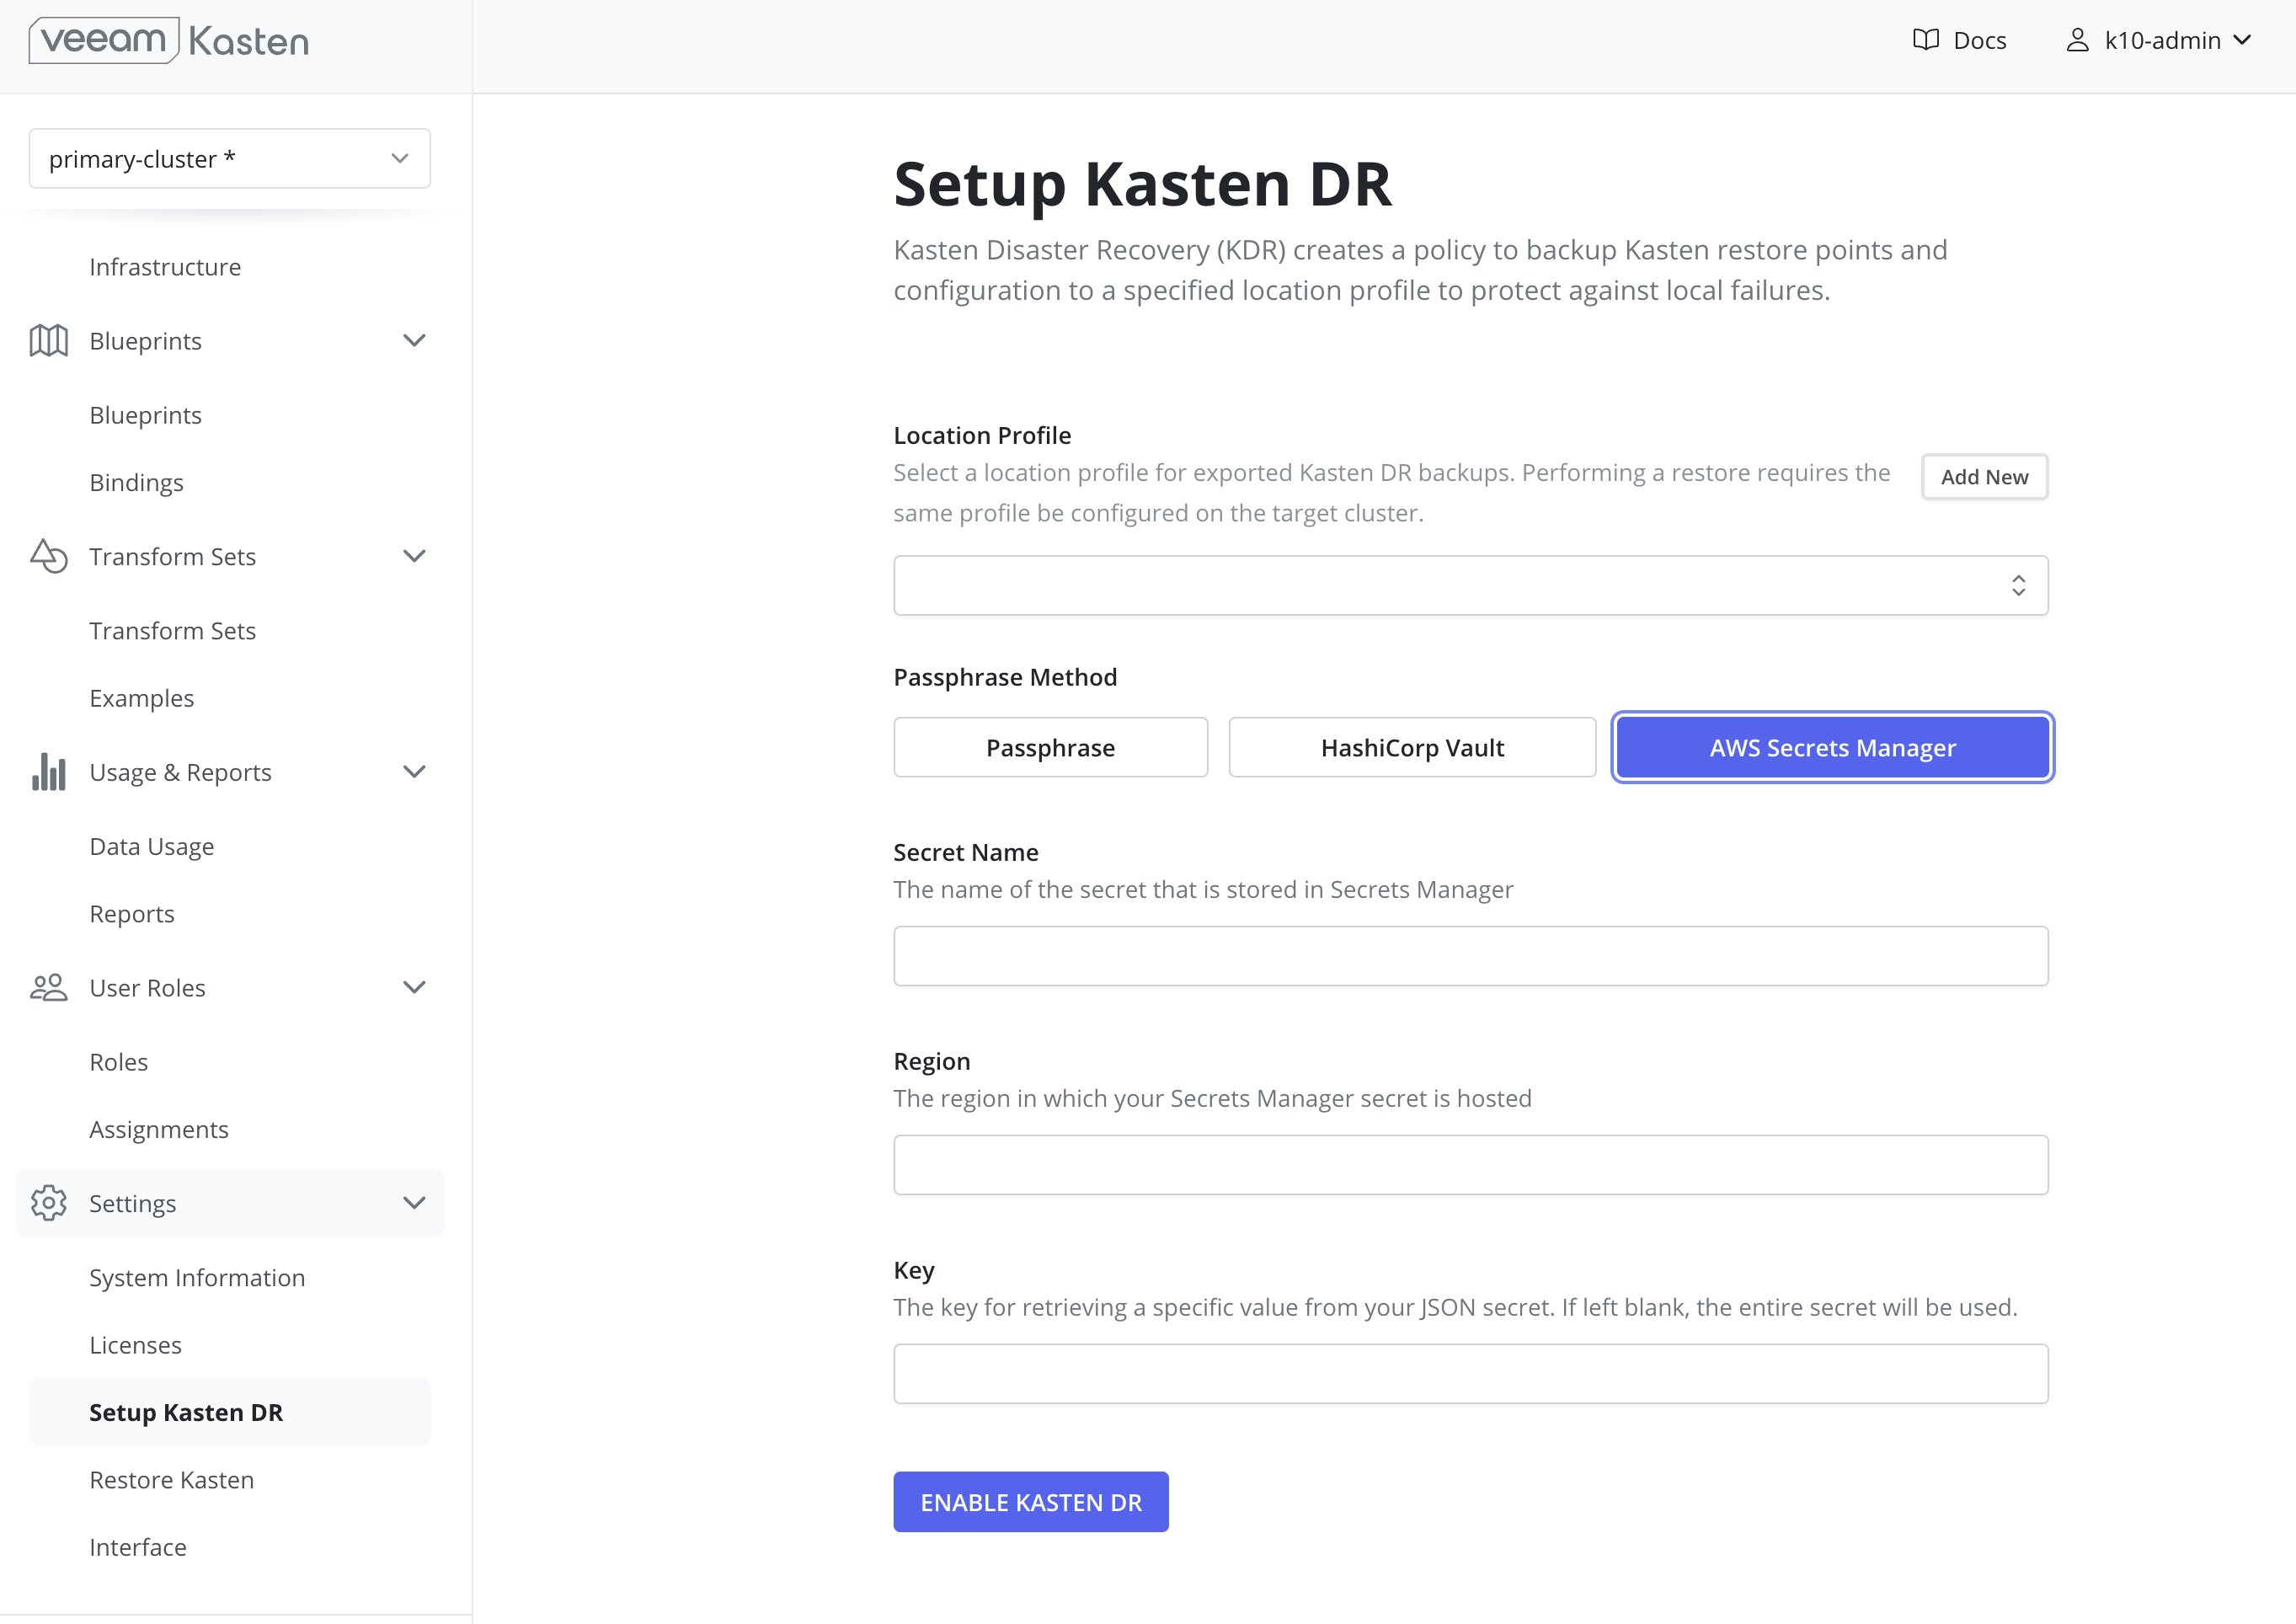 Note
NoteUsing AWS Secrets Manager requires that an AWS Infrastructure Profile exists with the required permissions
Azure Key Vault Secrets
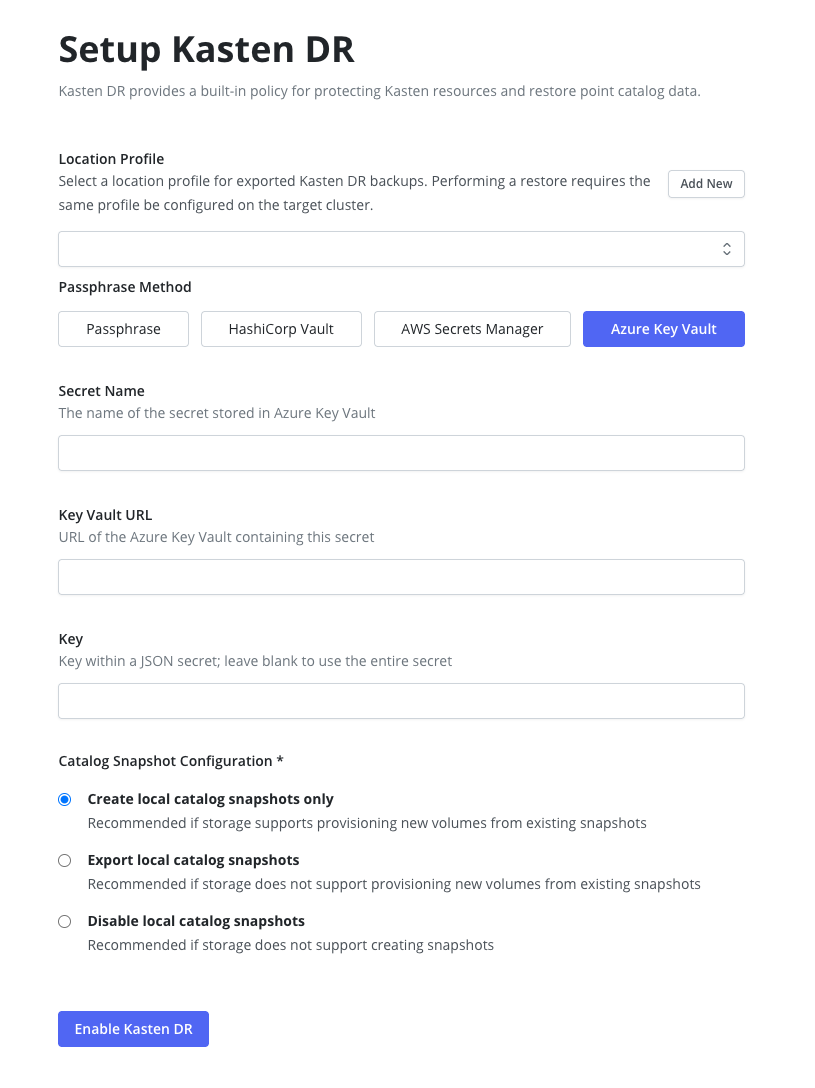 Note
NoteUsing Azure Key Vault for Disaster Recovery requires that an Azure Infrastructure Profile exists with permissions to read secrets from the specified Key Vault. Example Role Key Vault Secrets User see Key Vault Roles for more information.
When setting up Disaster Recovery with Azure Key Vault, the
latestversion of the secret will be used. This secret version must be in an enabled state for Disaster Recovery backup and recovery to work properly. The secret version used during setup is stored in thek10-dr-secretKubernetes secret under theazure-secret-versionkey. -
If Quick DR mode is enabled, specify the desired catalog snapshot behavior. See comparison for details and recommendations.
 Note
NoteUpdating the catalog snapshot configuration may be performed by disabling and re-enabling KDR.
-
Select
Enable Kasten DR.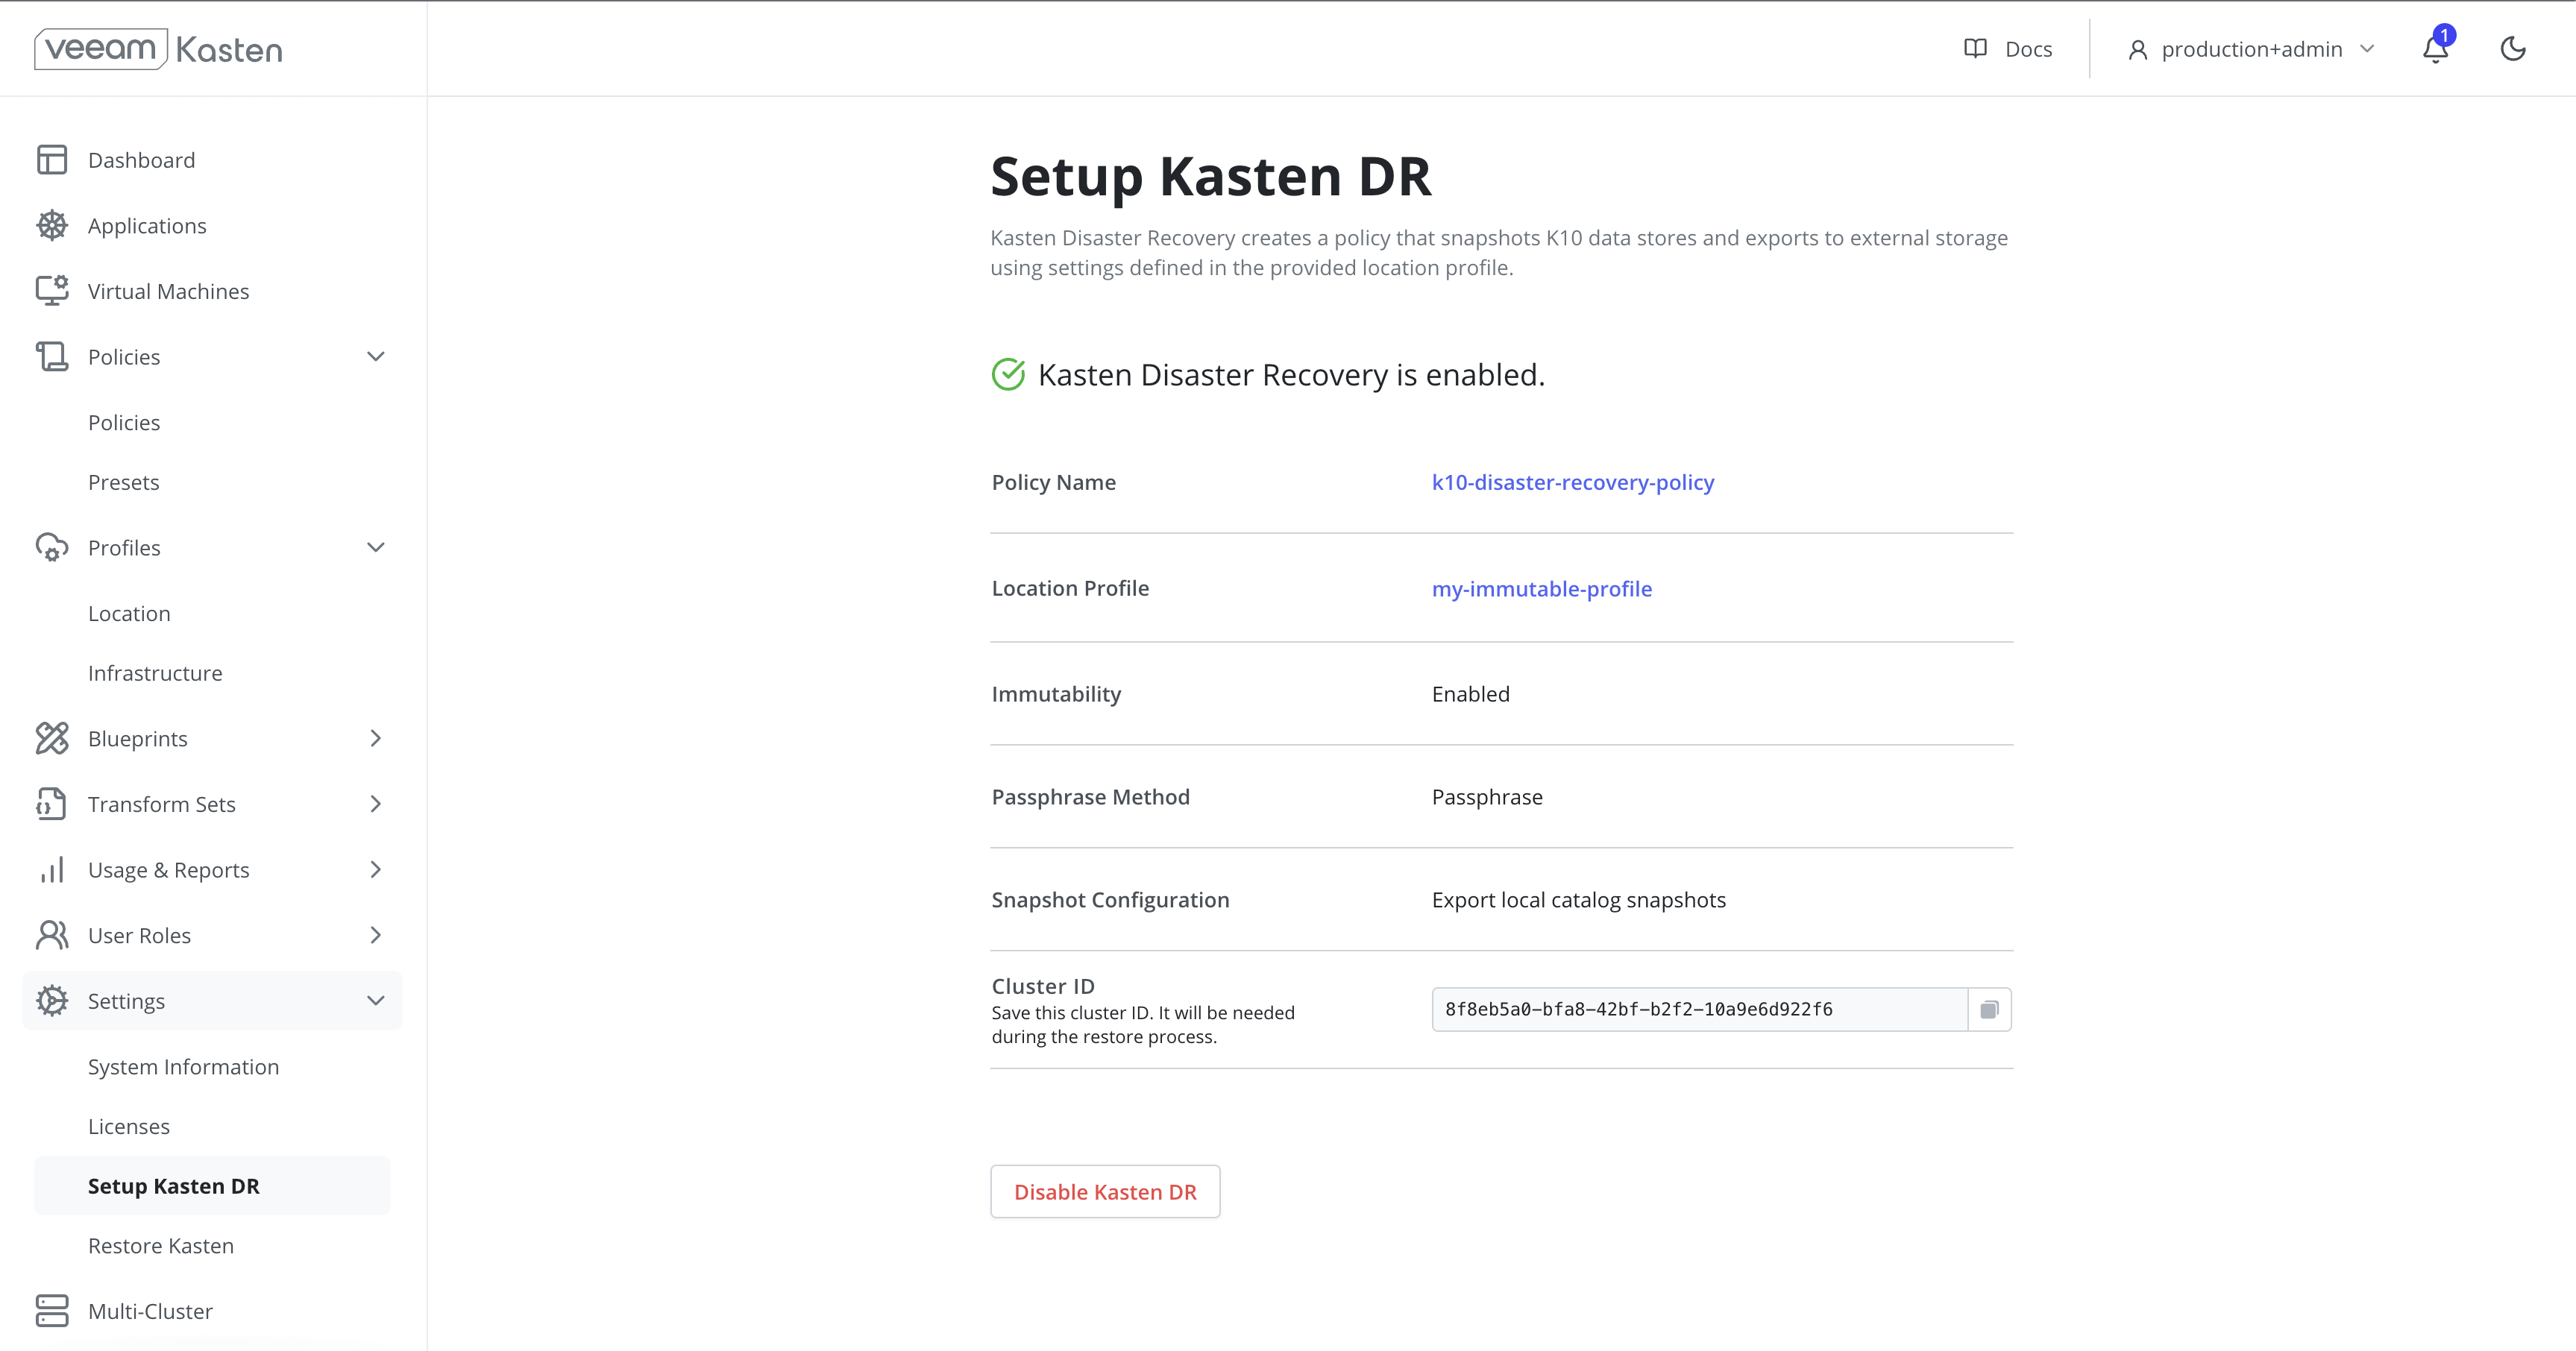
A confirmation with the configuration and
cluster IDwill be displayed when KDR is enabled. This ID is used as a prefix to the object or file storage location where Veeam Kasten saves its exported backup data.TipThe
Cluster IDvalue for a given cluster can also be accessed using the followingkubectlcommand:# Extract UUID of the `default` namespacekubectl get namespace default -o jsonpath="{.metadata.uid}{'\n'}"warningAfter enabling KDR it is critical to retain the following to successfully recover Veeam Kasten from a disaster:
- The source
Cluster ID - The KDR passphrase (or external secret manager details)
- The KDR location profile details and credential
Without this information, restore point catalog recovery will not be possible.
- The source
Enabling Veeam Kasten Disaster Recovery via CLI
As KDR backups are performed via a Veeam Kasten policy, configuration
of KDR may be automated via CLI or GitOps tools. Each of the following
examples assume deployment to the kasten-io namespace and must be
modified to reflect environment specific details including location
profile name, frequency, and retention.
-
Create the
k10-dr-secretSecret with the passphrase to be used to encrypt KDR backups:kubectl create secret generic k10-dr-secret --namespace kasten-io --from-literal key=<PASSPHRASE> -
Modify and apply one of the following
k10-disaster-recovery-policyPolicy examples. See comparison for available mode details and recommendations.Quick DR (Local Catalog Snapshot) - Default
apiVersion: config.kio.kasten.io/v1alpha1kind: Policymetadata:name: k10-disaster-recovery-policynamespace: kasten-iospec:actions:- action: backupbackupParameters:filters: {}profile:name: <NAME OF LOCATION PROFILE>namespace: kasten-iofrequency: '@hourly'retention:daily: 1hourly: 4monthly: 1weekly: 1yearly: 1selector:matchExpressions:- key: k10.kasten.io/appNamespaceoperator: Invalues:- kasten-iokdrSnapshotConfiguration:takeLocalCatalogSnapshot: trueQuick DR (Exported Catalog Snapshot)
apiVersion: config.kio.kasten.io/v1alpha1kind: Policymetadata:name: k10-disaster-recovery-policynamespace: kasten-iospec:actions:- action: backupbackupParameters:filters: {}profile:name: <NAME OF LOCATION PROFILE>namespace: kasten-io- action: exportexportParameters:exportData:enabled: trueprofile:name: <NAME OF LOCATION PROFILE>namespace: kasten-iofrequency: '@hourly'retention:daily: 1hourly: 4monthly: 1weekly: 1yearly: 1selector:matchExpressions:- key: k10.kasten.io/appNamespaceoperator: Invalues:- kasten-iokdrSnapshotConfiguration:exportCatalogSnapshot: truetakeLocalCatalogSnapshot: trueQuick DR (No Catalog Snapshot)
apiVersion: config.kio.kasten.io/v1alpha1kind: Policymetadata:name: k10-disaster-recovery-policynamespace: kasten-iospec:actions:- action: backupbackupParameters:filters: {}profile:name: <NAME OF LOCATION PROFILE>namespace: kasten-iofrequency: '@hourly'retention:daily: 1hourly: 4monthly: 1weekly: 1yearly: 1selector:matchExpressions:- key: k10.kasten.io/appNamespaceoperator: Invalues:- kasten-iokdrSnapshotConfiguration: {}Legacy DR (Full Catalog Export)
apiVersion: config.kio.kasten.io/v1alpha1kind: Policymetadata:name: k10-disaster-recovery-policynamespace: kasten-iospec:actions:- action: backupbackupParameters:filters: {}profile:name: <NAME OF LOCATION PROFILE>namespace: kasten-iofrequency: '@hourly'retention:daily: 1hourly: 4monthly: 1weekly: 1yearly: 1selector:matchExpressions:- key: k10.kasten.io/appNamespaceoperator: Invalues:- kasten-io
Managing the Veeam Kasten Disaster Recovery Policy
A policy named k10-disaster-recovery-policy that implements
KDR functionality will automatically be created when
KDR is enabled. This policy can be viewed through the Policies
page in the navigation sidebar.
Click Run Once on the k10-disaster-recovery-policy to start a
manual backup.
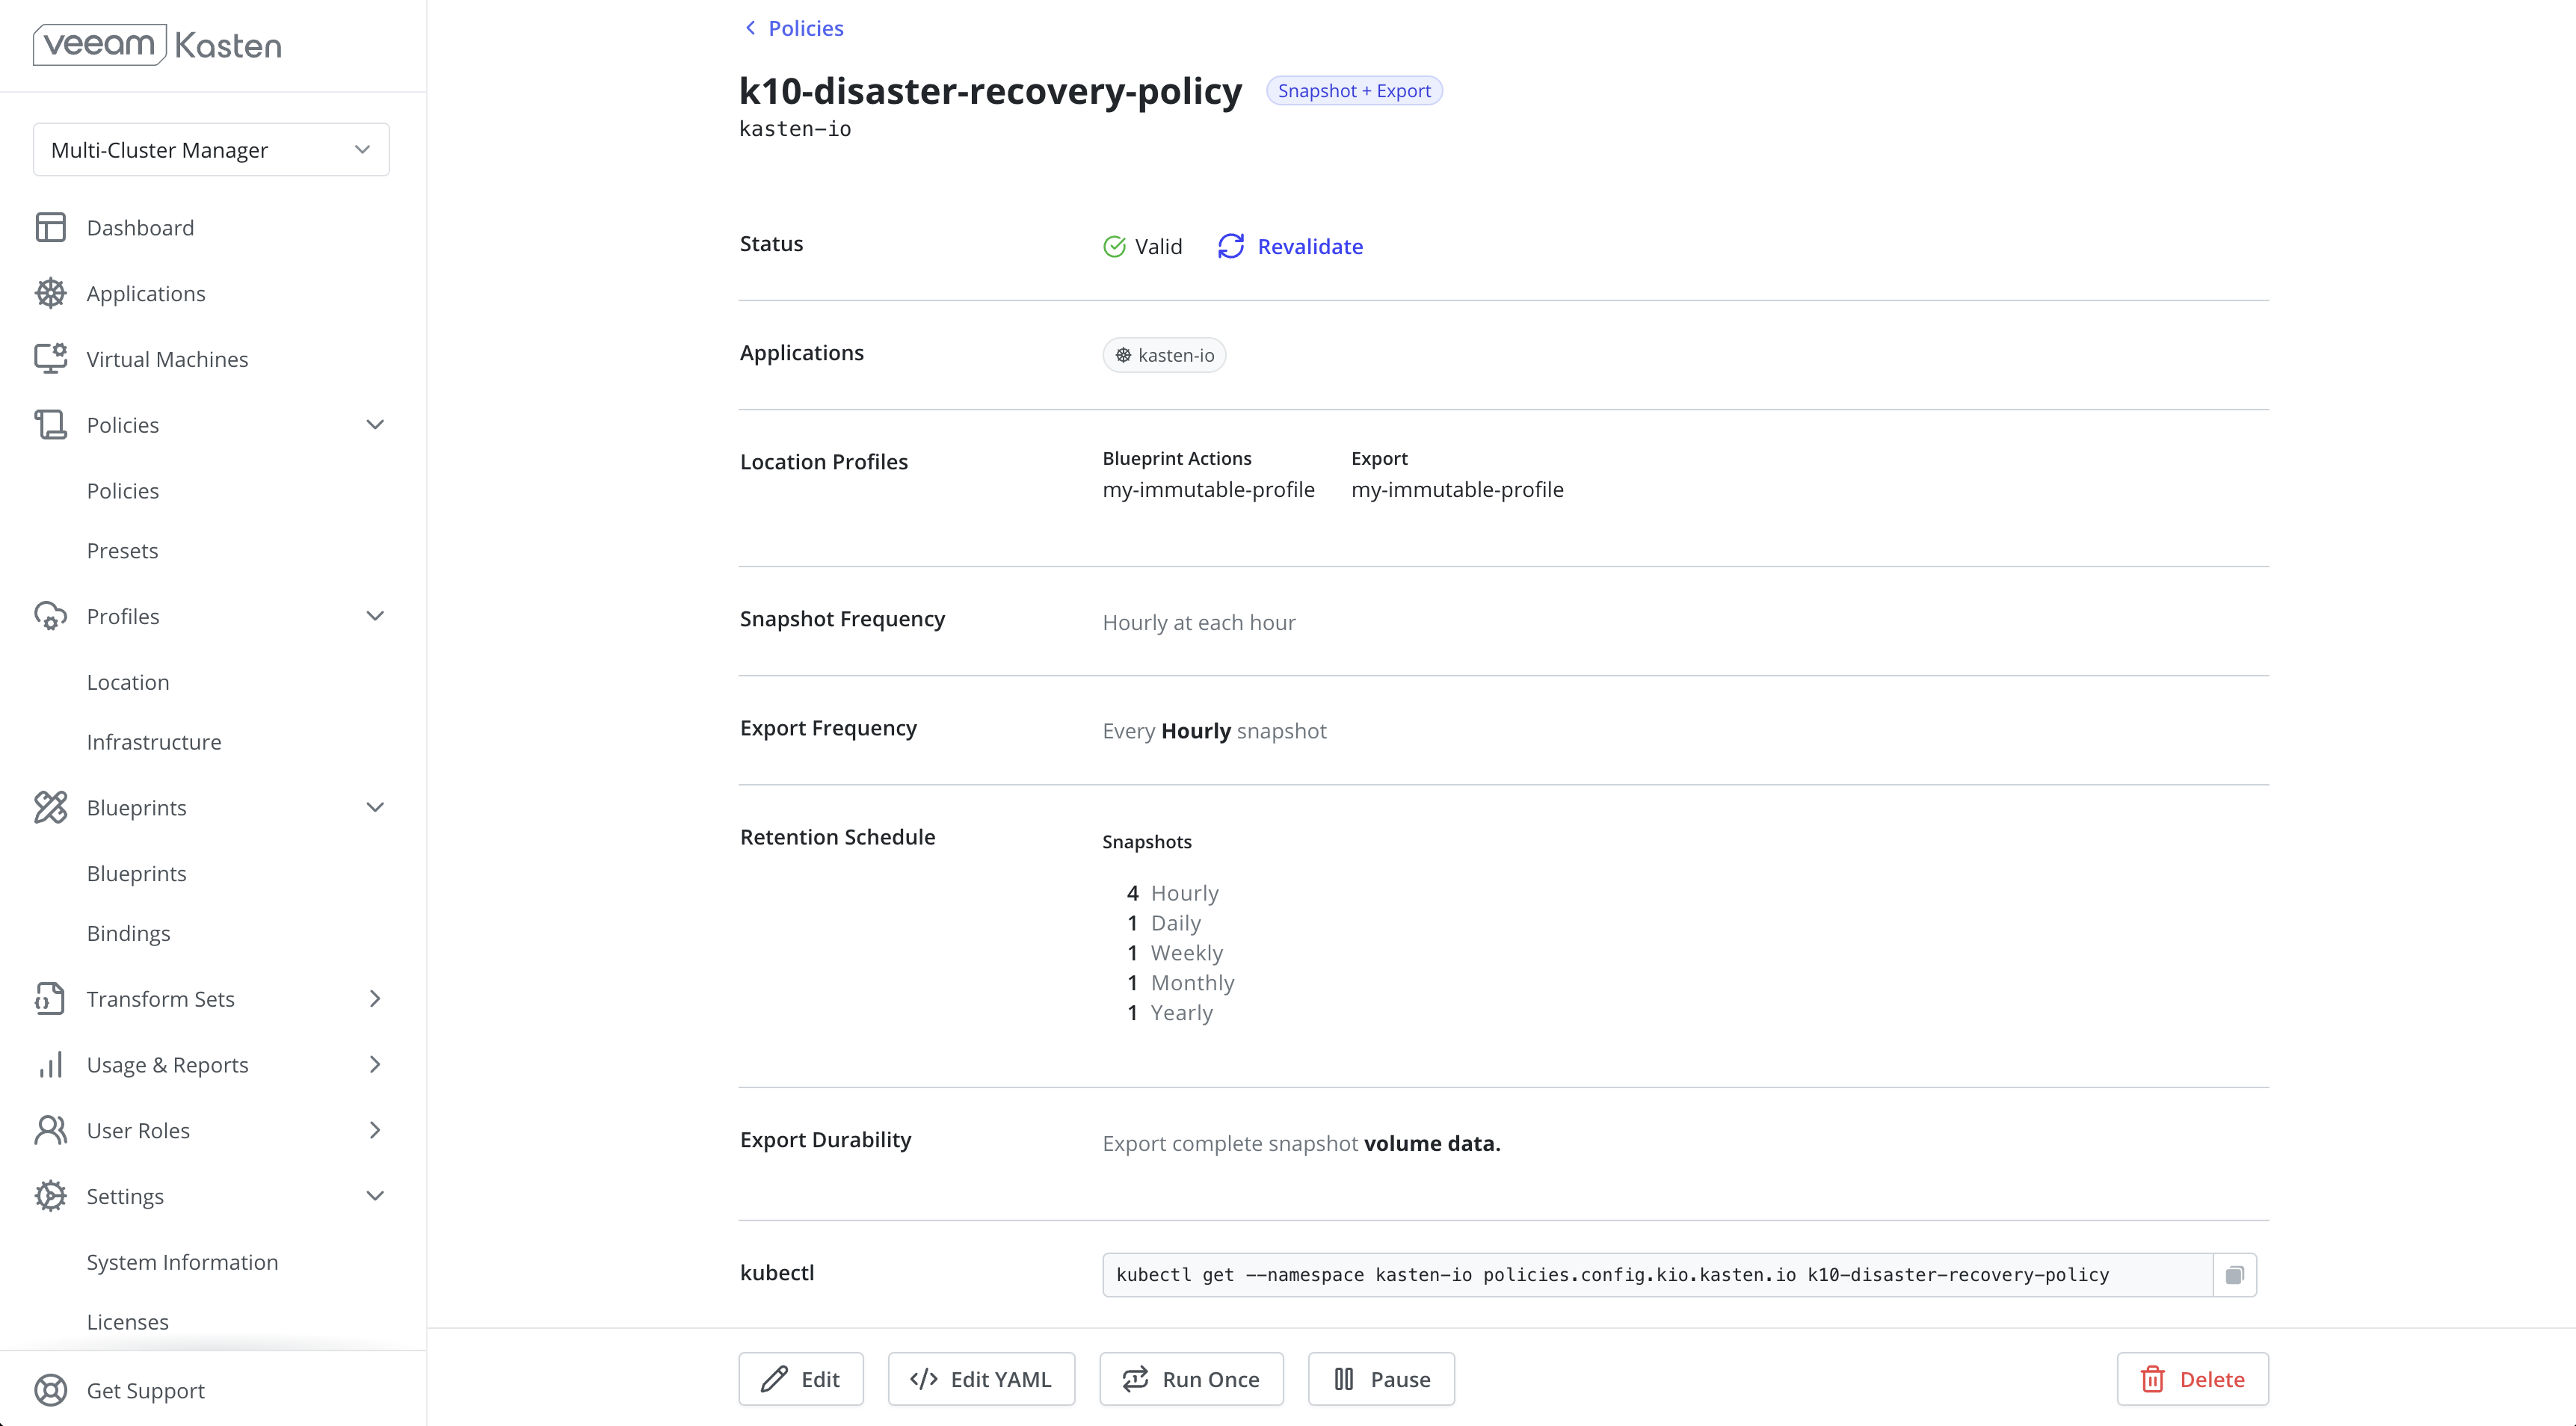
Click Edit to modify the frequency and retention settings. It is
recommended that the KDR policy match the frequency of the lowest RPO
policy on the cluster.
Disabling Veeam Kasten Disaster Recovery
Veeam Kasten Disaster Recovery can be disabled by clicking the
Disable Kasten DR button on the Setup Kasten DR page, which is found
under the Settings menu in the navigation sidebar.
It is not recommended to run Veeam Kasten without KDR enabled.
Recovering Veeam Kasten from a Disaster via UI
To recover from a KDR backup using the UI, follow these steps:
- On a new cluster, install a fresh Veeam Kasten instance in the same namespace as the original Veeam Kasten instance.
- On the new cluster, create a location profile by providing the bucket information and credentials for the object storage location or NFS/SMB file storage location where previous Veeam Kasten backups are stored.
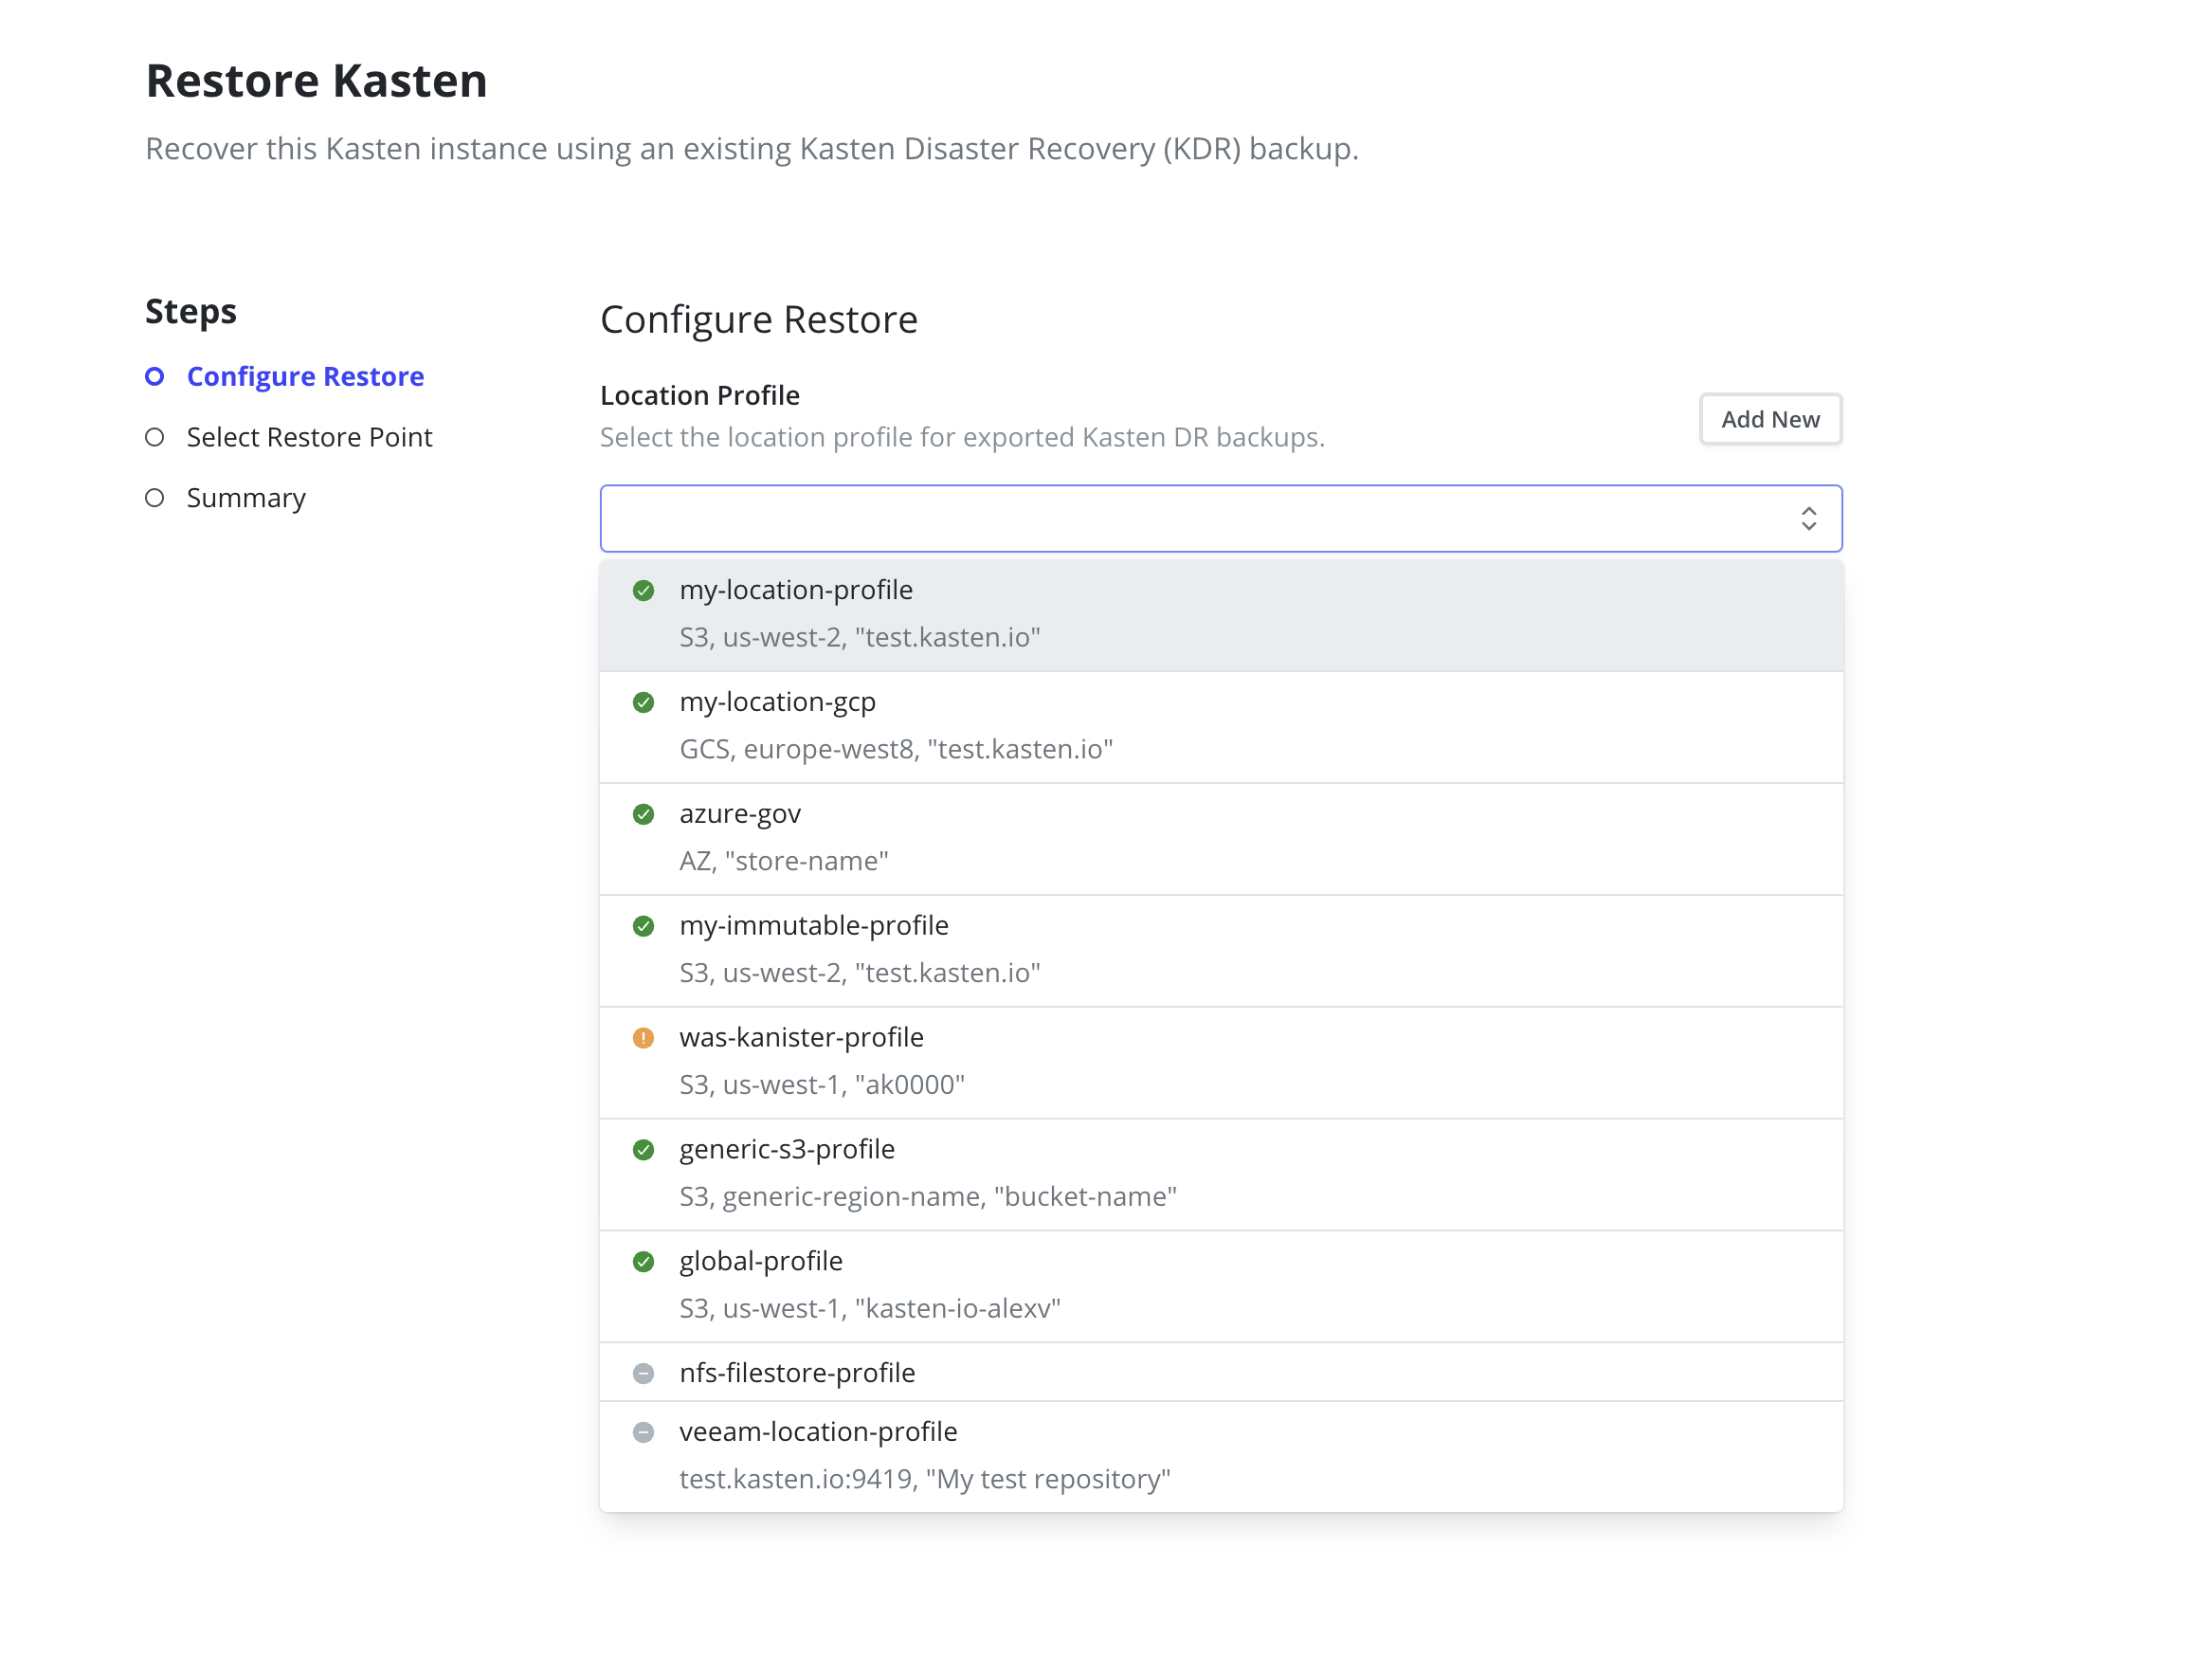
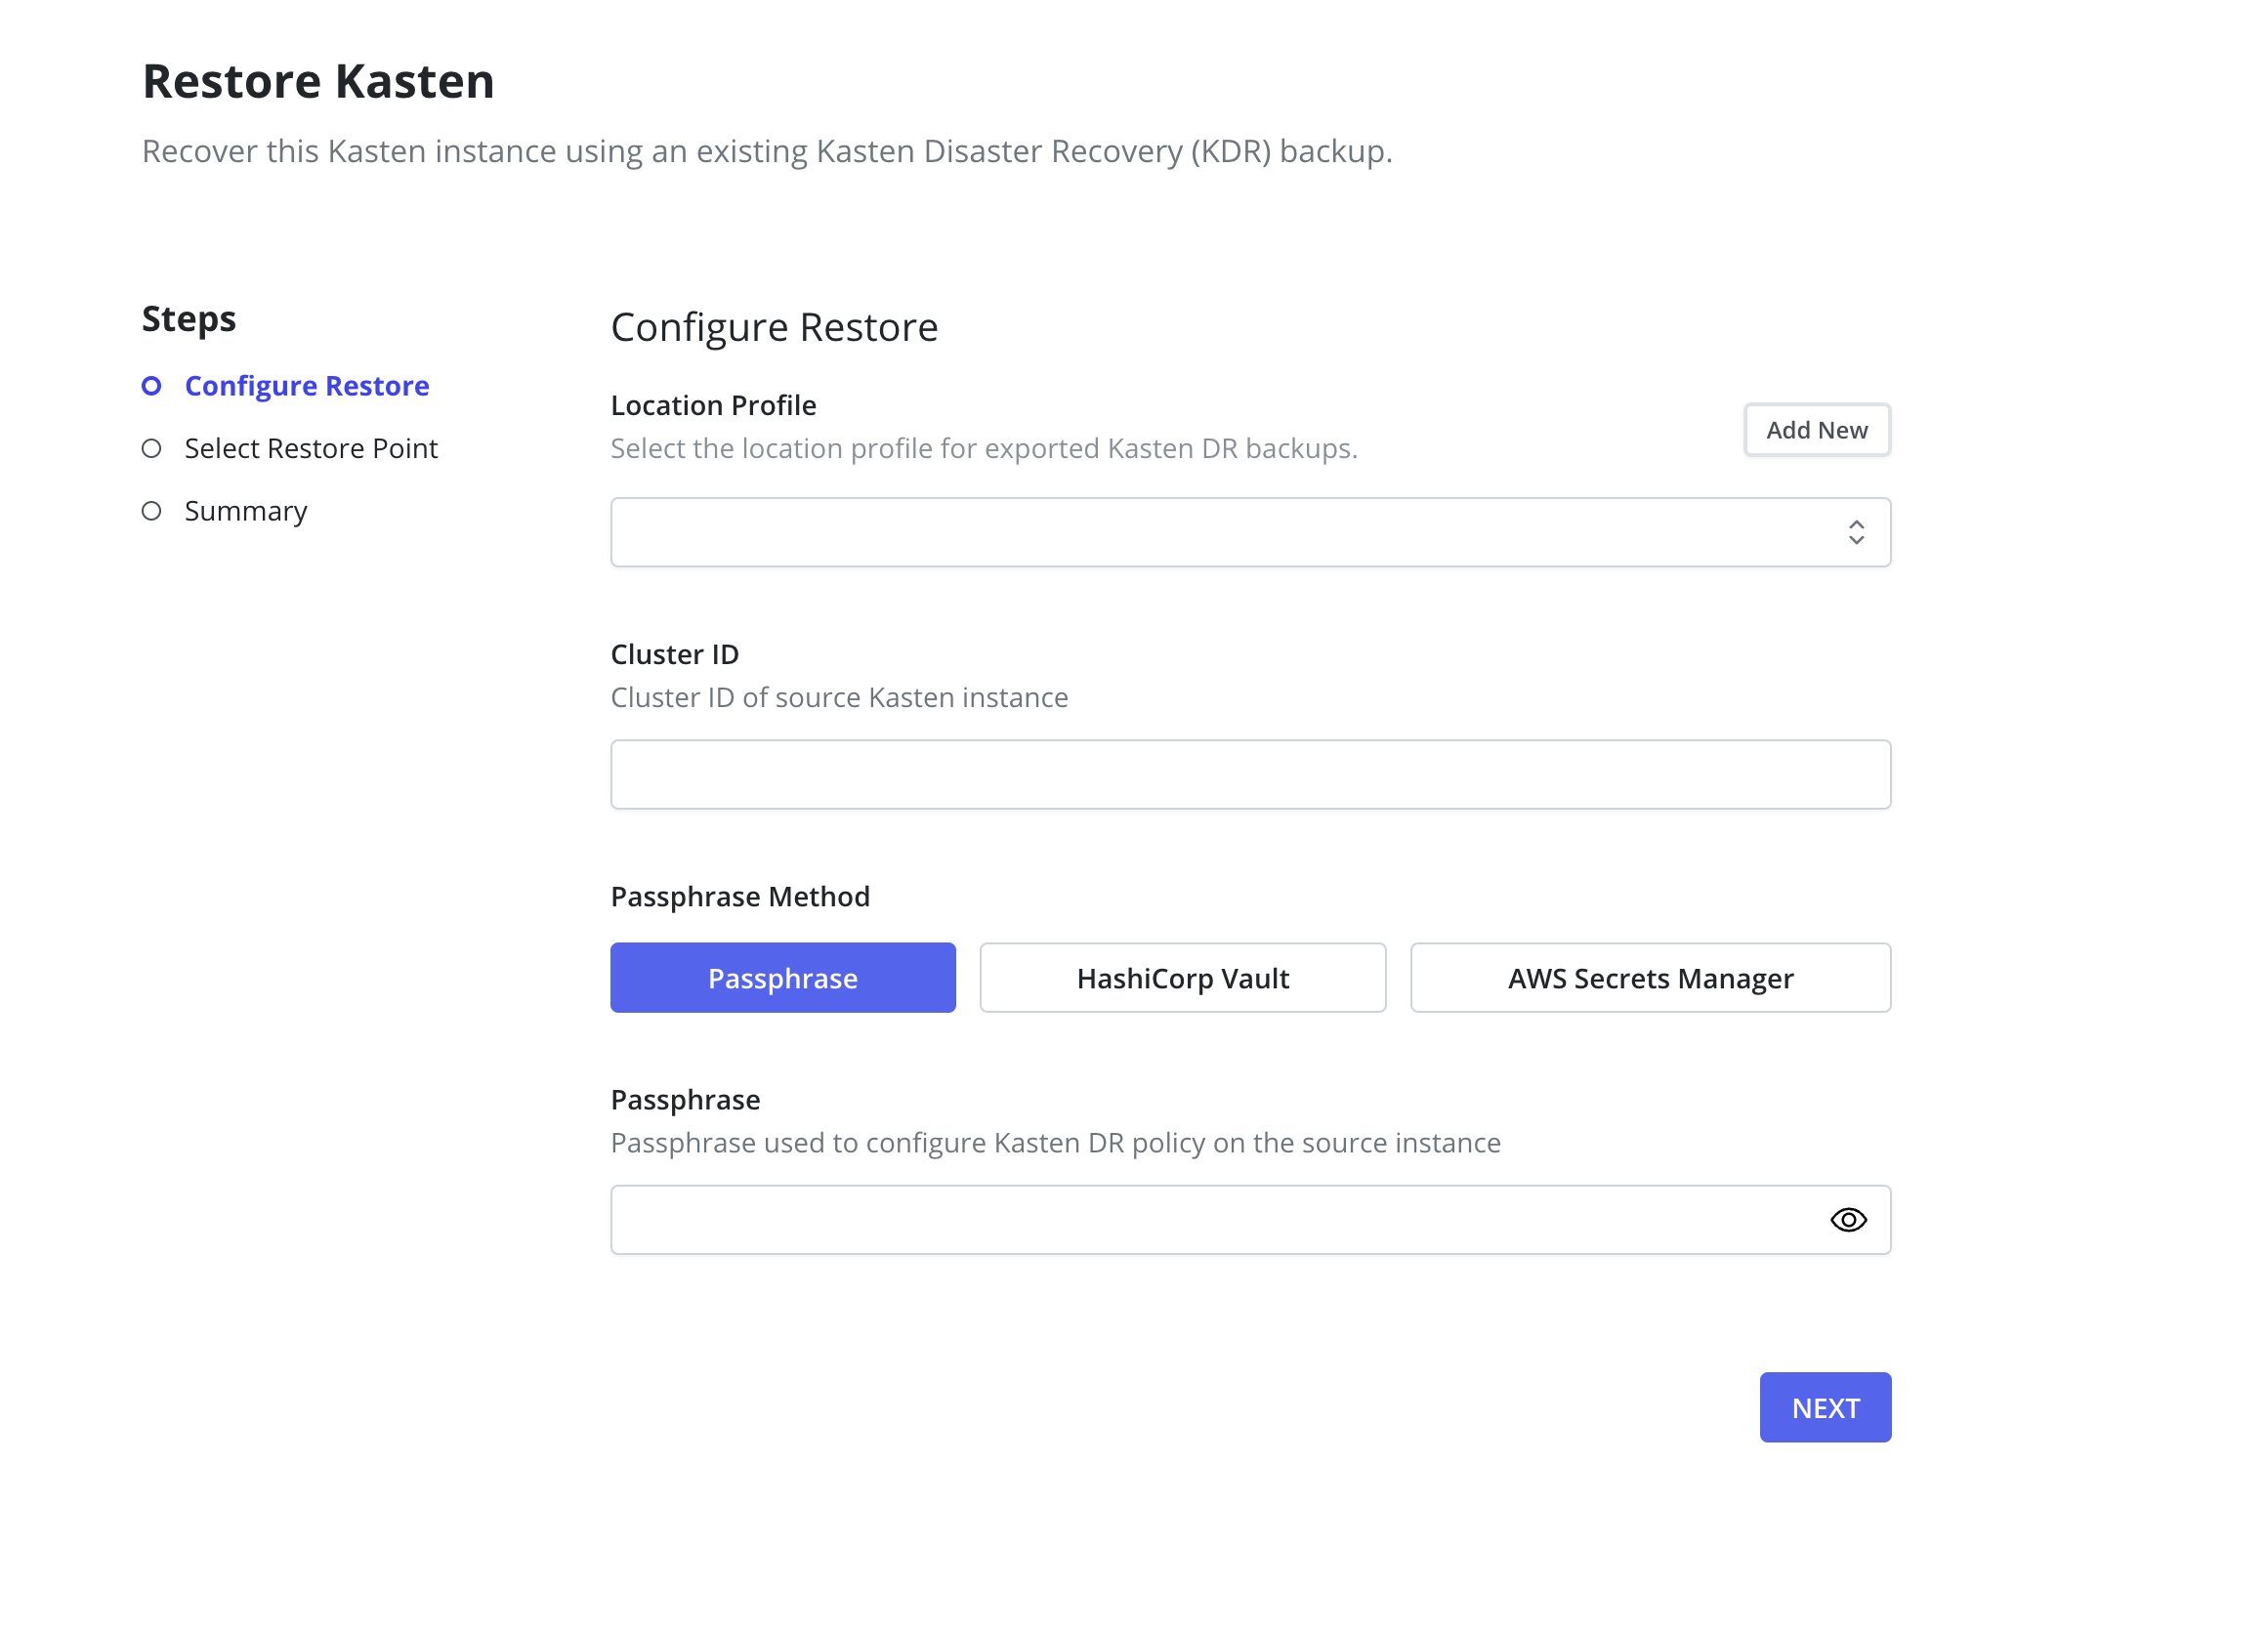
-
On the new cluster, navigate to the
Restore Kastenpage under theSettingsmenu in the navigation sidebar. - In the Profile drop-down, select the location profile created in step 3.
-
For Cluster ID, provide the ID of the original cluster with Veeam
Kasten Disaster Recovery enabled. This ID can be found on the
Setup Kasten DRpage of the original cluster that currently has Veeam Kasten Disaster Recovery enabled.

- Raw passphrase: Provide the passphrase used when enabling Disaster Recovery.
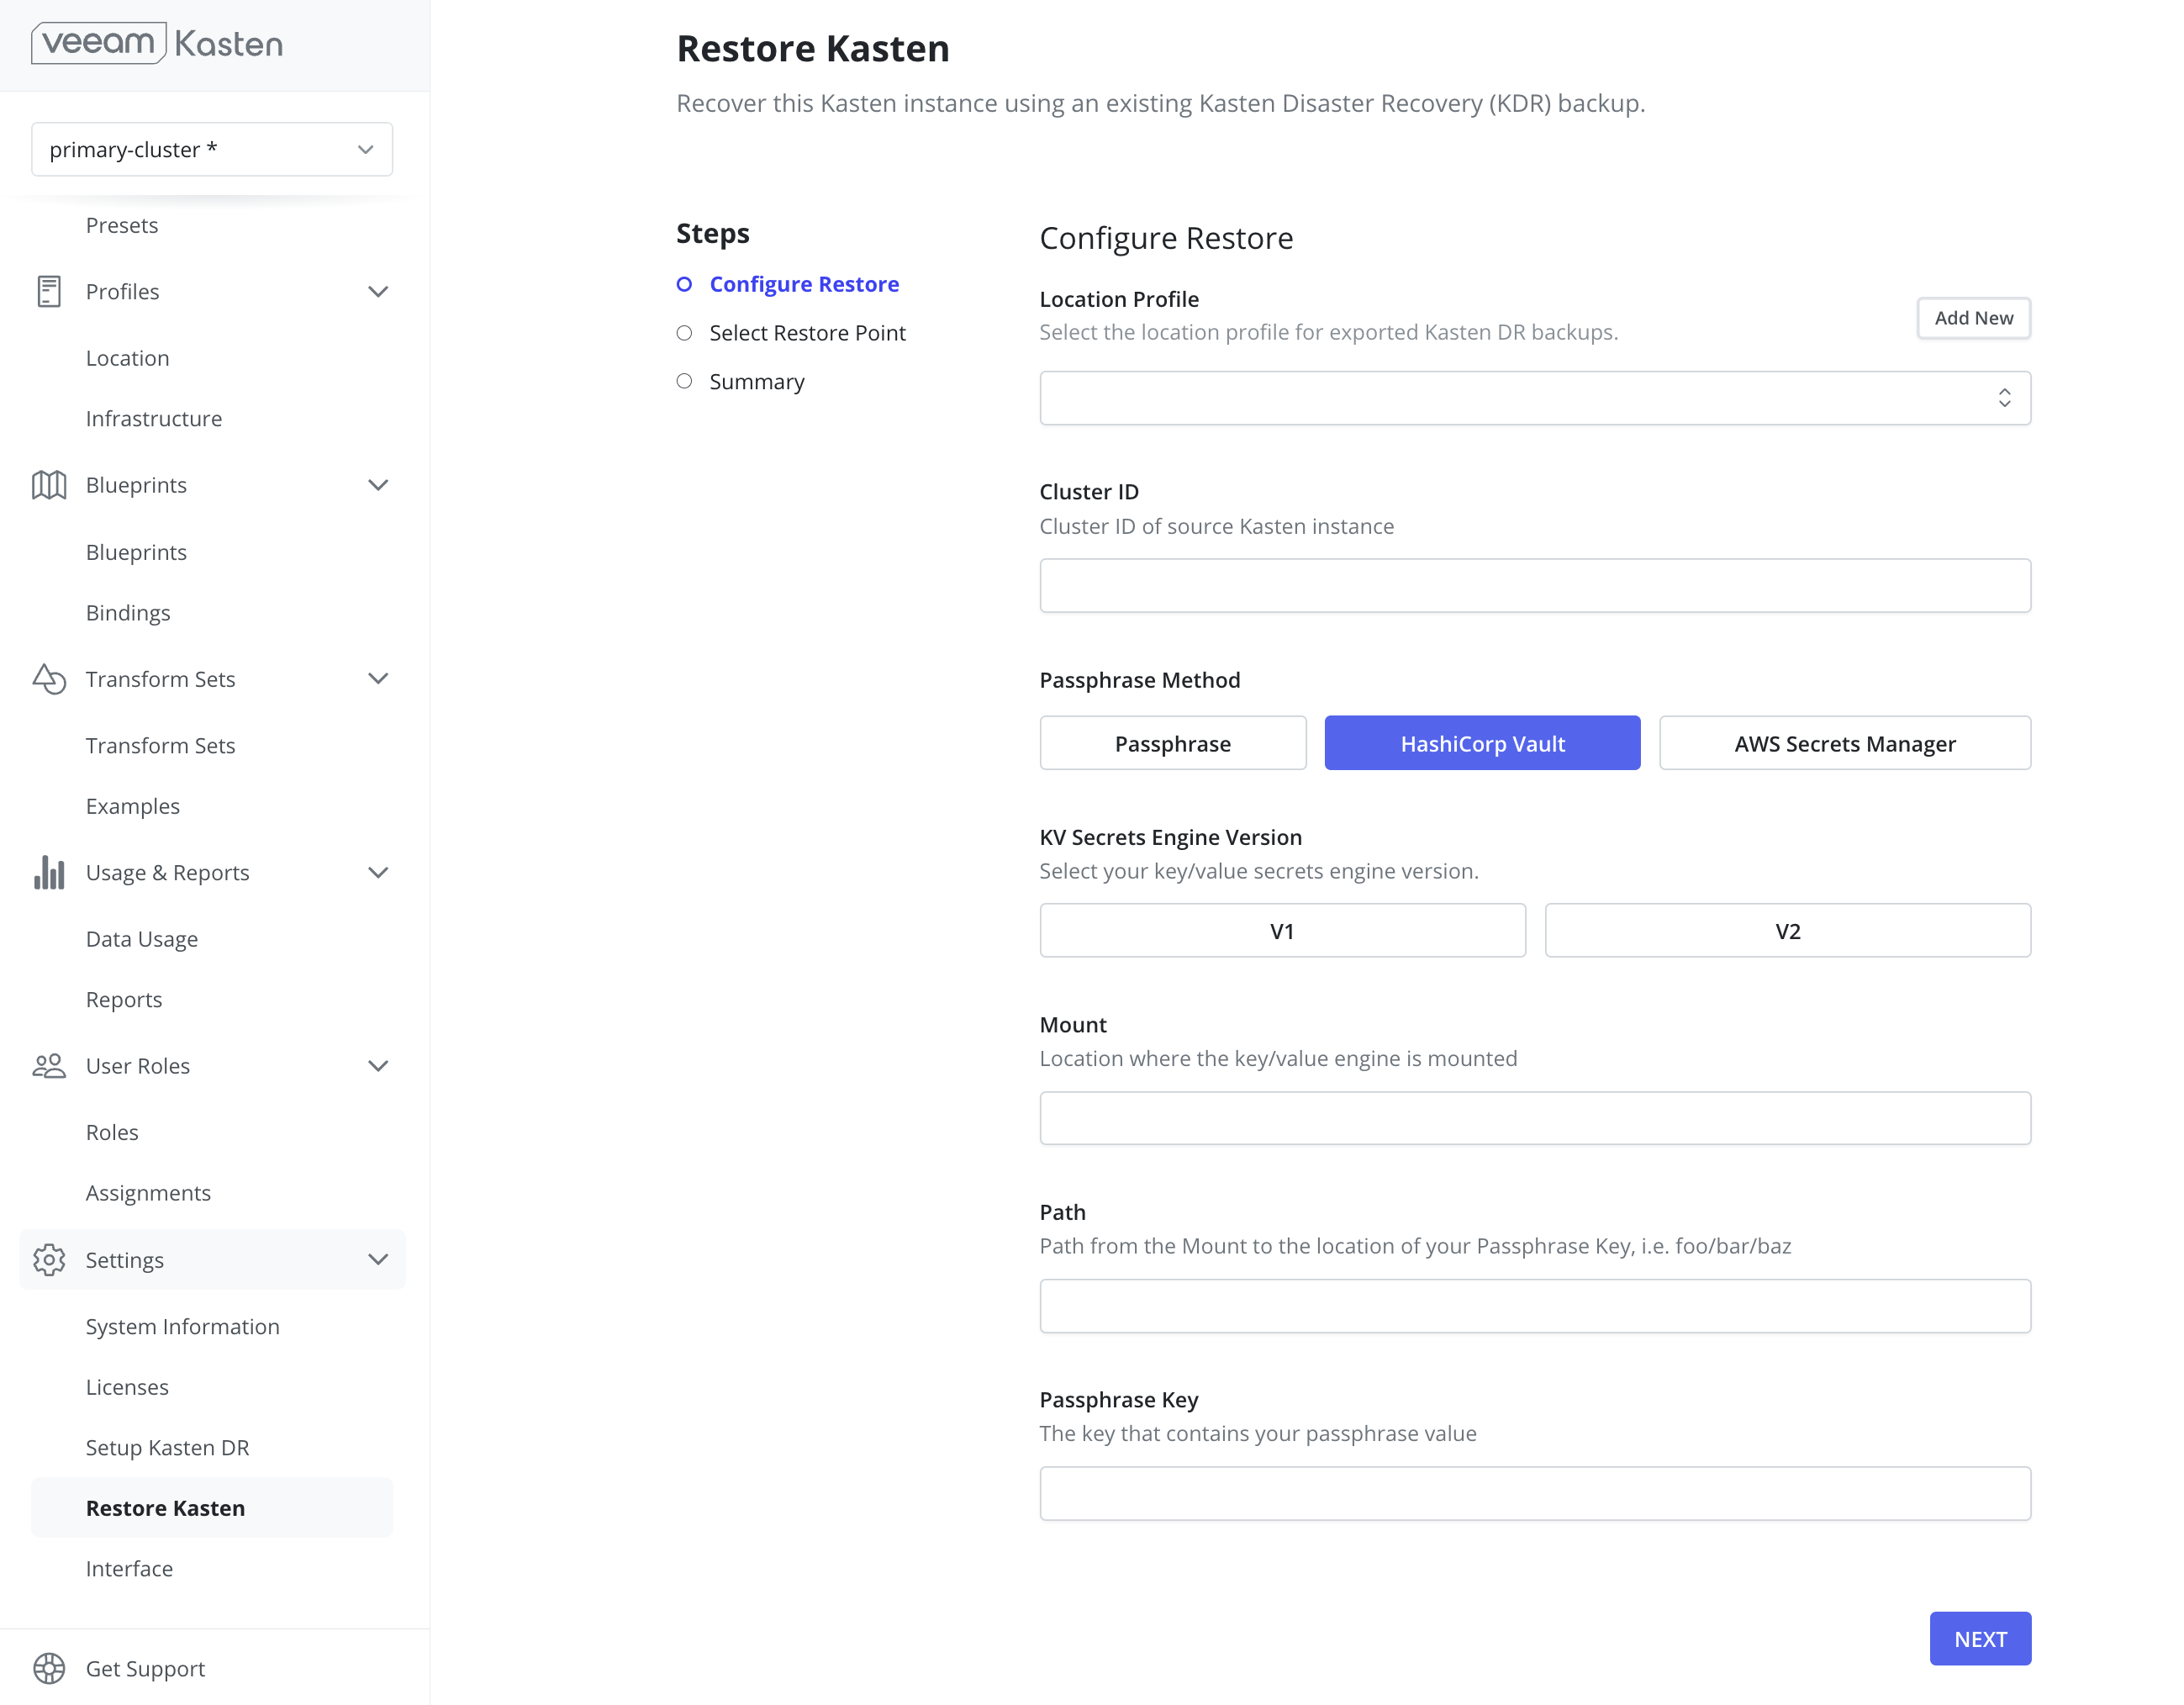
- HashiCorp Vault: Provide the Key Value Secrets Engine Version, Mount, Path, and Passphrase Key stored in a HashiCorp Vault secret.
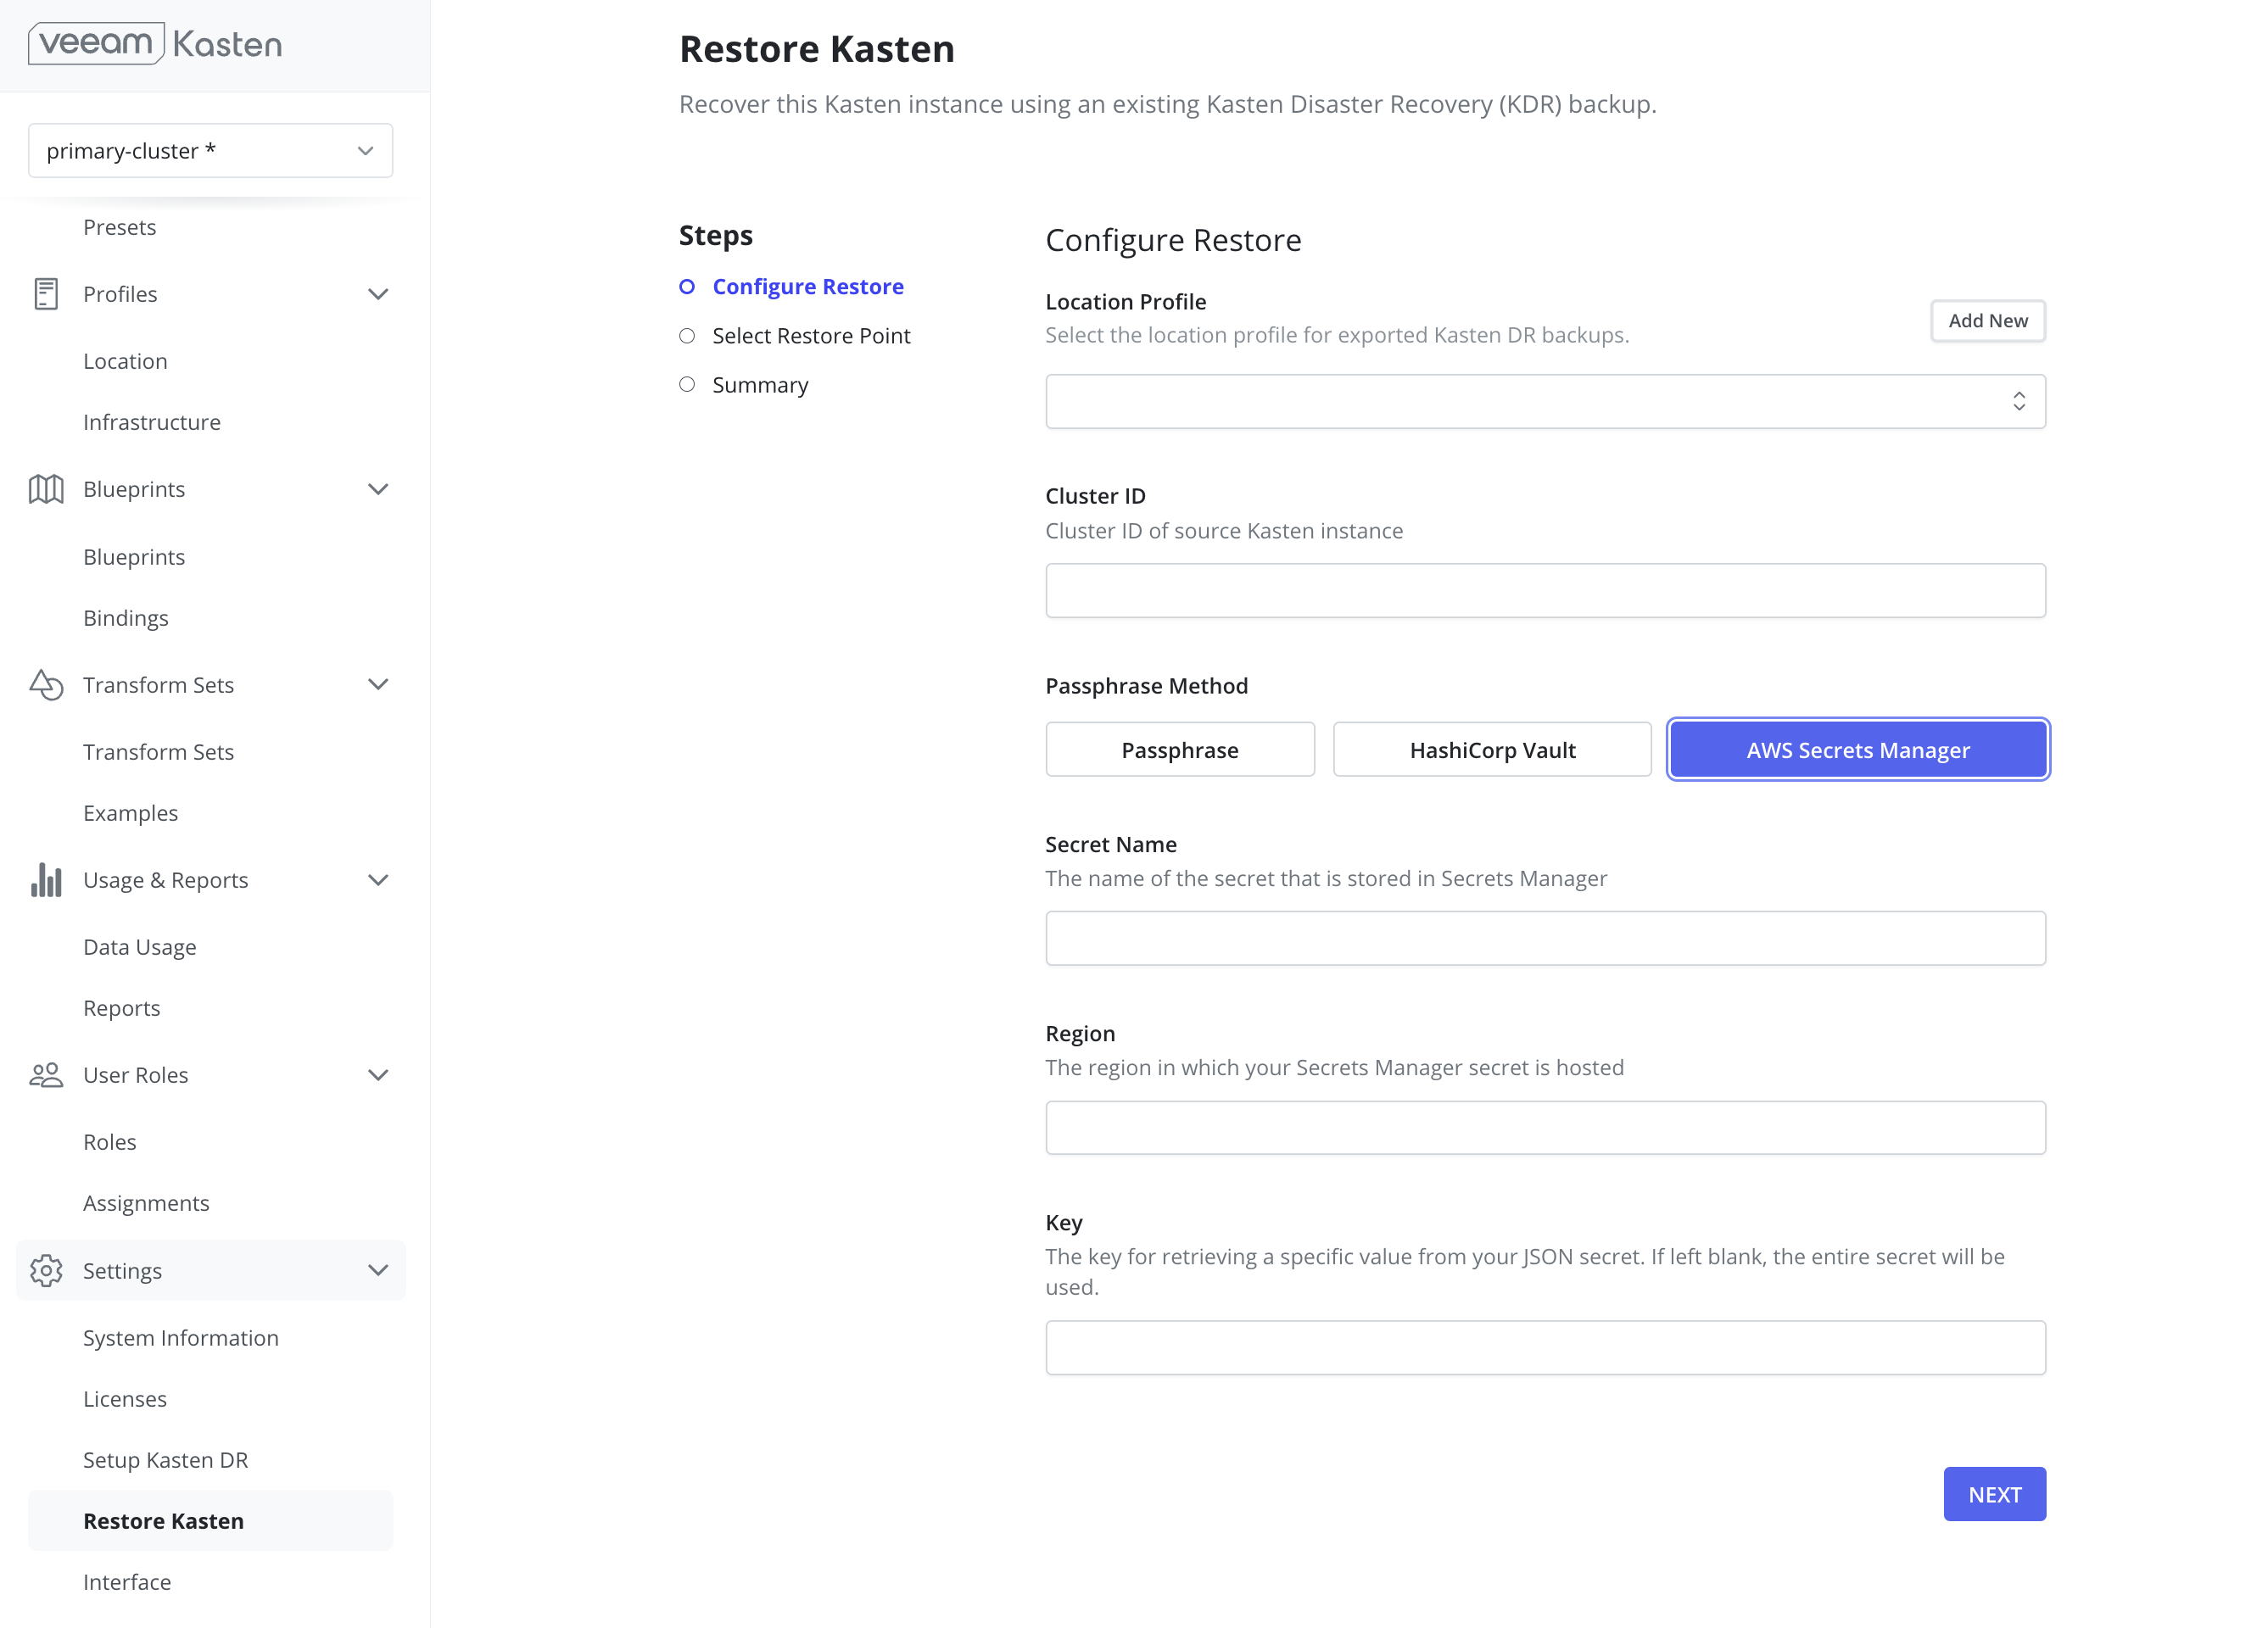
- AWS Secrets Manager: Provide the secret name, its associated region, and the key.
- Azure Key Vault Secrets: Provide the Azure Key Vault secret name and vault URL containing the DR passphrase.
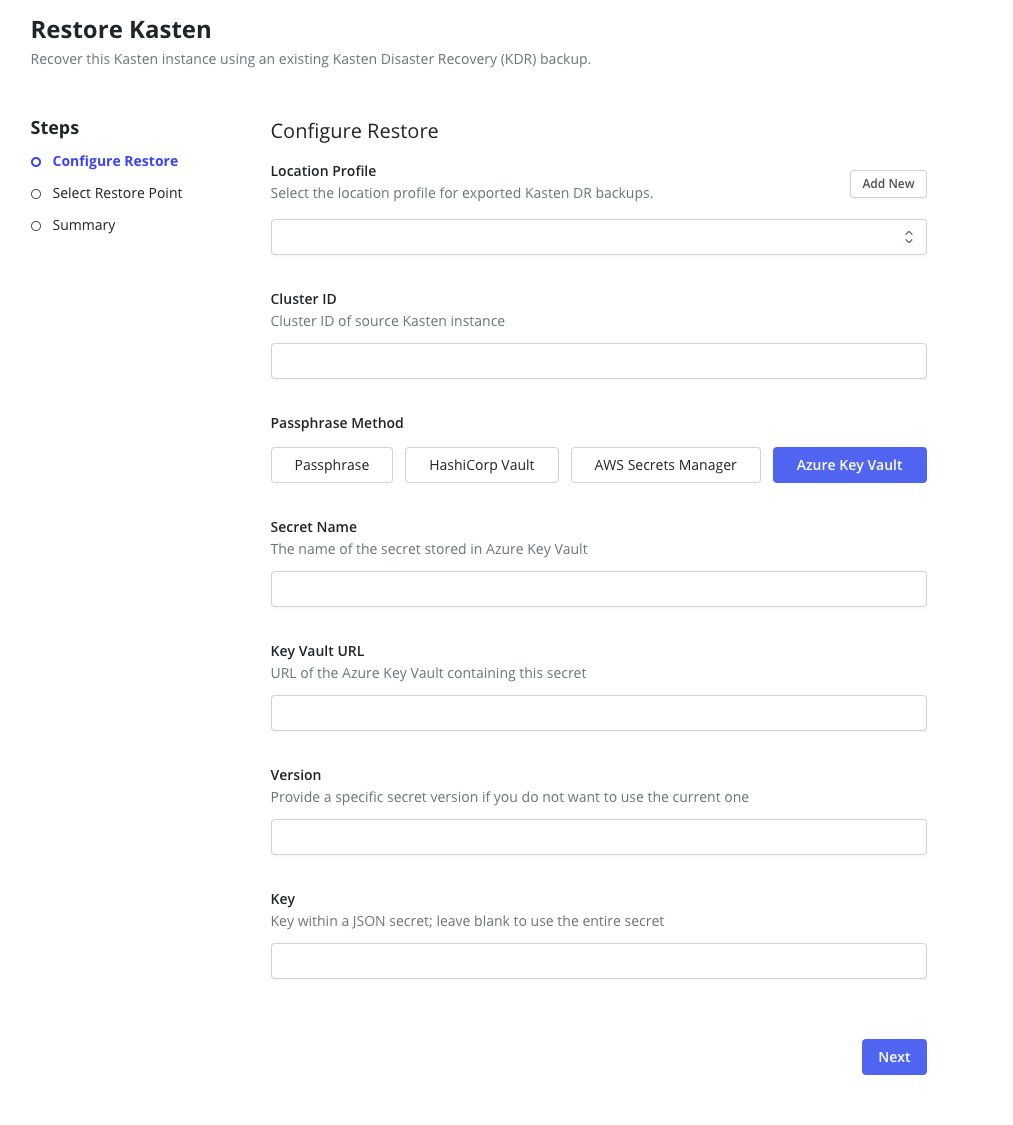
- Secret Name: The name of the secret in Azure Key Vault that contains the passphrase
- Key Vault URL: The vault URL (e.g.,
https://my-vault.vault.azure.net/) -
Secret Version (Optional): Specific version of the secret. If not provided, the
latest version will be used. The version from the original cluster is stored in the
k10-dr-secretKubernetes secret under theazure-secret-versionkey. - JSON Key (Optional): If the secret value is a JSON object, specify the field name that contains the passphrase
Using Azure Key Vault requires that an Azure Infrastructure Profile exists with permissions to read secrets from the specified Key Vault. Example Role Key Vault Secrets User see Key Vault Roles for more information.
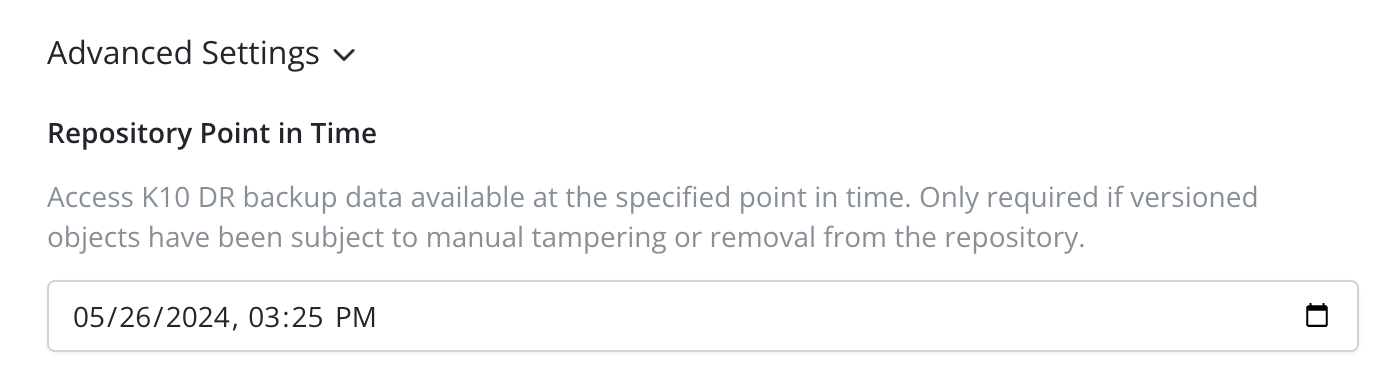
For immutable location profiles, a previous point in time can be provided to filter out any restore points newer than the specified time in the next step. If no specific date is chosen, it will display all available restore points, with the most recent ones appearing first.
-
Click the
Nextbutton to start the validation process. If validation succeeds, a drop-down containing the available restore points will be displayed.
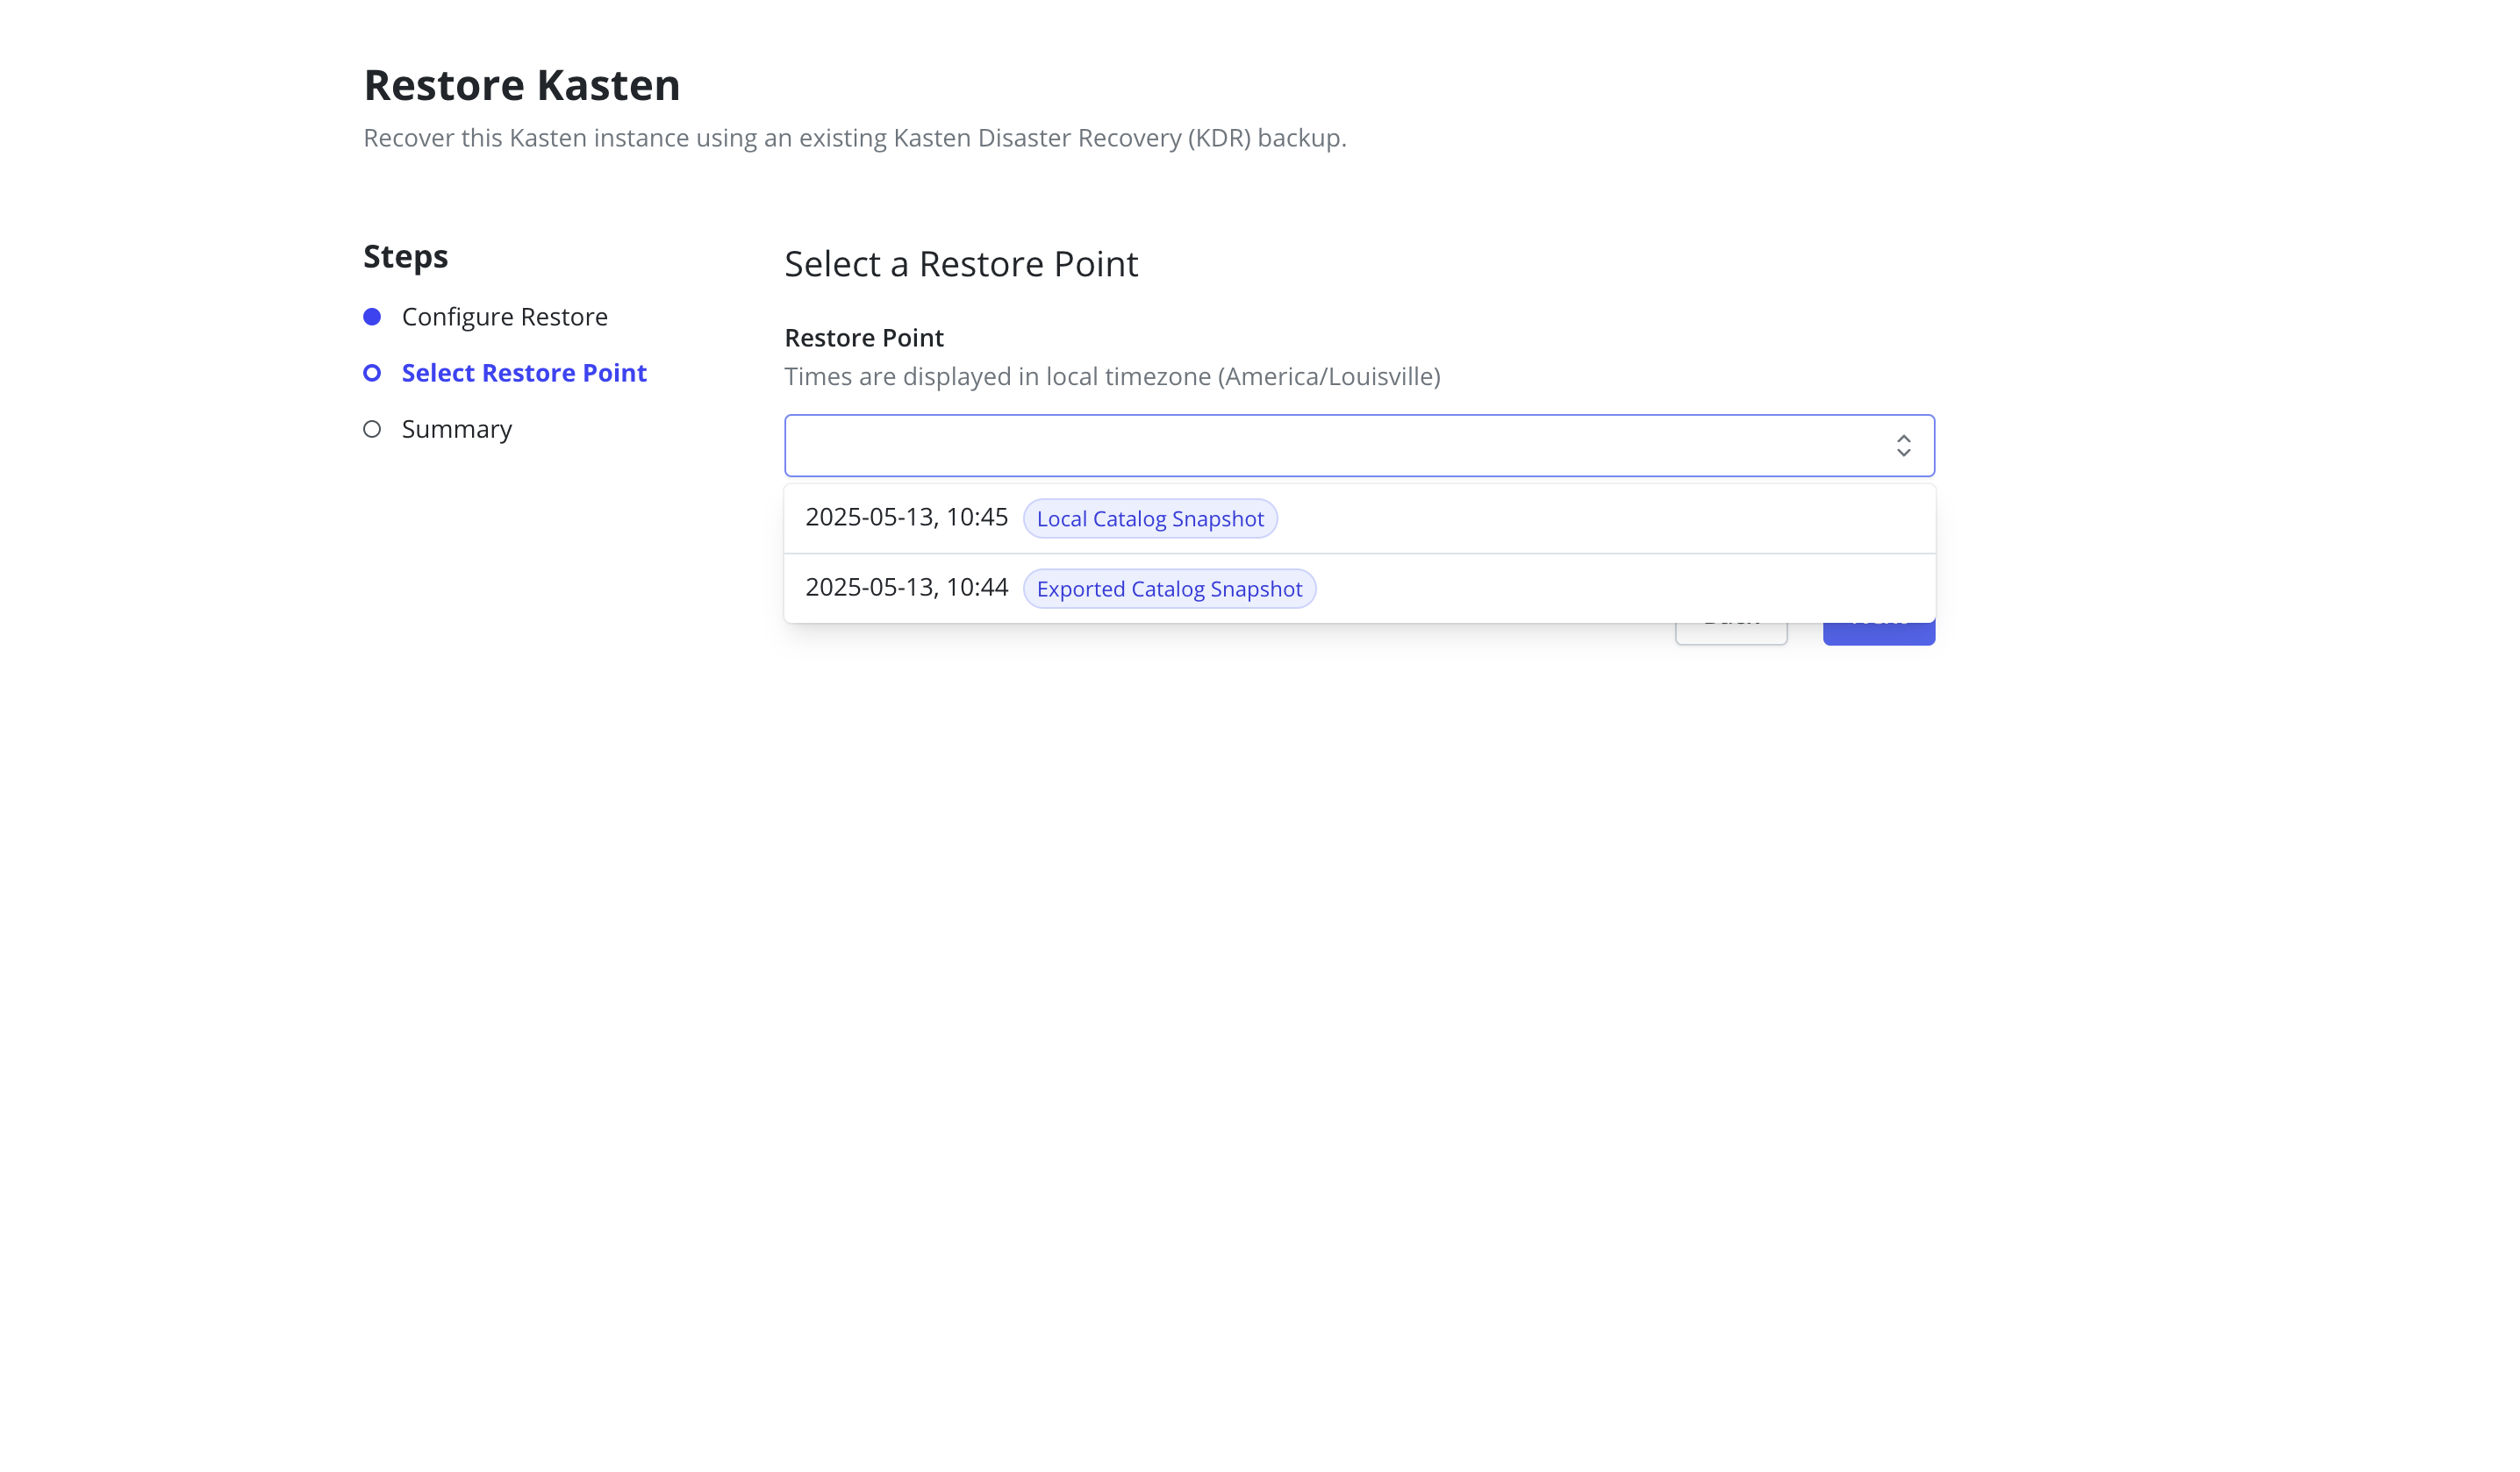
All times are displayed in the local timezone of the client's browser.
- Select the desired restore point and click the
Nextbutton. -
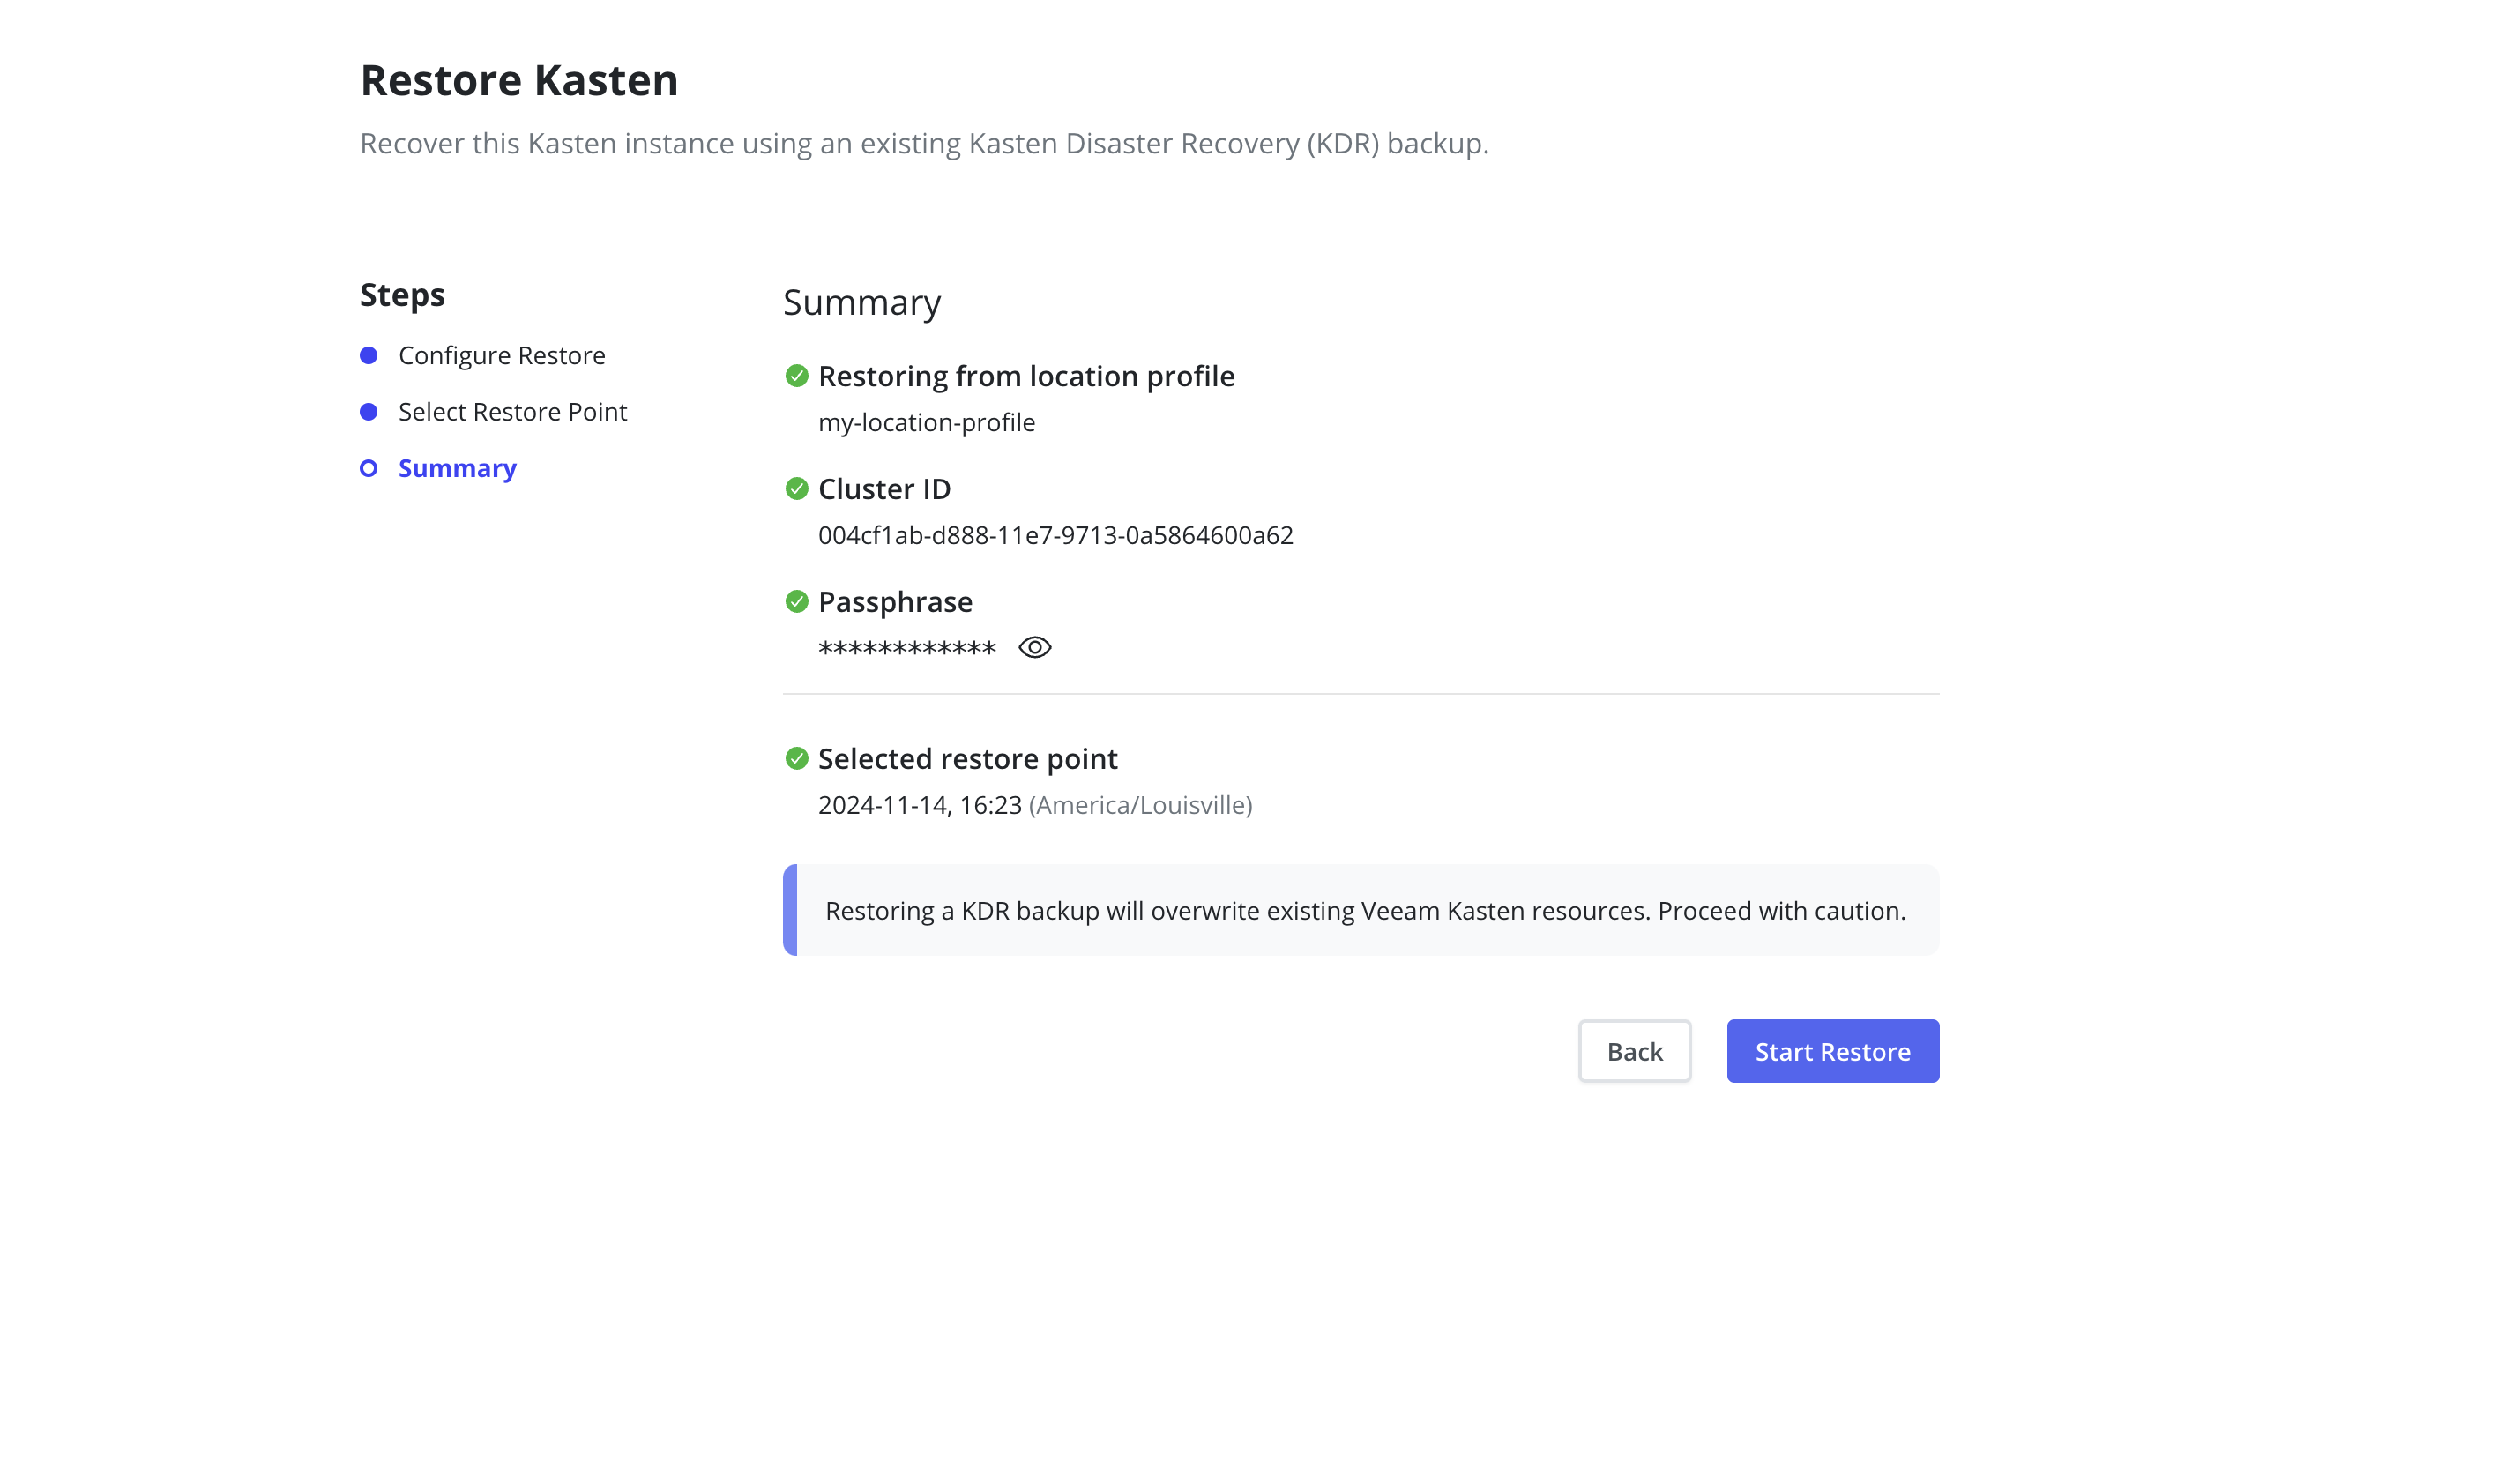
Review the summary and click the
Start Restorebutton to begin the restore process.
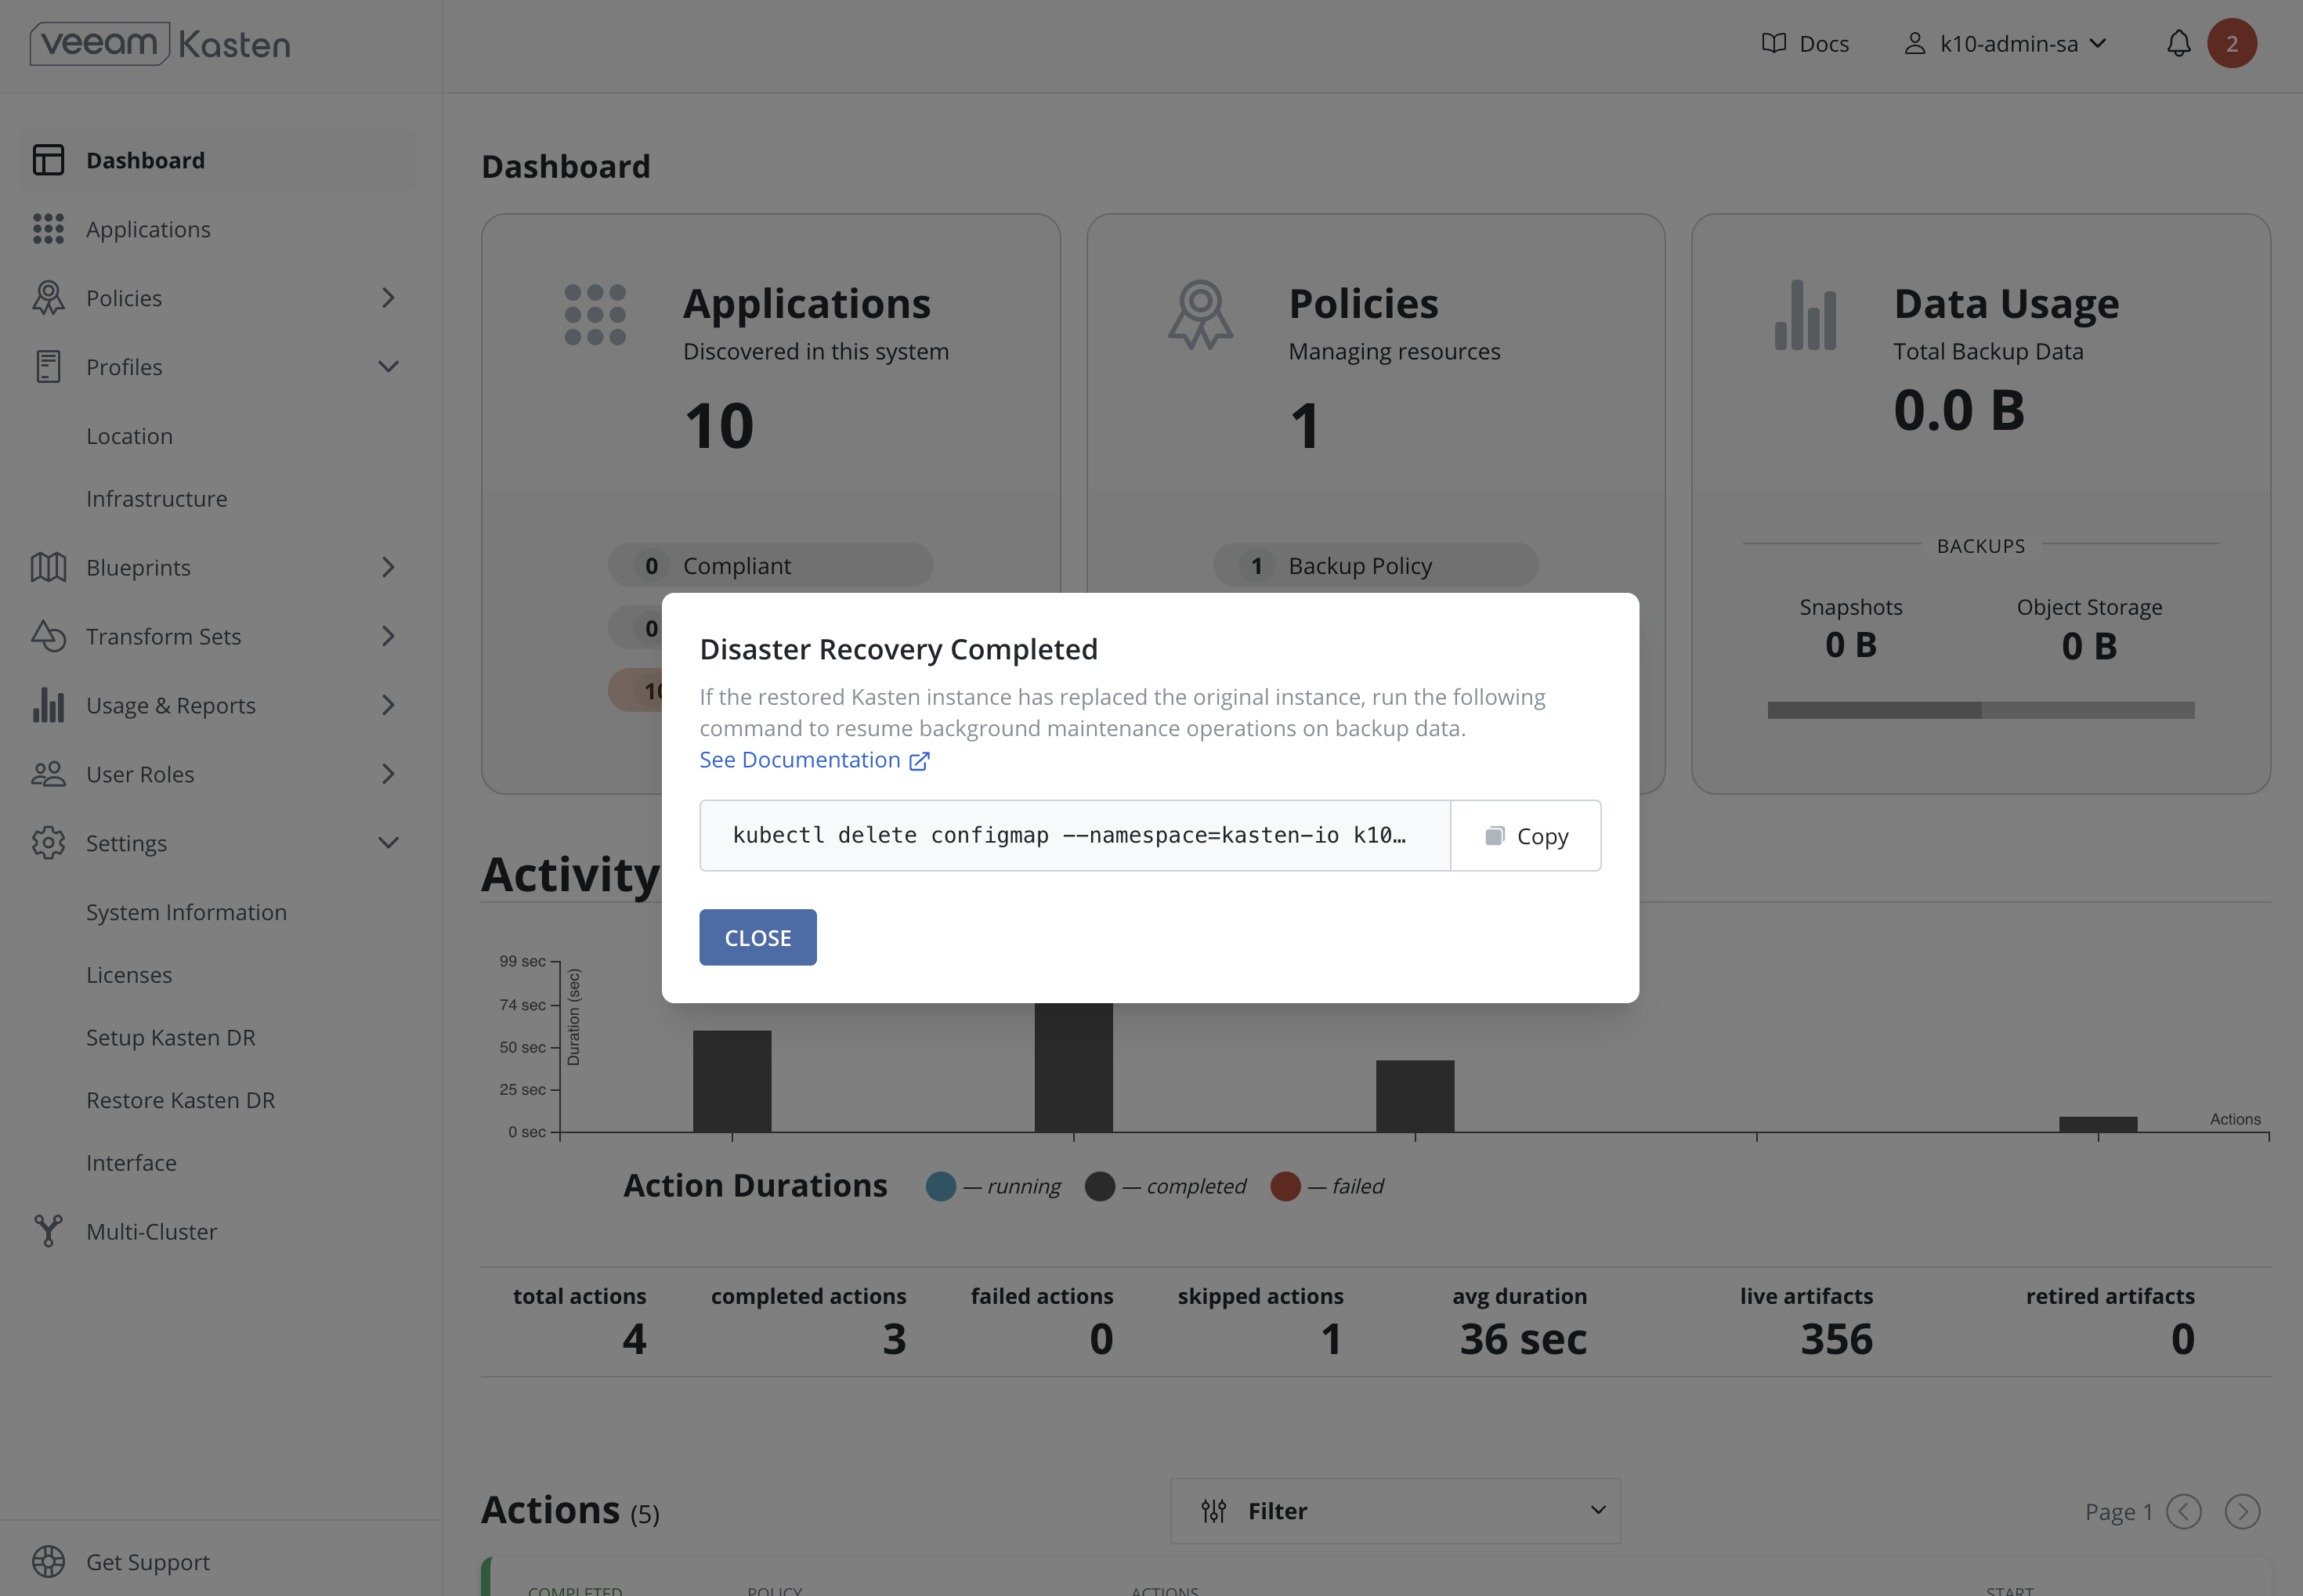
- Upon completion of a successful restoration, navigation to the dashboard and information about ownership and deletion of the configmap is displayed.
Following recovery of the Veeam Kasten restore point catalog, restore cluster-scoped resources and applications as required.
Recovering Veeam Kasten from a Disaster via CLI
In Veeam Kasten v7.5.0 and above, KDR recoveries can be performed via API or CLI using DR API Resources. Recovering from a KDR backup using CLI involves the following sequence of steps:
-
Create a Kubernetes Secret,
k10-dr-secret, using the passphrase provided while enabling Disaster Recovery as described in Specifying a Disaster Recovery Passphrase. - Install a fresh Veeam Kasten instance in the same namespace as the above Secret.
- Create a Location Profile with the object storage location or NFS/SMB file storage location where Veeam Kasten KDR backups are stored.
- Create KastenDRReview resource providing the source cluster information.
-
Create KastenDRRestore resource
referring to the
KastenDRReviewresource and choosing one of the restore points provided in theKastenDRReviewstatus. -
The steps 4 and 5 can be skipped and
KastenDRRestoreresource can be created directly with the source cluster information. -
Delete the
KastenDRReviewandKastenDRRestoreresources after restore completes. Following recovery of the Veeam Kasten restore point catalog, restore cluster-scoped resources and applications as required.
If Veeam Kasten backup is stored using an NFS/SMB File Storage Location, it is important that the same NFS share is reachable from the recovery cluster and is mounted on all nodes where Veeam Kasten is installed.
Specifying a Disaster Recovery Passphrase
Currently, Veeam Kasten Disaster Recovery encrypts all artifacts via the
use of the AES-256-GCM algorithm. The passphrase entered while enabling
Disaster Recovery is used for this encryption. On the cluster used for
Veeam Kasten recovery, the Secret k10-dr-secret needs to be therefore
created using that same passphrase in the Veeam Kasten namespace
(default kasten-io)
The passphrase can be provided as a raw string or reference a secret in HashiCorp Vault or AWS Secrets Manager.
Specifying the passphrase as a raw string:
$ kubectl create secret generic k10-dr-secret \
   --namespace kasten-io \
   --from-literal key=<passphrase>
Specifying the passphrase as a HashiCorp Vault secret:
$ kubectl create secret generic k10-dr-secret \
   --namespace kasten-io \
   --from-literal source=vault \
   --from-literal vault-kv-version=<version-of-key-value-secrets-engine> \
   --from-literal vault-mount-path=<path-where-key-value-engine-is-mounted> \
   --from-literal vault-secret-path=<path-from-mount-to-passphrase-key> \
   --from-literal key=<name-of-passphrase-key>

# Example
$ kubectl create secret generic k10-dr-secret \
   --namespace kasten-io \
   --from-literal source=vault \
   --from-literal vault-kv-version=KVv1 \
   --from-literal vault-mount-path=secret \
   --from-literal vault-secret-path=k10 \
   --from-literal key=passphrase
The supported values for vault-kv-version are KVv1 and KVv2.
Using a passphrase from HashiCorp Vault also requires enabling HashiCorp Vault authentication when performing restore using CLI. Refer: Enabling HashiCorp Vault using Token Auth or Kubernetes Auth.
Specifying the passphrase as an AWS Secrets Manager secret:
$ kubectl create secret generic k10-dr-secret \
   --namespace kasten-io \
   --from-literal source=aws \
   --from-literal aws-region=<aws-region-for-secret> \
   --from-literal key=<aws-secret-name>

# Example
$ kubectl create secret generic k10-dr-secret \
   --namespace kasten-io \
   --from-literal source=aws \
   --from-literal aws-region=us-east-1 \
   --from-literal key=k10/dr/passphrase
Specifying the passphrase as an Azure Key Vault secret:
$ kubectl create secret generic k10-dr-secret \
   --namespace kasten-io \
   --from-literal source=azure \
   --from-literal azure-key-vault-url=<key-vault-url> \
   --from-literal key=<azure-secret-name> \
   --from-literal azure-secret-version=<azure-secret-version>

# Example
$ kubectl create secret generic k10-dr-secret \
   --namespace kasten-io \
   --from-literal source=azure \
   --from-literal azure-key-vault-url=https://my-key-vault.vault.azure.net/ \
   --from-literal key=my-secret \
   --from-literal azure-secret-version=1234
Reinstalling Veeam Kasten
When reinstalling Veeam Kasten on the same cluster, it is important to clean up the namespace in which Veeam Kasten was previously installed before the above passphrase creation.
# Delete the kasten-io namespace.
$ kubectl delete namespace kasten-io
Veeam Kasten must be reinstalled before recovery. Please follow the instructions here.
Using the Restored Veeam Kasten in Place of the Original
The newly restored Veeam Kasten includes a safety mechanism to prevent it from performing critical background maintenance operations on backup data in storage. These operations are exclusive, meaning that there is only one Veeam Kasten instance should perform them one at a time. The DR-restored Veeam Kasten initially assumes that it does not have permission to perform these maintenance tasks. This assumption is made in case the original source, Veeam Kasten, is still running, especially during scenarios like testing the DR restore procedure in a secondary test cluster while the primary production Veeam Kasten is still active.
If no other Veeam Kasten instances are accessing the same sets of backup data (i.e., the original Veeam Kasten has been uninstalled and only the new DR-restored Veeam Kasten remains), it can be signaled that the new Veeam Kasten is now eligible to take over the maintenance duties by deleting the following resource:
# Delete the k10-dr-remove-to-get-ownership configmap in the Kasten namespace.
$ kubectl delete configmap --namespace=kasten-io k10-dr-remove-to-get-ownership
It is critical that you delete this resource only when you are prepared to make the permanent cutover to the new DR-restored Veeam Kasten instance. Running multiple Veeam Kasten instances simultaneously, each assuming ownership, can corrupt backup data.