Google Marketplace Installs and Upgrades
This documentation is specific to deploying and managing Veeam Kasten using the GCP Marketplace. For other deployment scenarios on Google Kubernetes Engine (GKE), please refer to the more general GKE install instructions.
Prerequisites
- Ensure that the GKE node pool has Compute Engine set to Read Write, per the more general GKE install instructions
-
Connect to the cluster where you intend to install Veeam Kasten via
kubectl. - Ensure that your cluster has been created with a Service Account with the required access to the underlying storage infrastructure. See Using the Default GCP Service Account for more details.
-
Create a dedicated namespace where you will install Veeam Kasten.
This can be accomplished during the Kasten installation wizard
within the Google Cloud Marketplace or
alternatively can be done ahead of time.
For example, if you want to pre-create namespace
kasten-io, you will run the following command.
$ kubectl create namespace kasten-io
Install from the GCP Marketplace Console
To deploy using the GCP Marketplace UI, follow these steps:
-
From the Applications section of Google Kubernetes Engine, select Deploy from the Cloud Marketplace
-
Locate Veeam Kasten from the list of applications.
-
Select the Configure option.
-
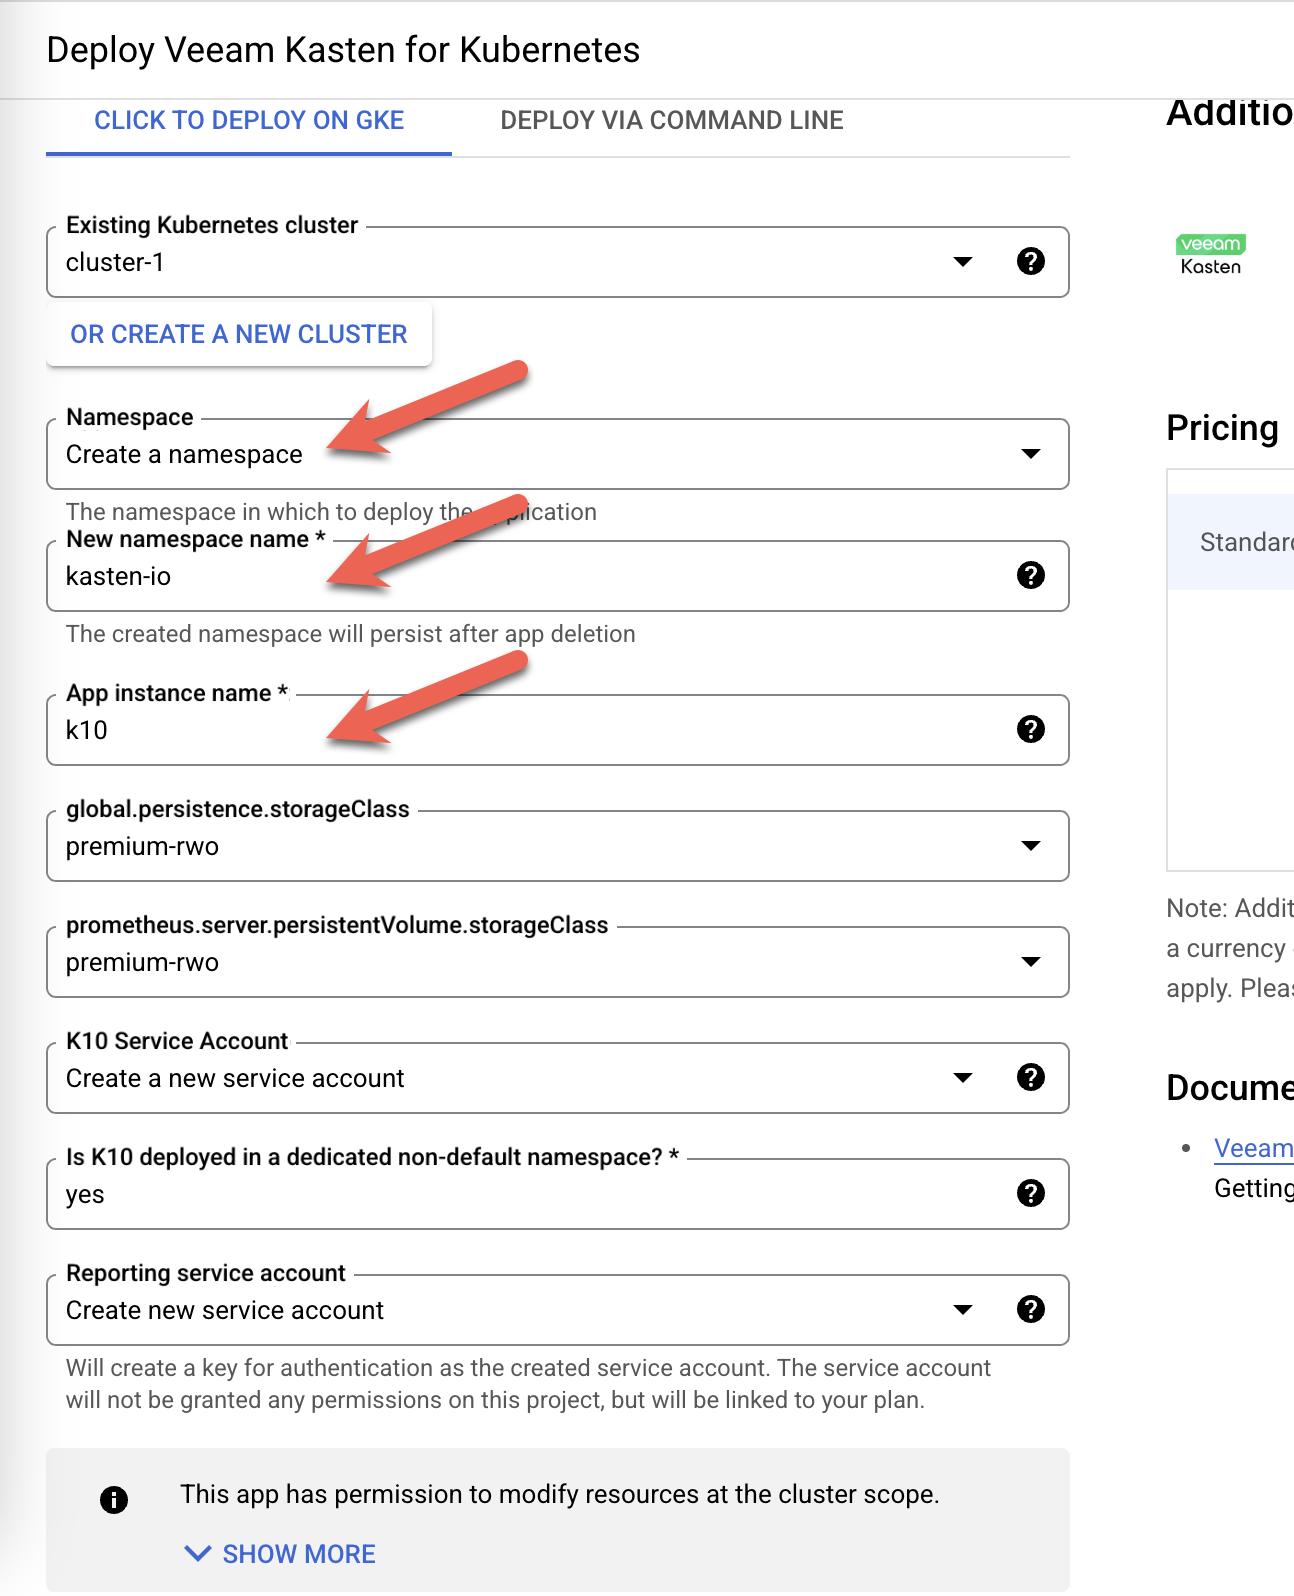
Select the cluster on which you would like to deploy.
-
If you haven't pre-created the
kasten-ionamespace, select "Create Namespace" and specifykasten-ioas the new namespace name. -
Leave "Create a new Veeam Kasten Service Account" selected that will have the proper permissions, or alternatively specify a pre-created service account with the required permissions
-
Specify a name for the application instance. It is recommended to remove the default value and instead specify
k10. Whatever is specified as the application instance name will be the directory to which you will need to navigate via your browser. So if you specifyk10and port forward the gateway service, it will be accessible at http://127.0.0.1:8080/veeam-kasten-google-marketpla-1/#/ -
Confirm by typing 'yes' that you are deploying in a dedicated, non-default namespace
-
Leave "Reporting service account" set to "Create a new service account," or choose a pre-created service account. To pre-create a service account run the following command:
gcloud iam service-accounts create k10-reporting-sa \--project=${myproject} \--display-name="Kasten Reporting Service Account" \--description="Service account for Kasten reporting"
This will deploy a version of Veeam Kasten using default settings.
It is strongly recommended that you install Veeam Kasten in a dedicated non-default namespace on your cluster. The instructions above describe how to do so
Using Veeam Kasten
Accessing the Veeam Kasten Dashboard
Once Veeam Kasten has been installed, enable access to the dashboard, which is not exposed by default. To access the dashboard, run the following commands locally:
$ kubectl --namespace kasten-io port-forward service/gateway 8080:80
Assuming that you installed in namespace kasten-io and named the
application kasten-k10, the dashboard will be accessible at:
http://127.0.0.1:8080/k10/#/
For detailed documentation on how to use Veeam Kasten once installed, please refer to Using Veeam Kasten.
Updating Veeam Kasten
When installing a new instance of Veeam Kasten on a cluster, you will always get the latest images corresponding to a given version. To upgrade to subsequent patch/minor versions, follow the instructions below.
Collect the Application Name, Namespace, and ServiceAccount settings for the Veeam Kasten deployment, and the desired version to upgrade. The following example executes below commands:
- Collects the ServiceAccount name.
- Runs the updater image to update Veeam Kasten application.
# Collect ServiceAccount Name
k10sa=$(kubectl --namespace kasten-io get sa --selector=app.kubernetes.io/name=<k10-application-name> -o jsonpath="{.items[*].metadata.name}")

# Run the updater:
kubectl run --wait updater \
  --image=us-docker.pkg.dev/veeam-marketplace-public/veeam-kasten/k10/updater:latest \
  --image-pull-policy=Always \
  --restart=Never \
  --overrides="{\"apiVersion\": \"v1\",  \"spec\": {\"serviceAccountName\": \"${k10sa}\"}}" \
  --env=TRACKING_TAG=<kasten_version> \
  --namespace <k10-namespace>
Assuming that Veeam Kasten is installed in the kasten-io namespace and is named k10, and desired version to upgrade is version 8.0:
# Collect ServiceAccount Name
k10sa=$(kubectl --namespace kasten-io get sa --selector=app.kubernetes.io/name=k10 -o jsonpath="{.items[*].metadata.name}")

# Run the updater:
kubectl run --wait updater \
  --image=us-docker.pkg.dev/veeam-marketplace-public/veeam-kasten/k10/updater:latest \
  --image-pull-policy=Always \
  --restart=Never \
  --overrides="{\"apiVersion\": \"v1\",  \"spec\": {\"serviceAccountName\": \"${k10sa}\"}}" \
  --env=TRACKING_TAG=8.0 \
  --namespace kasten-io
Deleting Veeam Kasten
Deleting from the GCP Marketplace Console
Select Veeam Kasten from the Applications section of the Google Kubernetes Engine Console, and then select Delete.
Deleting via the Command Line
To delete a Veeam Kasten instance that was installed using GCP Marketplace, simply delete all resources with the label corresponding to the application instance from the Veeam Kasten namespace.
$ kubectl delete all --namespace=<k10 namespace> --selector=app.kubernetes.io/name=<k10 instance name>
For example, if Veeam Kasten was installed in the namespace kasten-io
and the application was named kasten-k10, then you can delete it using
the command.
$ kubectl delete all --namespace=kasten-io --selector=app.kubernetes.io/name=k10
If you followed best practices and installed Veeam Kasten in a dedicated namespace, you should be able to simply delete that namespace.
$ kubectl delete namespace <k10 namespace>
Regardless of the approach, all resources will be cleaned up unless you have changed the default ReclaimPolicy for PersistentVolume to something other than the default of delete. If that is the case, you will need to manually clean PVs.