Installing Veeam Kasten on Azure Marketplace
The Veeam Kasten data management platform, which is purpose-built for Kubernetes, provides enterprise operations teams with an easy-to-use, scalable, and secure solution for backup and restore, disaster recovery, and mobility of Kubernetes applications. Veeam Kasten's application-centric approach, along with its deep integrations with both relational and NoSQL databases, Kubernetes distributions, and all cloud environments, providing teams the freedom of infrastructure choice without compromising on operational simplicity.
Veeam Kasten is a policy-driven and extensible platform, which includes features such as full-spectrum consistency, database integrations, automatic application discovery, multi-cloud mobility, and a powerful web-based user interface.
This documentation focuses on deploying and managing Veeam Kasten using Azure Marketplace. For other deployment scenarios on Azure Kubernetes Service (AKS), please refer to the more general Azure installation instructions .
Prerequisites
Before deploying and managing Veeam Kasten using Azure Marketplace, make sure the following prerequisites are in place to ensure an efficient installation and operation:
-
Make sure
kubectlhas proper access to the cluster where Veeam Kasten needs to be installed. -
Create a dedicated namespace for the Veeam Kasten installation. For
example, if Veeam Kasten needs to be installed in a namespace named
kasten-io, run the following command:
$ kubectl create namespace kasten-io
Installing or Upgrading Veeam Kasten
Searching for Veeam Kasten on Azure Marketplace
Veeam Kasten is published as an application on Azure Marketplace and
can be searched using the following steps:
-
Go to the Azure Marketplace https://azuremarketplace.microsoft.com/en-gb/marketplace/apps.
-
In the search bar, type
Veeam Kasten for Kubernetes on Azure Marketplaceand select the listed application. -
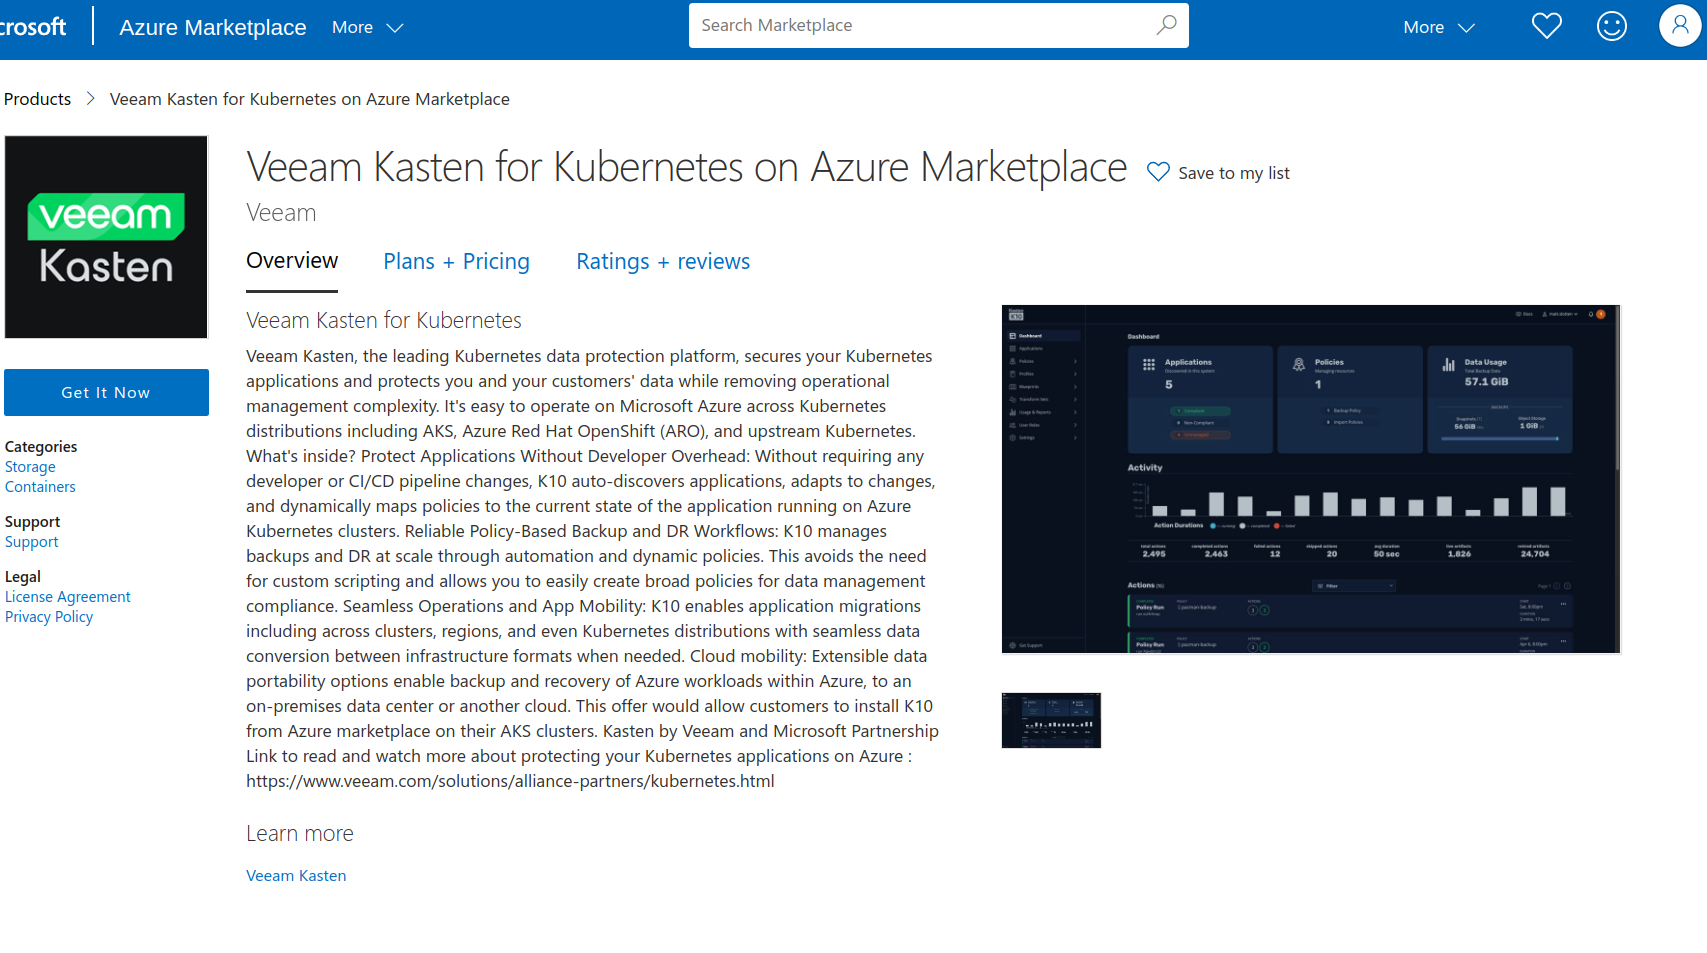
Locate the Veeam Kasten offer, as shown in the figure below.
-
Click the
Get It Nowbutton. -
Choose one of the plans:
Bring Your Own LicenseorHybrid Deployments - Term. as shown in the figure below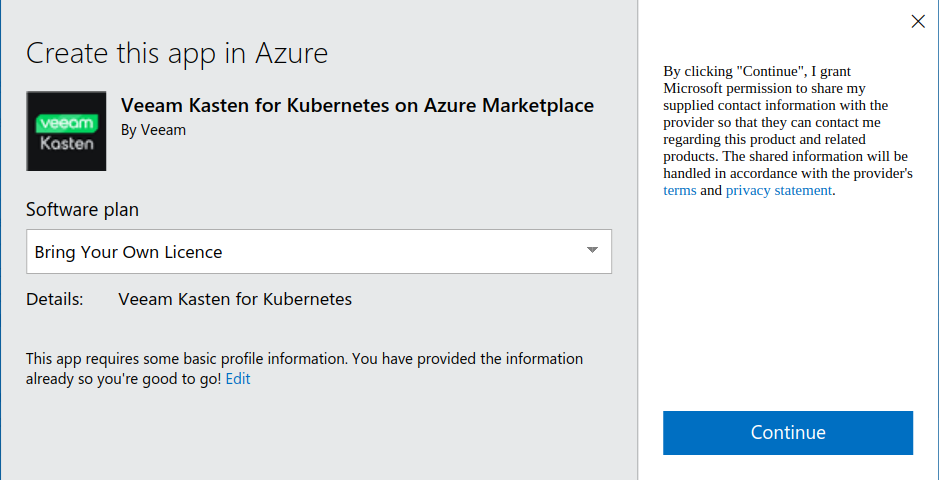
-
Click
Continueto proceed.
Selecting AKS Cluster Details
After clicking Continue by selecting one of the plans in the previous
section, begin the process of adding the Azure Kubernetes Cluster
details as shown in the image below
-
Subscription: Select the Azure subscription where the AKS cluster is created. -
Resource group: Select the Resource Group of the AKS cluster. -
AKS Cluster name: Provide the name of the AKS cluster. -
K10 extension Name on the cluster: Specify a unique name that will be used to represent Veeam Kasten in the cluster. This field is also used as helm release name on the cluster.
Click Next to provide the Veeam Kasten dashboard access details.
Provide Veeam Kasten Dashboard Access Details
Before installing Veeam Kasten, determine how the dashboard should be exposed.
The dashboard can be accessed externally by enabling ingress resource or
internally using localhost. If Veeam Kasten needs to be exposed using
ingress, provide ingress related information as explained below.
Provide Ingress Details to Access Veeam Kasten Dashboard
Select the Expose K10 using Ingress checkbox if Veeam Kasten needs to
be exposed via ingress.
Provide below additional Ingress details as shown in the image below:
-
Specify ingress'class: This is an optional field to specify the Ingress class on the cluster. -
Specify ingress controller service's FQDN: Specify the Ingress controller Kubernetes Service's FQDN.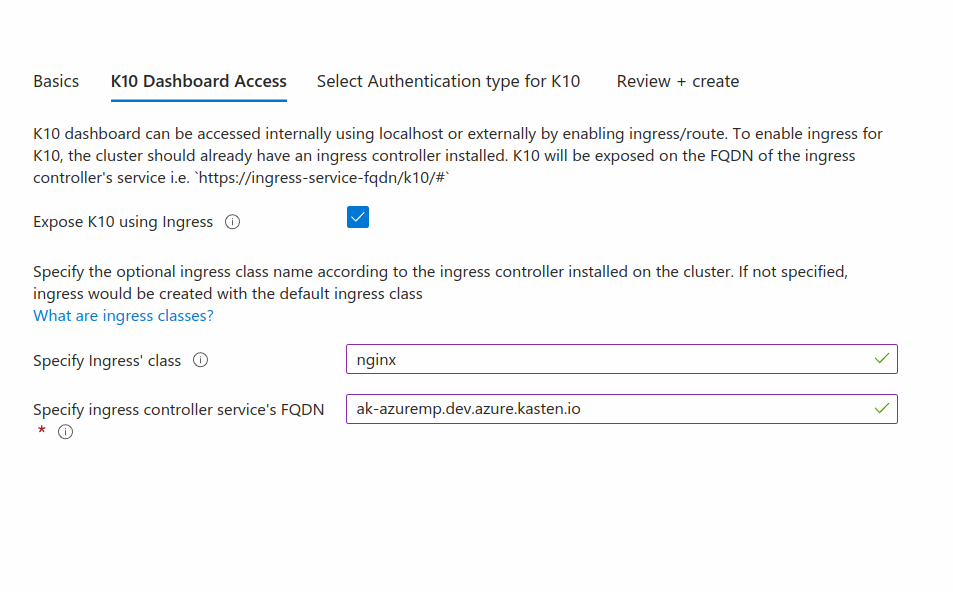
For example, if the nginx ingress controller is deployed in the cluster where Veeam Kasten will be installed, execute the below command to find the ingress class name:
$ kubectl get ingressclasses.networking.k8s.io
  NAME    CONTROLLER             PARAMETERS   AGE
  nginx   k8s.io/ingress-nginx   <none>       6d2h
The Ingress controller service's FQDN can be found by listing the Kubernetes service of type Loadbalancer in the namespace where the ingress controller is deployed. Execute the below commands to get the ingress controller service's FQDN:
$ kubectl get svc  -n kube-ingress
  NAME                           TYPE           CLUSTER-IP     EXTERNAL-IP     PORT(S)                      AGE
  ingress-nginx-controller       LoadBalancer   10.0.230.242   13.86.157.227   80:32307/TCP,443:32335/TCP   6d3h
To find the FQDN for the External-IP of the Kubernetes service listed in the previous command, the value of the annotation external-dns.alpha.kubernetes.io/hostname of the Kubernetes service can be used. Execute the below command to get the annotation:
$ kubectl describe svc ingress-nginx-controller -n kube-ingress
 Name:                     ingress-nginx-controller
 Namespace:                kube-ingress
 Labels:                   app.kubernetes.io/component=controller
                           app.kubernetes.io/instance=ingress-nginx
                           app.kubernetes.io/managed-by=Helm
                           app.kubernetes.io/name=ingress-nginx
                           app.kubernetes.io/part-of=ingress-nginx
                           app.kubernetes.io/version=1.10.1
                           helm.sh/chart=ingress-nginx-4.10.1
                           k8s-addon=ingress-nginx.addons.k8s.io
 Annotations:              external-dns.alpha.kubernetes.io/hostname: ak-azuremp.dev.azure.kasten.io
                           meta.helm.sh/release-name: ingress-nginx
 .
 .
 .
So, the ingress class name is nginx and ingress controller service's
FQDN is ak-azuremp.dev.azure.kasten.io in the above example.
Click Next to provide the Veeam Kasten authentication details.
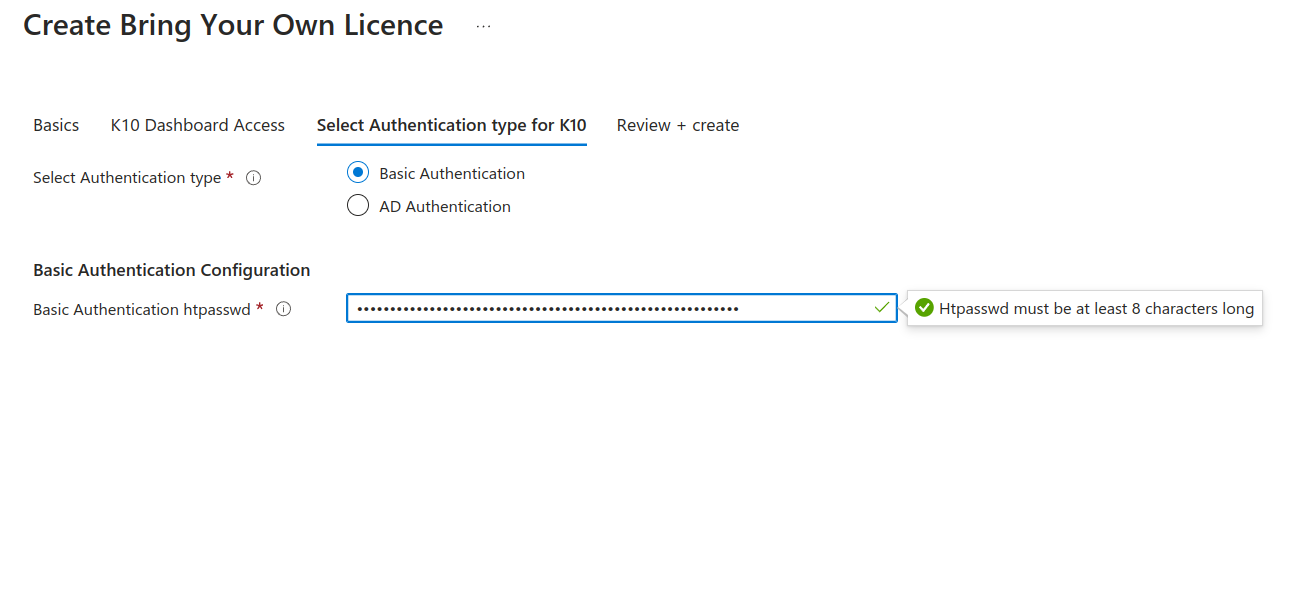
Provide Veeam Kasten Authentication Details
Basic Authentication
To enable Basic Authentication, first generate htpasswd credentials in the format of username:hashedpassword using either an online tool or the htpasswd binary found on most systems. Once generated, specify the credentials as shown in the figure below. After Veeam Kasten is installed, use the htpasswd credentials to log in to the Veeam Kasten dashboard.
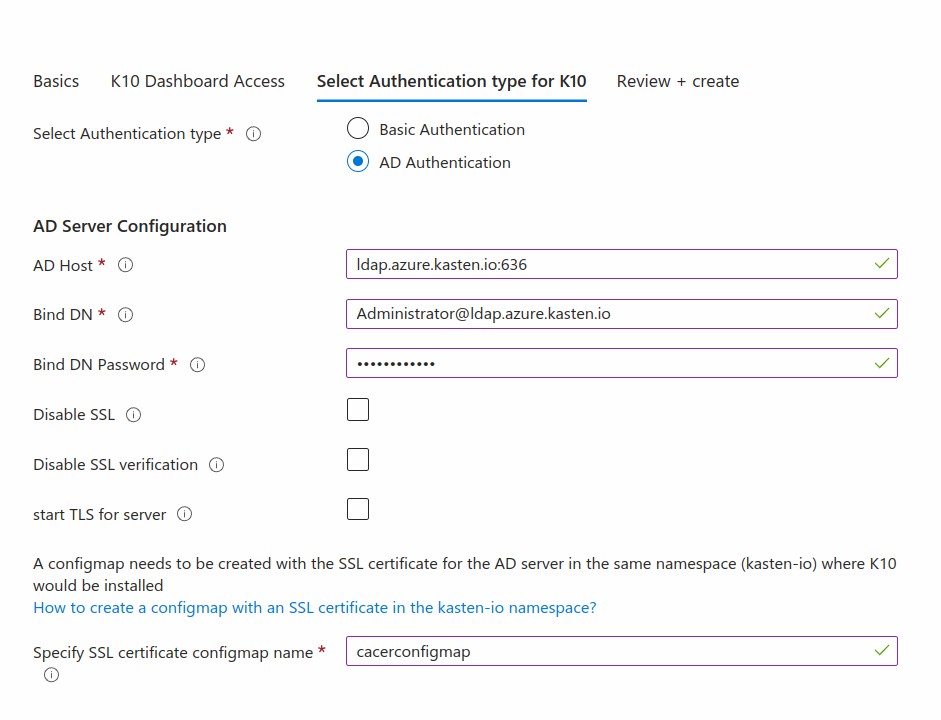
Azure Active Directory Authentication
To configure Active Directory authentication, specify the following details:
Azure Directory (AD) Server Configuration:
-
AD Host: Provide the host and optional port of the AD server in the form of host:port. -
Bind DN: Provide the Distinguished Name used for connecting to the AD host. -
Bind DN Password: Provide the password corresponding to the bind DN for connecting to the Active Directory host. -
Disable SSL: Select this checkbox if the Active Directory host is not using TLS. -
Disable SSL Verification: Select this checkbox to disable SSL verification of connections to the Active Directory server. -
Start TLS for server: Select this checkbox to use ldap:// to connect to the server followed by creation of a TLS session. If this option is deselected, ldaps:// is used for the connection. -
Specify SSL certificate configmap name: If SSL is enabled for the AD server, create a Configmap with the SSL certificate of the AD server in the Veeam Kasten namespace before installing it. Since Veeam Kasten will be installed in thekasten-ionamespace, create thekasten-ionamespace first and then create a Configmap in it.NoteThe SSL certificate must be in PEM format, e.g.;
<custom-bundle-file>.pem.Create a ConfigMap to contain the certificate
$ kubectl --namespace kasten-io create configmap cacertconfigmap --from-file=<custom-bundle-file>.pemReplace
<custom-bundle-file>with the desired filenameSpecify the Configmap name on Azure Marketplace as shown in the figure below:
User Search Details:
-
Base DN: Provide the base Distinguished Name to start the AD user search. -
User attribute to search users in the AD: Provide the user's AD attribute used for comparing user entries when searching the directory. -
AD Attribute for User ID: Provide the user's AD attribute that should map to the user ID field in the Veeam Kasten token. -
AD Attribute for User's Email: Provide the user's AD attribute that should map to the email field in the Veeam Kasten token. -
AD Attribute for User's Name: Provide the user's AD attribute that should map to the name field in the Veeam Kasten token. -
AD Attribute for User's PreferredUserName: Provide the user's AD attribute that should map to the preferred_username field in the Veeam Kasten token. -
User Search Filter: Provide the optional filter to apply when searching the AD for users.
Group Search Details:
-
Group Base DN: Provide the base Distinguished Name to start the AD group search from. -
AD Attribute for Group's Name: Provide the AD attribute that represents a group's name in the directory. -
Group Search Filter: Provide the optional filter to apply when searching the directory for groups. -
Group Search - User attribute: This attribute, in combination withGroup Search - Group attribute, is used to search group memberships for a user. In this field, specify the user's AD attribute that should match the group's AD attribute specified inGroup Search - Group attribute. -
Group Search - Group attribute: This attribute, in combination withGroup Search - User attribute, is used to search group memberships for a user. In this field, specify the group's AD attribute that should match a user's AD attribute specified inGroup Search - User attribute.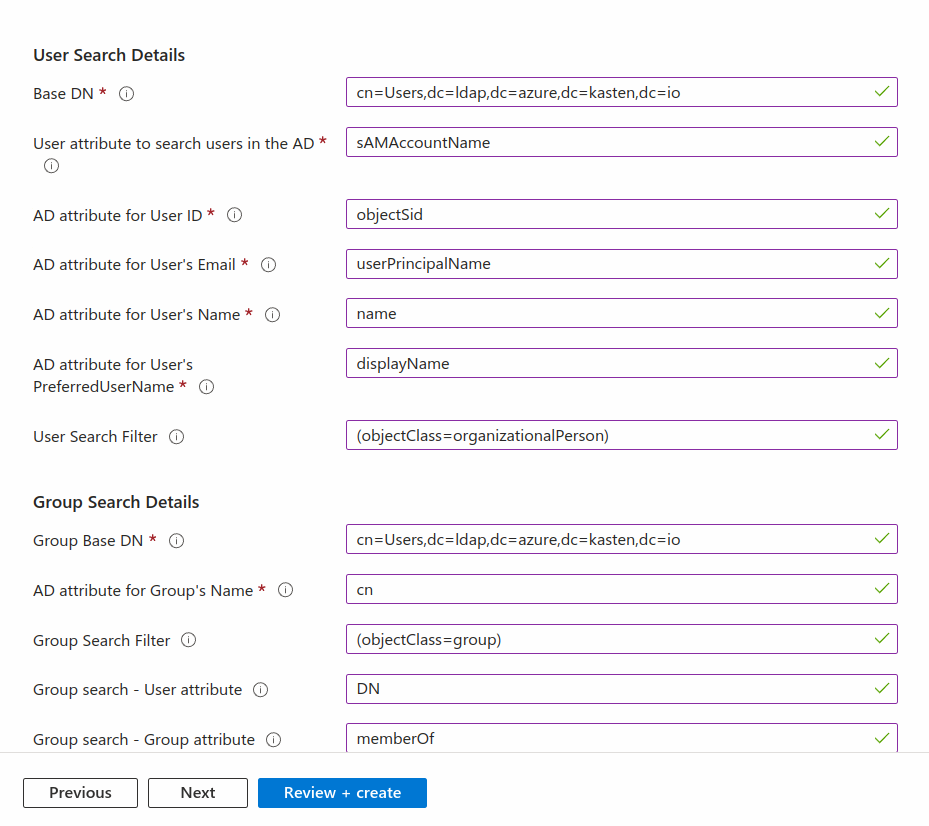
Click Next to review and create the Kasten K10 application
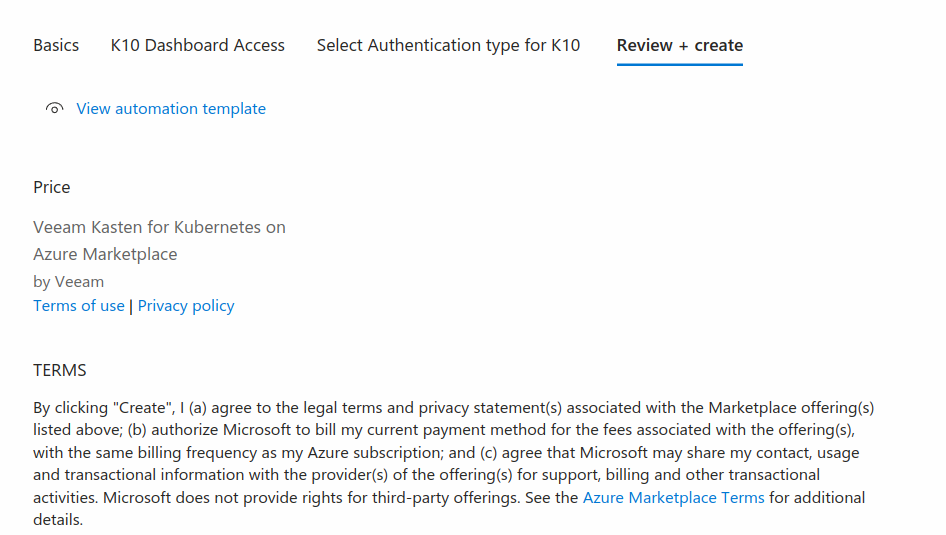
Reviewing and Creating
Once all of the configurations is done, review them and click Create.
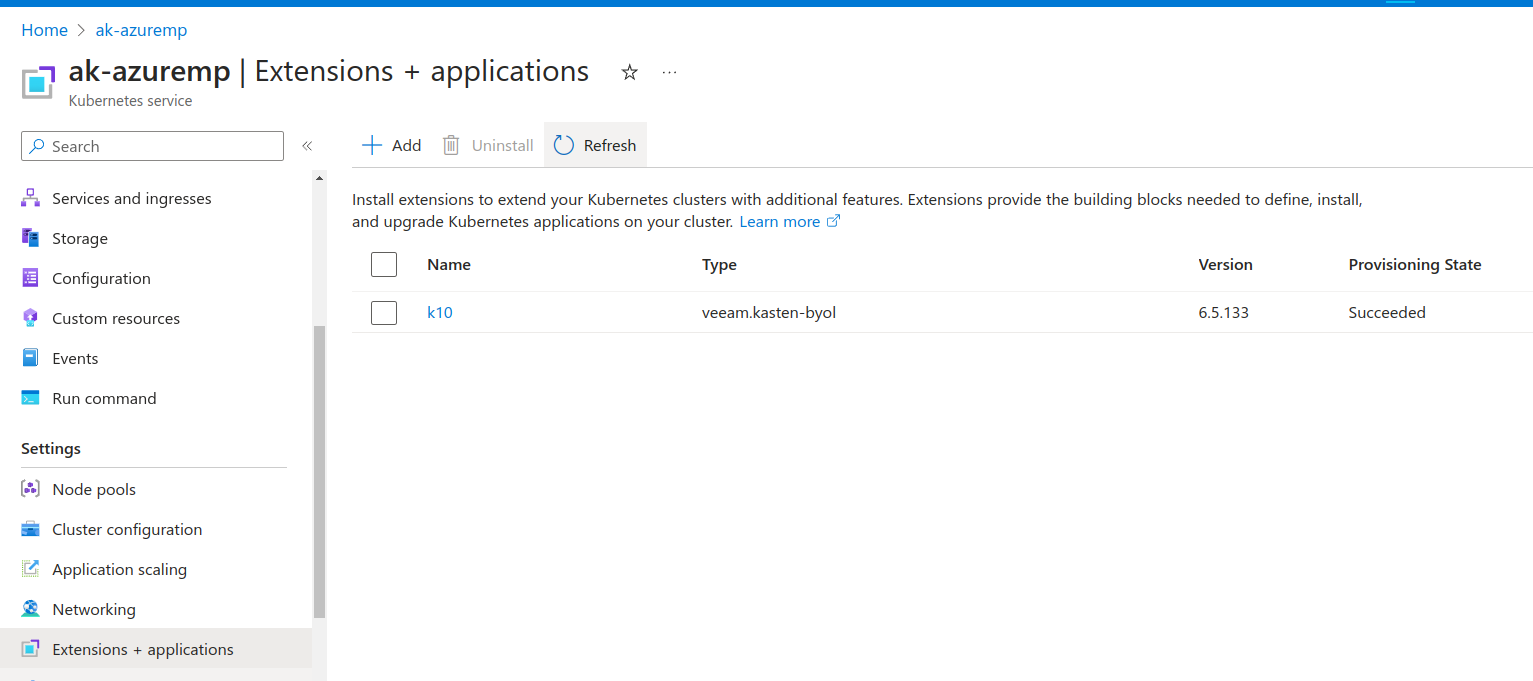
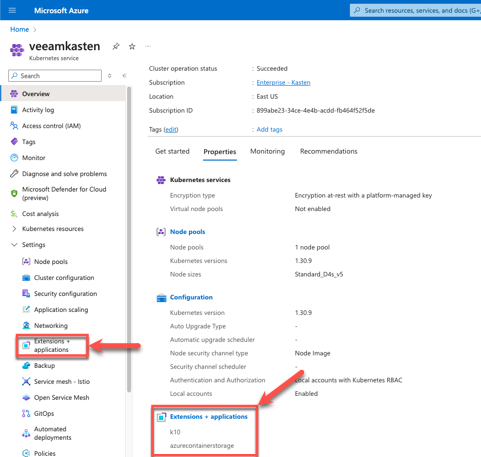
Verifying Installation Status
-
Log in to Azure portal and search for
the cluster where Veeam Kasten is installed. Upon locating the
cluster, Veeam Kasten will be listed under
Extensions + applicationfor the cluster. - Verify that the provisioning state is
Succeeded.
Alternatively, one can connect to the AKS cluster using kubectl and
verify whether Veeam Kasten pods are in the Running state.
$ kubectl get pods -n kasten-io

  NAME                                     READY   STATUS    RESTARTS   AGE
  aggregatedapis-svc-7458566bb5-4gkbj      1/1     Running   0          24h
  auth-svc-7765cfb458-pwdvw                1/1     Running   0          24h
  catalog-svc-8688fc7575-lgqjh             2/2     Running   0          24h
  controllermanager-svc-6cf56b78f8-9c8zx   1/1     Running   0          24h
  crypto-svc-548cfb67f7-8zp9r              4/4     Running   0          24h
  dashboardbff-svc-6b96bd6766-7248n        2/2     Running   0          24h
  executor-svc-57dfb6df96-9gh8g            1/1     Running   0          24h
  executor-svc-57dfb6df96-qsphc            1/1     Running   0          24h
  executor-svc-57dfb6df96-w5jw4            1/1     Running   0          24h
  frontend-svc-7d57c7785b-gkmpm            1/1     Running   0          24h
  gateway-5466c7b958-pgsrl                 1/1     Running   0          24h
  jobs-svc-c555c9ccb-wfxdx                 1/1     Running   0          24h
  kanister-svc-78d49dcf6f-4znrh            1/1     Running   0          24h
  logging-svc-6947bb658-24kgk              1/1     Running   0          24h
  metering-svc-6b8c69996b-l6947            1/1     Running   0          24h
  prometheus-server-6d9565ffcf-hv8hh       2/2     Running   0          4d6h
  state-svc-cb99dc7bb-srmdf                3/3     Running   0          24h
Accessing the Veeam Kasten Dashboard
Accessing Veeam Kasten Externally Using Ingress
If ingress is enabled, as mentioned in the section
configure Veeam Kasten Dashboard access using Ingress , Veeam Kasten will be available at
https://<ingress-controller-fqdn>/k10/#. For example,
https://ak-azuremp.dev.azure.kasten.io/k10/#
Accessing Veeam Kasten Internally
If Ingress is not enabled, enable local access to the dashboard by executing the following commands after the Veeam Kasten is installed:
$ kubectl --namespace kasten-io port-forward service/gateway 8080:80
Assuming that Veeam Kasten is installed in namespace kasten-io and the
K10 extension Name on the cluster is configured as k10, the
dashboard will be accessible at: http://127.0.0.1:8080/k10/#/
For detailed documentation on how to use Veeam Kasten after
installation, please refer to usage.
Deleting Veeam Kasten
Deleting from the Azure Marketplace Console
-
Login to azure portal and search for the cluster where Veeam Kasten is installed. Veeam Kasten will be listed under
Extensions + applicationfor the cluster. -
Click the
Uninstalloption to remove the Veeam Kasten from the console.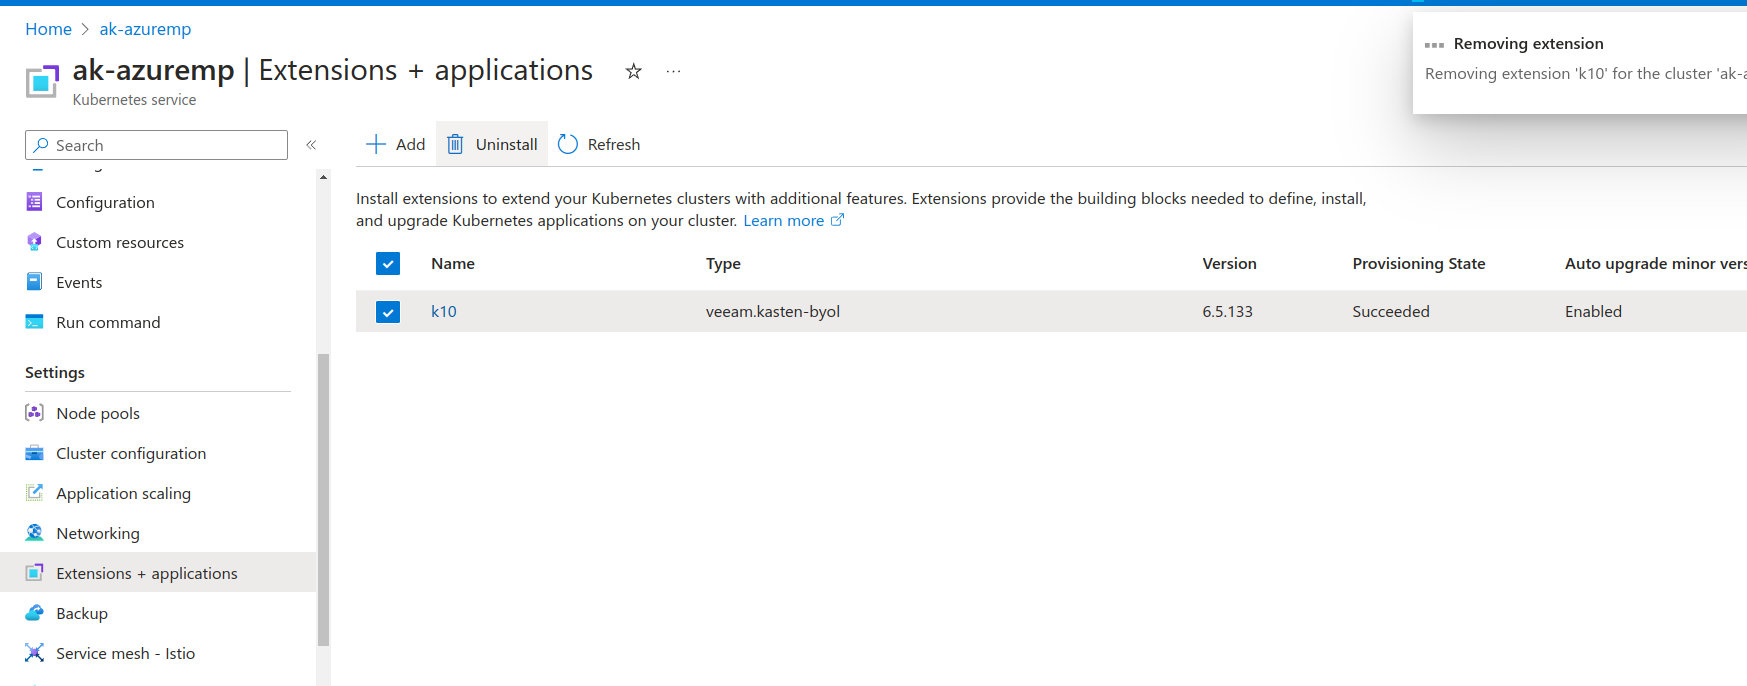
Setting Advanced Configurations for Veeam Kasten
To set advanced configuration options for Kasten deployed via the Azure Marketplace (i.e. Complete List of Veeam Kasten Helm Options), within the Azure Portal, navigate to the AKS cluster on which Kasten is deployed, and select Extensions + Applications
Select k10, then scroll down and select Configuration Settings.
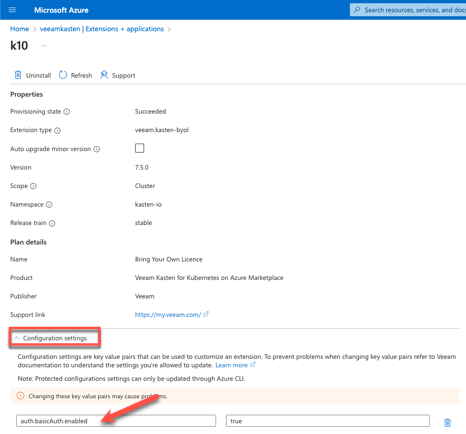
Here the advanced configuration options can be modified, added, or removed.
Deleting via the Command Line
To delete a Veeam Kasten instance installed via Azure Marketplace, delete all resources in the Veeam Kasten namespace using the following command:
$ kubectl delete all --namespace=<k10 namespace>
For example, if Veeam Kasten is installed the in namespace kasten-io
and the application is named k10, use the following command to delete
it:
$ kubectl delete all --namespace=kasten-io
Once all the resources are deleted, use the following command to delete the namespace:
$ kubectl delete namespace <k10 namespace>
Regardless of the approach, all resources will be cleaned up unless the ReclaimPolicy for PersistentVolume is changed to value other than the default value delete. If that is the case, manual cleaning of PVs will be necessary.